

Is your system hanging every 10 seconds, and you can barely get any work done? That's temporary files piling up in the background, quietly eating your storage. If you know how to clear temporary files, you can bring your PC back to life.
But here's where most people hesitate: what if deleting the wrong file crashes the system? That fear stops them from ever cleaning up their PC.
Explore exactly how to safely delete temporary files on Windows 10/11, Mac, Android, and iPhone step by step, with zero guesswork. Moreover, discover a free tool that will help clear temporary files in Windows without much work. Let's get into the topic to learn how to clear out temporary files.
In this article
- What Are Temporary Files and Is It Safe to Delete Them?
- How to Clear Temporary Files in Windows 10
- How to Clear Temporary Files in Windows 11
- [Bonus] Clear Temporary Files Automatically in Windows 11/10 [Deeply]
- How to Clear Temporary Files on Mac
- How to Clear Temporary File on Android
- How to Clear Temporary Files on iphone
- Hot FAQs Related to Cleaning Temporary Files
Part 1: What Are Temporary Files and Is It Safe to Delete Them?
Temporary files are files created by system and apps to store temporary information while it's running. But once the job is done, the temp file is of no use. So, it's absolutely safe to delete them. For more Here are the common types of temp files:
- System temporary files
- App temp files
- cookies, pictures, and stored web pages
- Diagnostic files
- Files left over from program configurations
When Is It Safe to Delete Temporary Files?
Although you can delete temporary files, sometimes doing so might crash your PC. so, you must know when it's safe to delete them and when it's not.
It's safe to delete when:
- There are no applications currently running
- Windows is not mid-update
- No active installation is in progress
- Files haven't been modified in the last few hours
However, it's not safe to delete temporary files when:
- An app is actively using a temp file in the background
- A software installation or Windows update is running
- You recently crashed and need to recover unsaved work
Read our detailed write-up to know is it safe to delete local temp and AppData temp files.
The safest method to clear your temporary files is to restart your PC first, close everything, and then clear your temp files. That single step eliminates 90% of the risk.
But before you clear these temp files, please head over to our detailed write-up to learn more about temporary files, how to view them, and how to access temp files on Windows 11 like a pro.
Part 2: How to Clear Temporary Files in Windows 10
Cleaning temporary files is necessary for your system to work smoothly. And knowing the right method is important for clearing the temporary files deeply. You can choose one of these three methods to clear temporary files in Windows 10.
Use Settings -System -Storage - Temporary Files
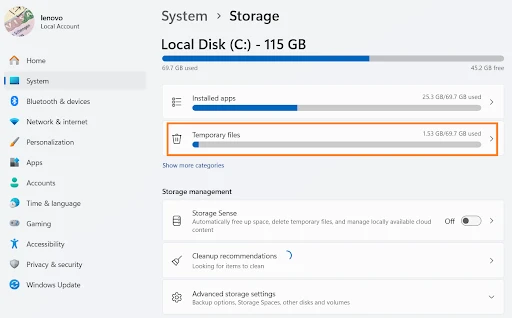
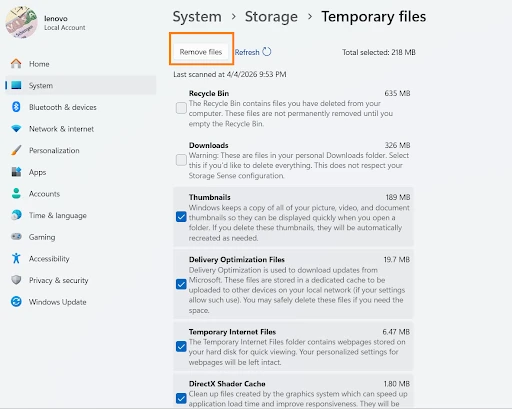
Step 1: First up, press Windows + I to open Settings on your desktop. Once the window opens, click System, and then select Storage. Here, you have to wait a bit to let Windows 10 finish the scanning process.

Step 2: Here you'll find different options. Select the Temporary Files and check the file categories you want to remove from your PC. Now, click on Remove Files to delete everything selected.
Use Disk Cleanup Method
Next up, we have a disk cleanup method for how to clean windows temporary files:
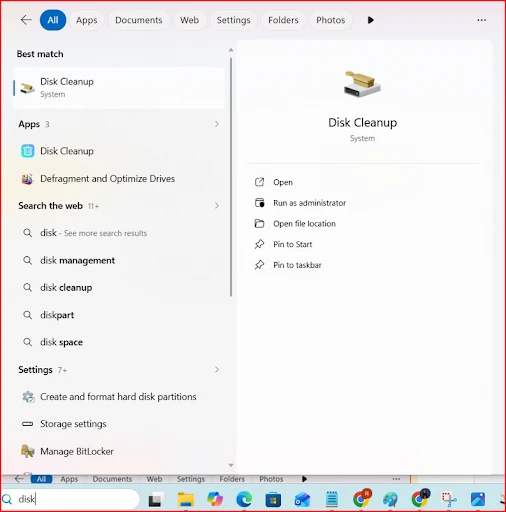
Step 1: For this, you have to press Windows + S. Once the window appears, type "Disk Cleanup," and hit Enter to find the temp files folder on your Windows 10.
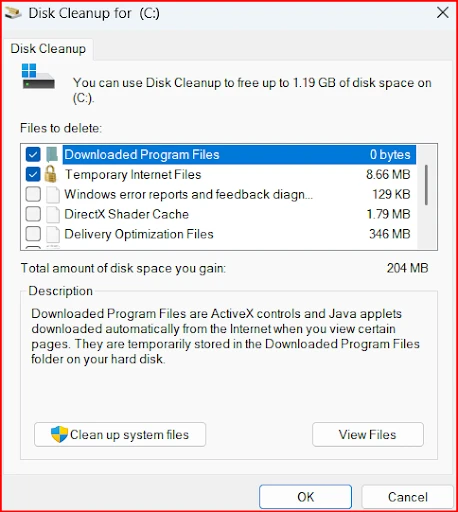
Step 2: Here, you need to select the drive you want to clean. In most of the cases, It's C:. So, type it and click OK.

Step 3: You have to wait for Disk Cleanup to calculate how much space you can free up. Then, check Temporary Files and Temporary Internet Files, and click OK to delete them.
Use Manual %temp% and temp Folders (Advanced)
With the manual method, you can get an in-depth cleanup of your Windows Temp folder.
Step 1: First up, press Windows + R to open the Run dialog. A dialogue box will appear on screen, you have to type %temp%, and you will land in the Temp folder instantly.
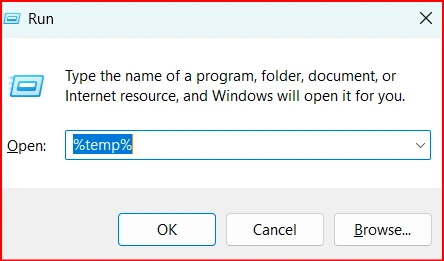
Step 2: Here, you'll find multiple temp files for different apps and programs. Select the files you want to remove inside the temp folder. Once selected, you have to right-click to delete the selected files.
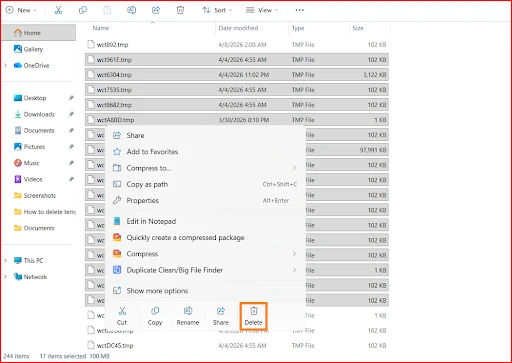
Insider Tip: If any file is currently running, skip it, or your system will freeze or crash. To thoroughly clean up the temp folder, empty your Recycle Bin to fully reclaim disk space.
Part 3: How to Clear Temporary Files in Windows 11
Windows 11 offers three solid ways to clear temporary files: two automatic and one manual. Each method is built right into the system, no downloads needed. Here's exactly how to use all three.
Use Settings - System - Storage - Cleanup Recommendations / Temporary Files
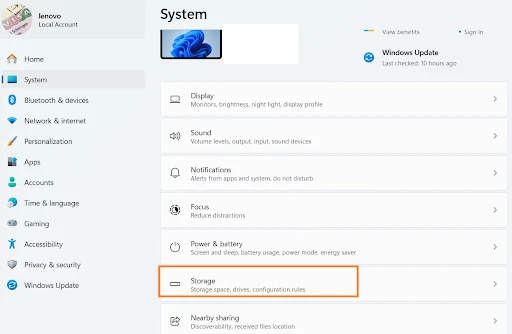
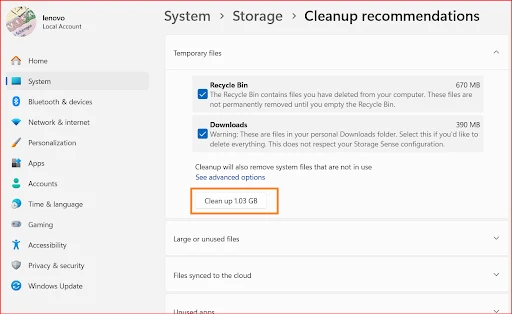
Step 1: First, you have to press Windows + I to open Settings. Once the Settings open, click on System from the left sidebar, and then you have to select Storage to see how much space temporary files have occupied on your PC.
Step 2: Now, tap on Cleanup Recommendations under the storage breakdown. You'll find different options here. Now, expand the Temporary Files section to see exactly what Windows found.
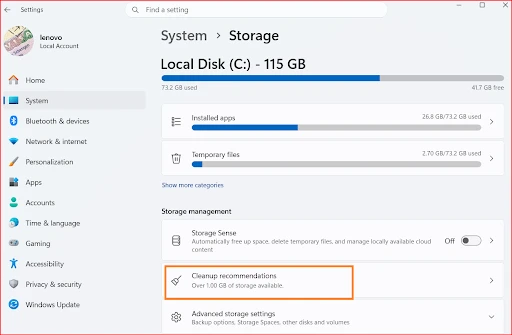
Step 3: Now, select the file types you want to remove, and you have to click "Clean up" to remove the temporary files.
Use Storage Sense Automatic Cleanup Method
Follow along to clear the temporary files on Windows 11:
Step 1: To initiate the process, you need to press Windows + I to open Settings. Now, you have to go to System, and then click Storage and then Storage Sense to open its settings.
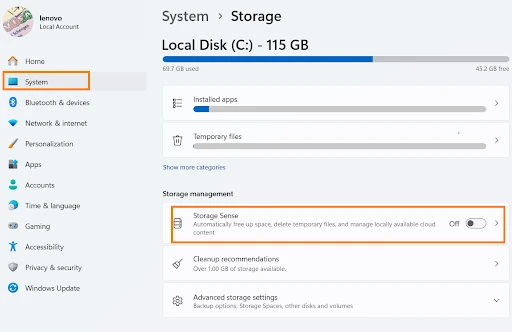
Step 2: Then, you must toggle Storage Sense ON. Once done, you have to set your cleanup schedule to weekly, monthly, or any particular timeframe. Then, click Run Storage Sense to trigger cleanup.
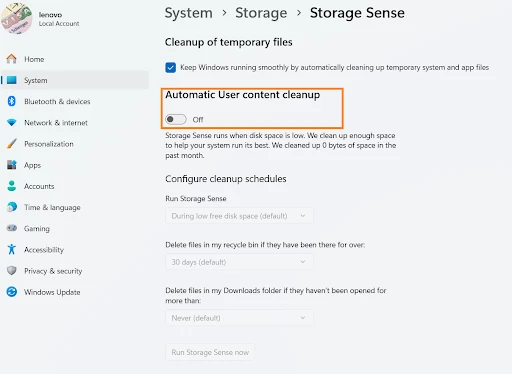
💡Tips:If you enable the Storage Sense feature, your Windows 11 PC will automatically clear temp files in the background at a scheduled time.
Use Disk Cleanup + System Files Method
However, if you want to clean up temporary files in Windows 11 deeply, here are the steps for how to clear temporary files in Windows 11:
Step 1: For this process, you have to press Windows + S. Once the window opens, type Disk Cleanup to open the menu.

Step 2: Here, you have to select drive C: and click "OK". You need to wait a bit while Disk Cleanup calculates space to free up.

Step 3: Here, you'll find multiple files that can be deleted. Check Temporary Files, Temporary Internet Files, and any other categories you want cleared. Click OK to remove the junk from your PC.

If you are looking for the easiest, most hassle-free guide to clean up your Windows 11 system using both manual and automation methods, check out our latest writeup to reclaim your device space-no technical skills needed!
Part 4: [Bonus] Clear Temporary Files Automatically in Windows 11/10 [Deeply]
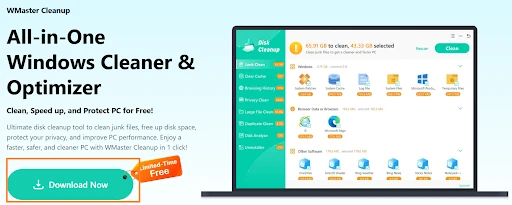
Manual cleanup gets the job done, but it does not deeply check your system. Windows' built-in tools miss hidden junk, deep system residues, and cached data buried across your drive. WMaster Cleanup is a limited-time free Windows cleaner that goes several layers deeper to scan and remove junk, like temporary files.

WMaster Cleanup
Clear Tempoary Files Deeply in One Click
- · Removes temp files, junk, and system clutter without manual navigation.
- · Deletes your temp files without touching any critical system files.
- · Offer auto clean mode to let you schedule the cleanup.
- · Remove multiple types of temp files with a single click.
- · Modern and simple interface make it beginner-friendly.
Tutorial to Clear Temporary Files by WMaster Cleanup in Windows11/10
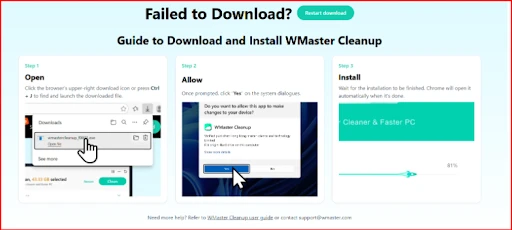
Step 1: To begin, you have to search for WMaster Cleanup in your browser and click on the Download option on the official site. Once you click, the download will start. You have to follow the steps to install the software on your Windows PC.
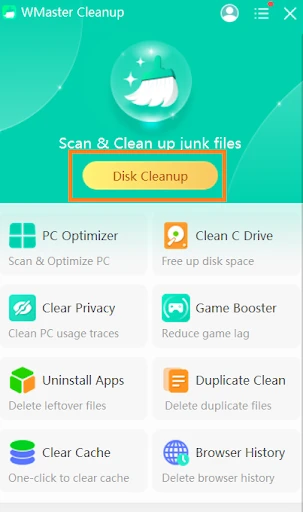
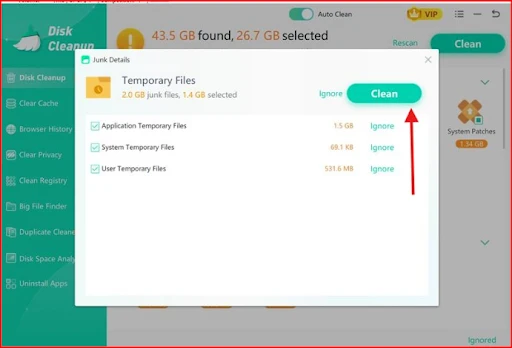
Step 2: Once the installation is complete, you've to launch it, and then select Disk Cleanup on the main interface.
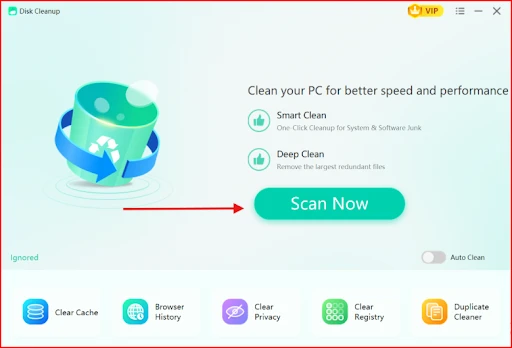
Step 3: Now,you have to click on "Scan Now" to start cleaning up. Once the scan completes, you'll find the temporary files option along with the space it uses.
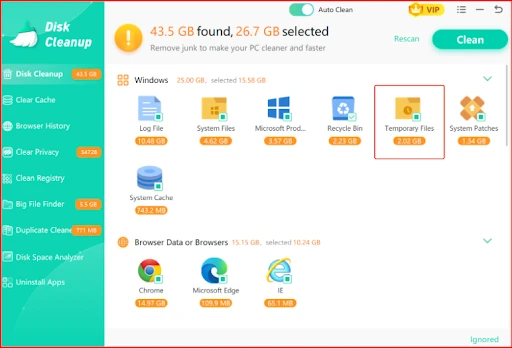
Step 4: Once you've accessed the "Temporary Files" folder, choose the unwanted items you wish to remove. Then, you need to click the "Clean" button located in the upper-right corner.
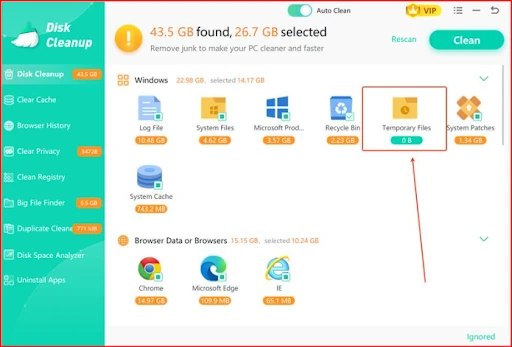
💡Tips:Once the cleanup finishes, you'll see no residual left in the temporary files section if you have selected all junk to remove.
If you are already convinced to try WMaster Cleanup, why don't you clean your Windows PC thoroughly?
Try the Disk Cleanup feature for a deep scan of the whole system. For specific cleanup, you can also use other features, like duplicate clean, clean browser history, clear privacy traces, uninstall applications , and more. Please refer to these feature pages and get back your device storage within a few clicks-all at no cost (limited-time offer).
Part 5: How to Clear Temporary Files on Mac
You'll find an entirely different method to handle temporary files on Mac than on Windows. Most of the time, your Mac device automatically cleans up a lot of junk. But, you still have to manually delete cache files, browser junk, and leftover app data, which pile up over time and slow things down. Here are two reliable methods to clear them out manually.
Use Finder and the ~/Library/Caches method.
If you're opting for this method to clean up your Mac, you'll go directly into your Mac's hidden Library folder. Here, you'll find cached and temporary files stored.
Step 1: First up, open Finder from your dock, and then pick the option Go from the top menu. Next, you have to hold down theOption key and then click Library from the available options.
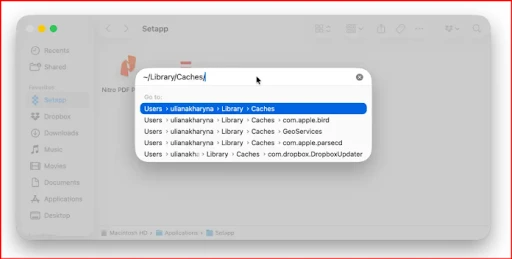
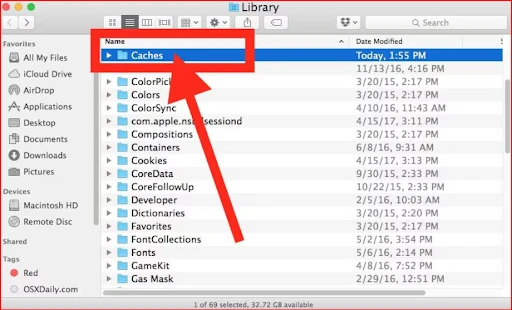
Step 2: Next, you have to open the Caches folder. You'll find different folders. Now, you need to open each of them individually and delete the data.
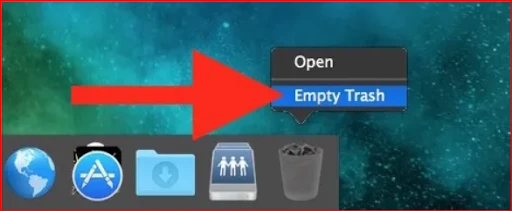
Step 3: Once you finish, now right-click the Trash icon in your dock and select Empty Trash.
💡Tips:Do not delete cache files for apps currently running.You've to quit all apps before starting this process.
Use Built-In Tools - Restart, Storage Management, and Browser Cache Clearing
If you're one of those who is most concerned about their privacy and safety, macOS has built-in tools that handle most temp file cleanups automatically. There are three different methods for how to clear temporary files on mac.
Method A: Restart Your Mac
The simplest and quickest temp file fix is to restart your Mac. macOS clears a large portion of system temp files automatically every time you restart.
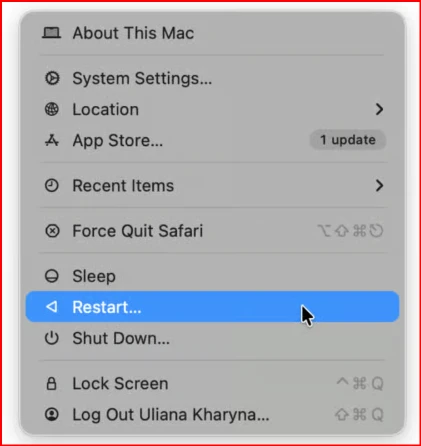
Step 1: The first thing you need to do is to click the Apple menu in the top left corner and select Restart to let your Mac fully reboot.
Method B:Use Storage Management
Step 1: First, you've to click the Apple menu and select System Settings. If you have an older version, click on System Preferences to go to Storage.
Step 2: Now, you have to click General, and then Storage. Here, macOS will scan your drive and display storage recommendations. Click Review Files under each category to see what can be removed.
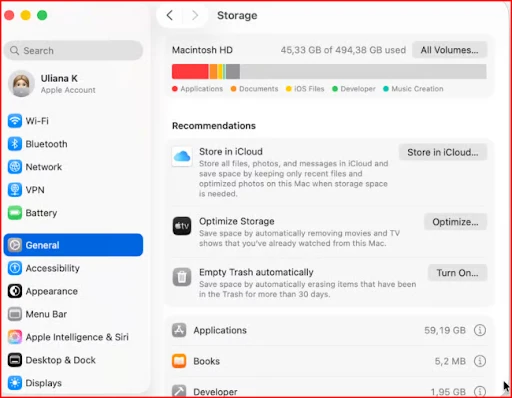
Step 3: You have to check each category manually, especially Caches and Temporary Files, and delete what you no longer need.
Method C: Clear Browser Cache
The browser cache is one of the biggest temp file offenders on Mac. Here's how to clear it in the most common browsers:
Safari
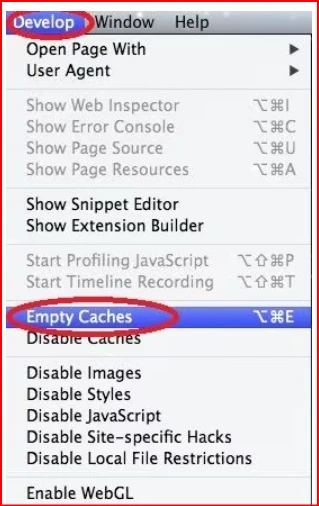
Step 1: Here, you need to click Safari and go to Settings. Then, you have to tap on the Advanced tab and enable Show Develop menu in the menu bar.
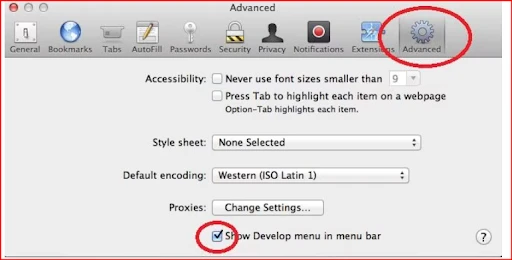
Step 2: Once the top menu appears, you need to press Develop and select Empty Caches.
Chrome
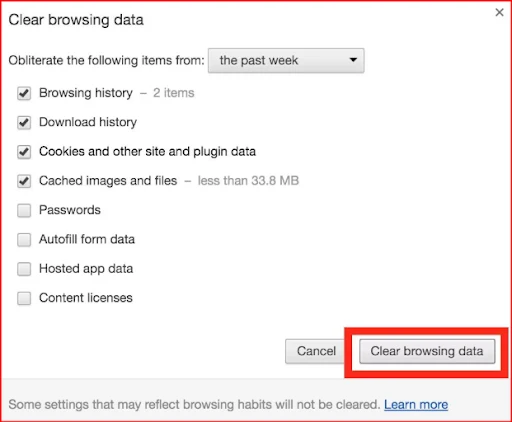
Step 1: To clear the cache from Chrome, you have to open Chrome on your Mac and press Command + Shift + Delete. Now that you have the interface in front of you, tap on the Chrome icon, then click Clear Browsing Data.

Step 2: Here, you have to set the time range to All Time, and then check the Cached images and files. Once done, you now have to click Delete Data.
Firefox
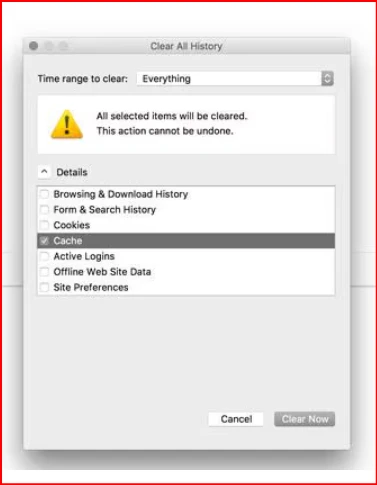
Step 1:To start, open Firefox on your system and press Command + Shift + Delete.
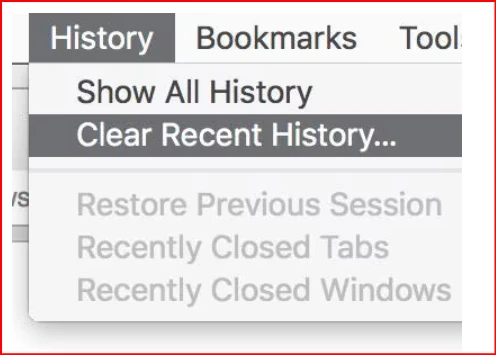
Step 2: Now, you have to set the time range to Everything, check the cache, and click OK.
Part 6: How to Clear Temporary File on Android
As far as Android devices are concerned, they automatically manage many temporary files. But, still, so much accumulates over time, which slows the performance of your device.
Below are the steps for how to clear temporary files on android?
Use Settings -Storage - Cached Data / App Storage Method
Step 1: To begin with, open Settings on your Android device and scroll down to Storage. Now, you have to wait for Android to calculate storage usage and display file categories on your device.

Step 2: Now, tap on Cached Data or select Apps to view which apps are storing your temporary files. Here, you need to select a desired app and tap Storage Cacheto remove temporary files without even touching your personal data.
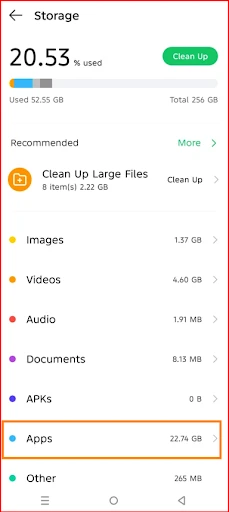
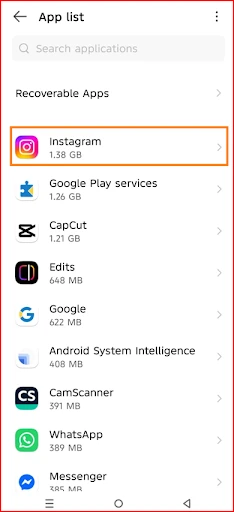
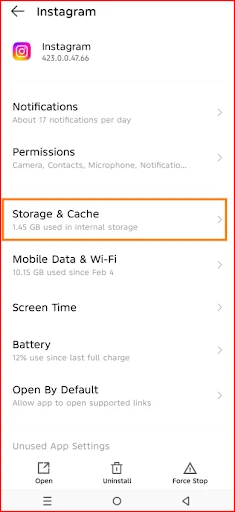
Step 3: Here, you can review the storage occupied by the cache of a specific app. Click "Clear cache" at the bottom to free up the space.
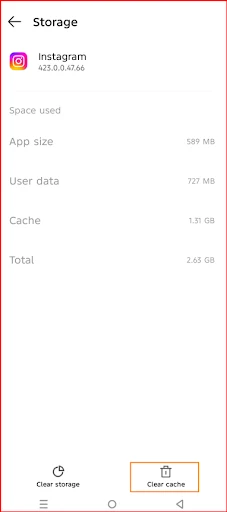
💡Tips:You may repeat the process for other apps as well that are consuming large amounts of cached storage. In this way, you could free up your device storage space without changing any app settings.
Part 7: How to Clear Temporary Files on iphone
If you're an iPhone user, you know that it does not provide direct access to temporary file folders, but cached data still builds up over time. The methods below help clear temporary files, free storage space, and improve device performance using built-in iOS settings.
Offload your Unused Apps
Offloading removes your device apps itself but keeps its documents and data saved on your device.
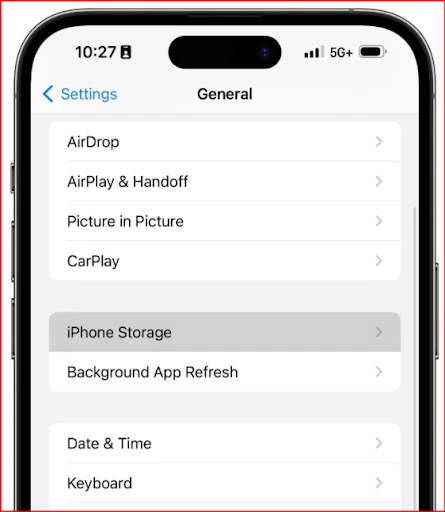
Step 1: Open Settings on your iPhone. Then tap General and select iPhone Storage where you'll find the list of installed apps sorted by storage usage.
Step 2: Tap the app you want to offload. And click on the offload app and confirm it.

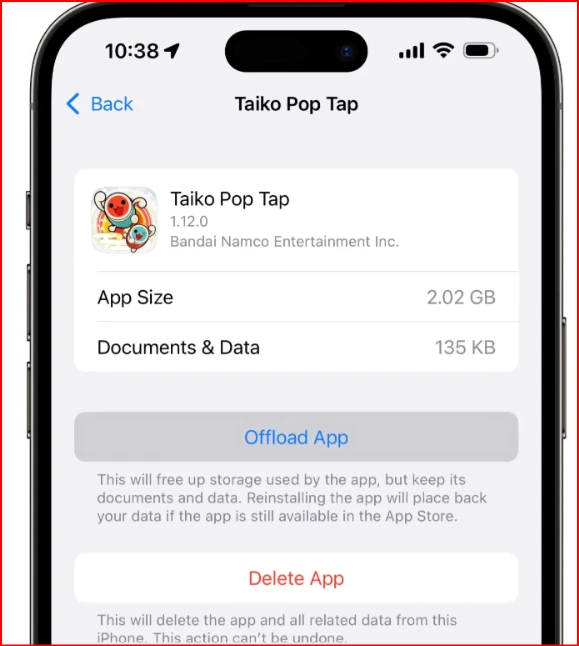
With a few more steps, you can automate this task as well. In iPhone Storage, tap Enable next to Offload Unused Apps to do the job automatically.
Clear Safari Cache and Browser Data
Safari stores browsing cache, cookies, and temporary website data. You can clear Safari to clean up cache . Here's how you can do that:
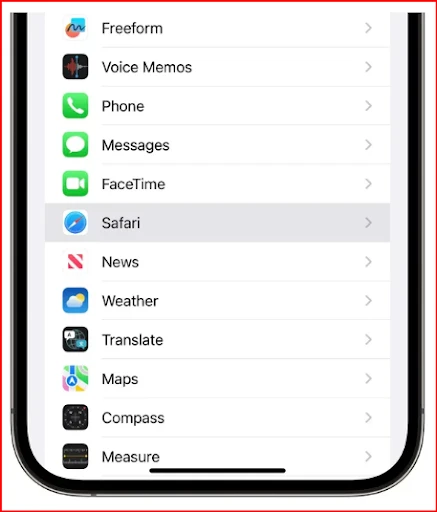
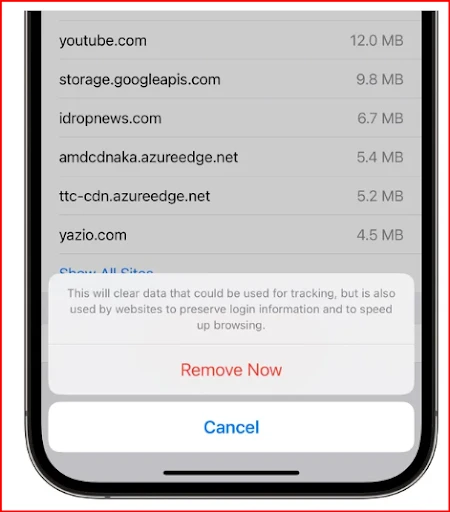
Step 1: You have to open Settings on your iPhone and tap Safari.
Step 2: Here, you should scroll down and tap on Clear History and Website Data. You need to select the time range or choose the clear all history option.
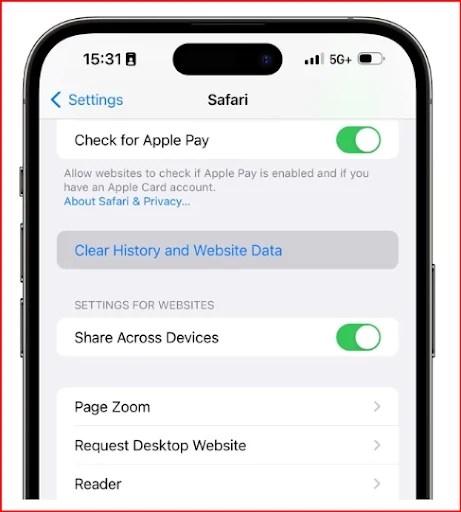
Step 3: Now, tap Clear History, and then you need to click Remove Now to confirm the cache cleanup.
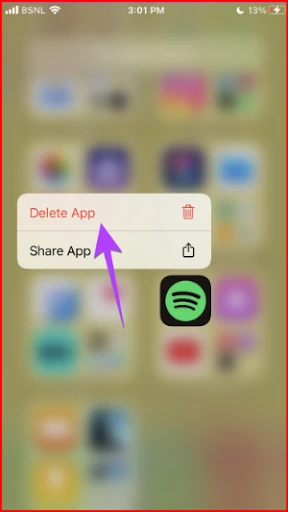
Delete and Reinstall Heavy Apps
There are multiple apps that takes up space. So, you can delete them and reinstall them.
Step 1: First of all, navigate to Settings on your phone, then go to General and tap iPhone Storage. Here, you need to review the list of your device apps and identify those that are taking up a large storage space.

Step 2: Now, you can delete desired apps and reinstall them that are taking up space.
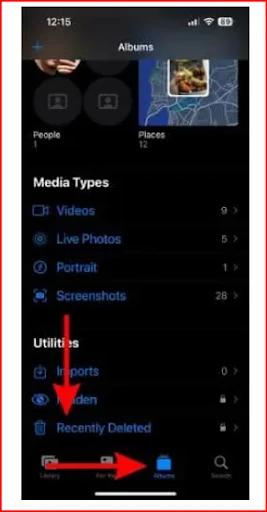
Manage Photos and Videos
Photos and videos often take up the most space on an iPhone.
Step 1: First up, you have to open the Photos app and tap Albums. Now, you must scroll down to Recently Deleted and tap Delete All to permanently remove files from the deleted folder.
Read our hands-on write-up and discover three proven ways to find and delete duplicate photos on an iPhone before emptying your Recently Deleted folder to reclaim more device space.
An iPhone automatically clears some system temporary files when storage is low or after a restart. You can also select Optimize iPhone Storage to keep smaller versions of photos on the device.
Part 8: Hot FAQs Related to Cleaning Temporary Files
Q1: Does the iPhone have temp files? If yes, how do I clear temporary files on iPhone?
Yes, iPhones have temporary files, but you can't access them directly. Although the iOS deletes temporary files automatically, there are a few that you have to delete manually. Because, over time, the app cache and leftover files can pile up on your device.
Q2: How can I delete temporary files on my iPhone device?
To delete temporary files on an iPhone device, follow these steps:
First, you have to go to Settings, and then click on General. And next, you have to click on iPhone Storage. This is where you can offload apps you don't use. Besides this, I would recommend digging in and checking out apps that are taking up a lot of space.
You can also remove browser cache to free up space on your iPhone. For this, go to your phone's settings and tap on Safari, and then select Clear History and Website Data.
Q3: Can I clean C:\Windows\Temp?
Yes, you can clean the C:\Windows\Temp as its contents are safe to delete.
Press Windows + R, type C:\Windows\Temp. From here, select all files, and hit Delete. However, don't delete any file that is currently in use, or your PC will crash.
Q4: How do I delete temporary data from my Windows PC?
On Windows, you have to press Windows + R, type "%temp%," and hit Enter. You have to select everything inside and delete it. For a deeper clean, use Disk Cleanup or a tool like WMaster Cleanup to clear temp files, system cache, and junk in one click.
Q5: How much disk space will I actually free up by clearing temporary files?
The answer varies depending on when you last cleaned up your device. If you never clean your PC, you can expect to free up anywhere between 1GB and 10GB. However, if you're a heavy user with lots of installed software, frequent updates, or large browsers, it can recover even more.
Final Words
Temporary files are harmless, but if left unchecked, they silently slow your entire system down. If you're on Windows, Mac, or mobile, cleaning them out regularly is one of the simplest ways to keep your device running fast.
If you're on Windows and want to skip the manual steps entirely, WMaster Cleanup handles everything in one click, from temp files to junk, cache, and all digital system clutter. So, wait no more! Download this tool now, as it is powerful, safe, and built for every Windows version.