

Is your C drive begging for space, and you don't know what to do next? As Windows 11 rolls up updates, the hidden files and cache get heavier, and that slows down your system.
The good news is that you can unallocate space to extend the C drive. However, the space should be right next to the C Drive; otherwise, the option will remain gray, as Windows can't jump over the partitions.
In this blog, I'll share 8 ways on how to extend the C drive in Windows 11 without touching anything critical in your system. Besides this, I'll share a reliable tool like WMaster Cleanup to free up space beforehand and reclaim your space.
In this article
- What You Need Before Extending the C Drive
- How to Enable Extend Volume in C Drive
- Using WMaster Cleanup to Free Space Before Extension [Work on Both Windows 10 & 11]
- How to Extend C Drive in Windows 11 by Other 7 Ways
- Helpful Tips to Extend the C Drive in Windows 11
- FAQs – How to Extend C Drive in Windows 10 & 11
Part 1: What You Need Before Extending the C Drive
Extending a drive means increasing the space allocated to it on your hard drive. For example, you can extend the C drive in Windows 11 by allowing it to absorb unallocated space available on the hard drive. To make the process work and avoid risk:
- 1. Verification of Free Space: In disk management, look at the free space and make sure it's right next to your C drive. Without this empty space, you can't make the size bigger.
- 2. Verify Disk Location: The free space must be on the same physical disk as your C drive. You cannot borrow space from a separate physical SSD or HDD to extend a partition on another.
- 3. Get a copy of your data: Carefully look over your important files before you expand the C drive. Take them to an external drive so you don't lose your files.
- 4. Identify Extend Volume Gray-Outs: If the extend volume option is grayed out, it means there’s something sitting between the C drive and unallocated space. So, you must get rid of that to enable the option.
- 5. Check Drive Health: Check your drive health by running chkdsk to ensure your file system is healthy.
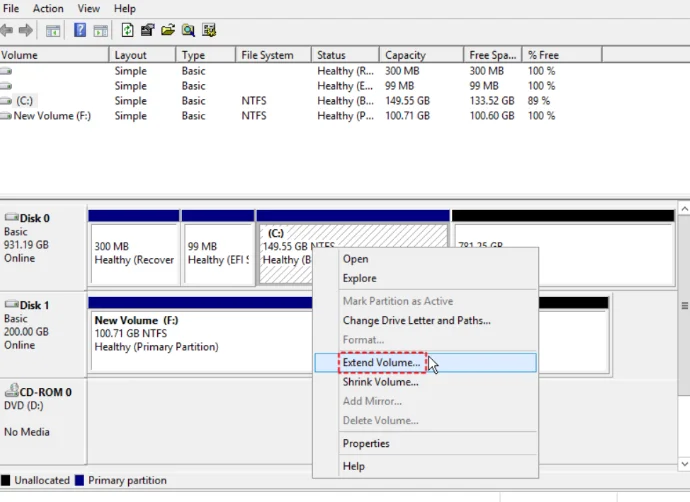
Part 2: How to Enable Extend Volume in C Drive
Extending volume in the C drive becomes necessary if your system is running out of space. Here's how to enable Extend volume in the C drive:
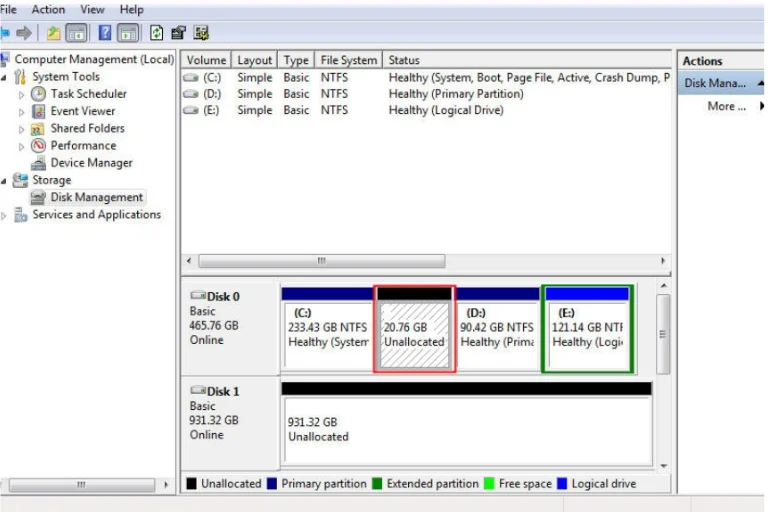
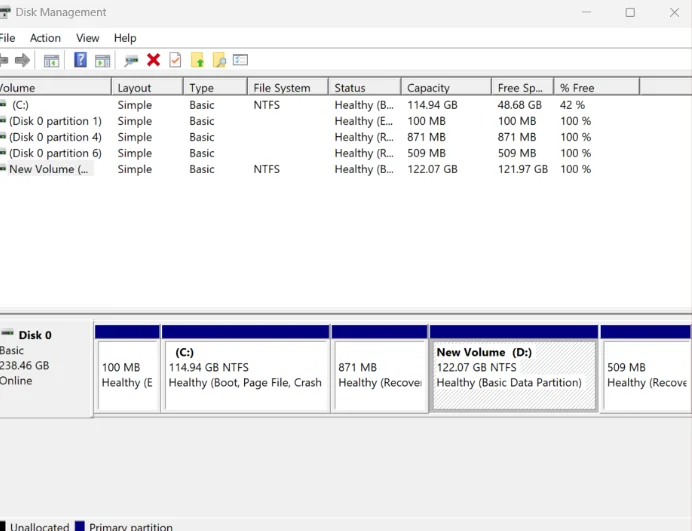
1: Check for Unallocated Space
- First things first, you need to go to the Disk Management from the Start menu.
- Now, look at the visual bar representing your Disk 0.
- Here, your focus should be on the black bar labeled "Unallocated." This black bar must be sitting directly to the right of your (C:) partition.
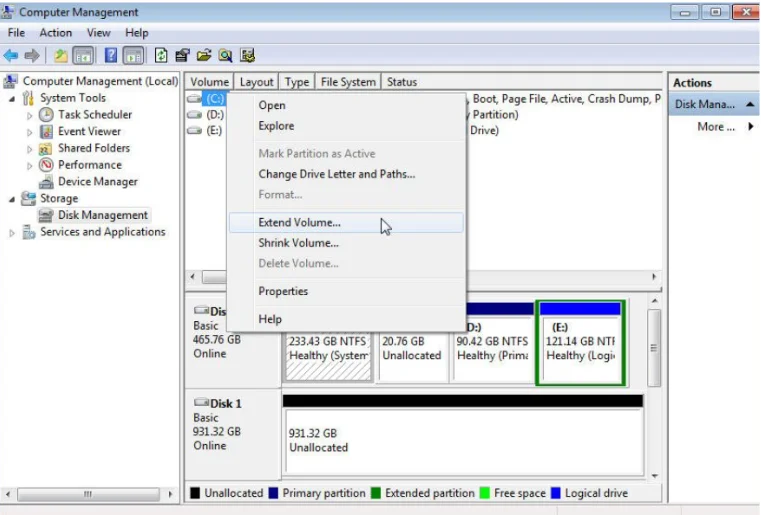
2: If Space is Available
- If the black bar is right next to (C:), you are ready to expand the C drive in Windows 11.
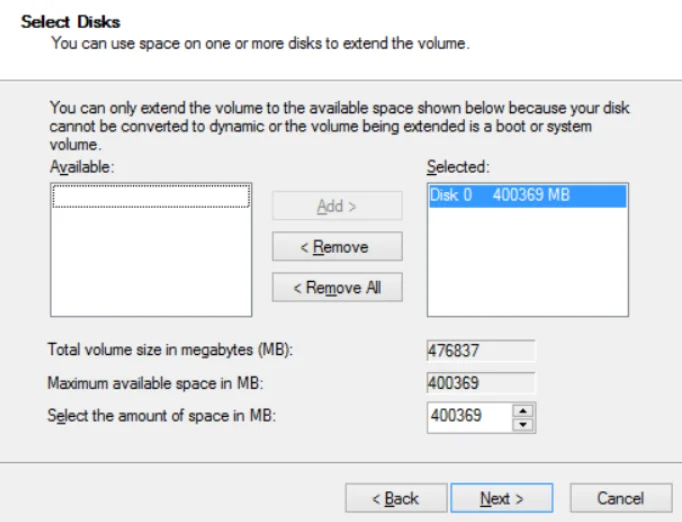
- For this, you must right-click the (C:) drive box & Extend Volume. Now follow the Extend Volume Wizard prompts to merge the space.
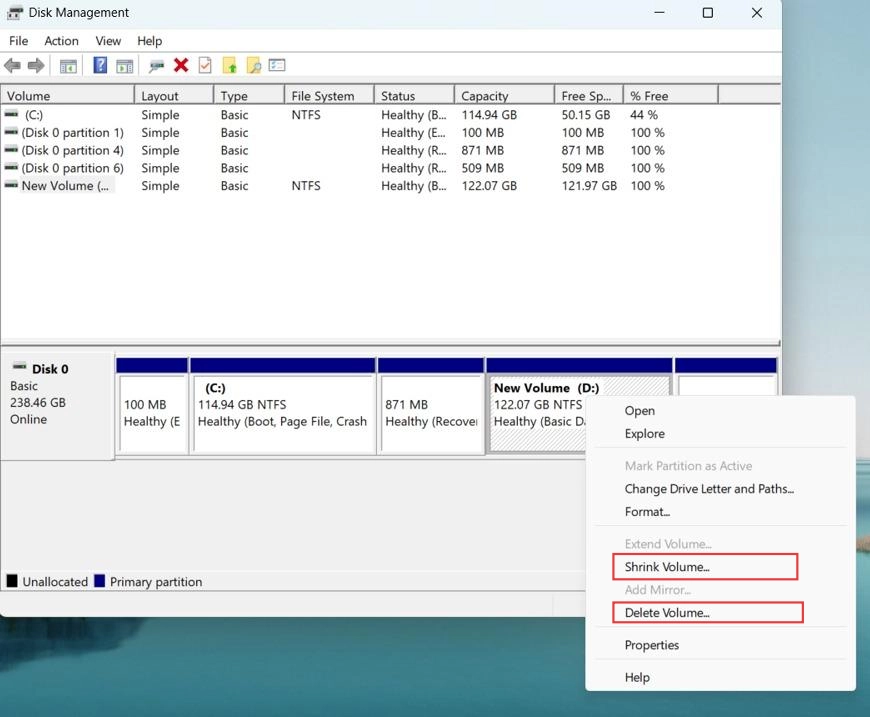
3: If Space Is Not Available
- If there is no space, the "Extend Volume" option becomes unclickable. Here, to create unallocated space immediately next to the C drive, you need to either delete or shrink the partitions.
💡Warning:Deleting a partition will erase all data on that specific section, so back up those files first!
- You need to use a third-party partition tool to move the partitions. This allows you to slide the C drive and the unallocated space together without losing data.
Part 3: Using WMaster Cleanup to Free Space Before Extension [Work on Both Windows 10 & 11]
Before you extend the C drive using built-in tools, it's best to clean C drive to create some space. WMaster Cleanup is an ultimate solution to free up space in Windows 10 and 11. It targets the hidden files and junk that Windows' built-in tools often miss. Moreover, it cleans the large files, temp files, and cache to free up space.
WMaster Cleanup
Remove Junk And Free up Space in One Click
- ·Automatically remove junk, temp files, browser cache, and system leftovers.
- ·Speeds up your pc performance by removing the clutter and unused apps.
- ·Quickly find large files that are taking up the space in your C drive.
- ·Ensure system clean up without touching the system's critical files.
- ·Quickly identifies the large files that are taking up the space in your C Drive.
How to Clean C Drive to Free Up Space By WMaster Cleanup Before Head Towards Extending C Drive
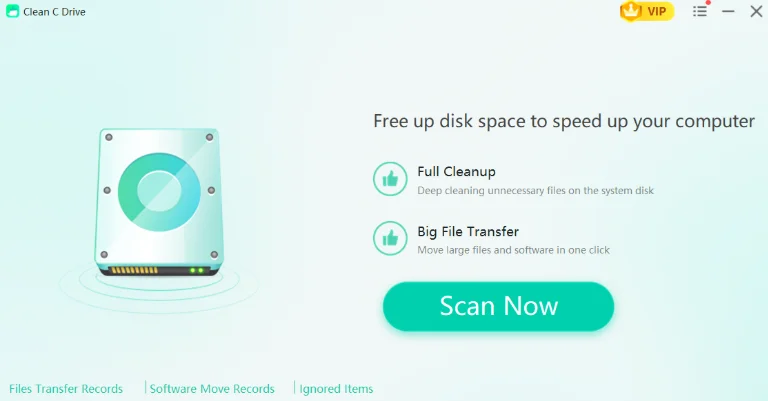
Step 1: Search for WMaster Cleanup on the search engine. Now, click on the Download Now option from the official website to initiate the process.

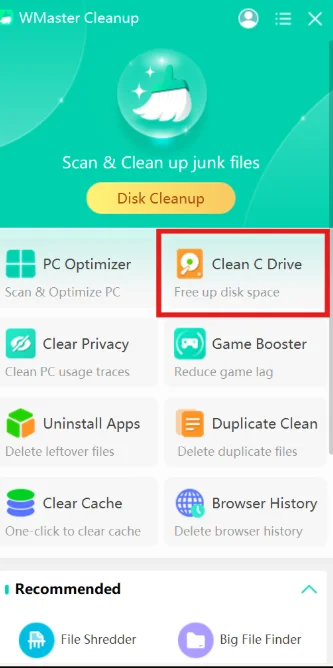
Step 2: Now, from the main interface, you have to select Clean C Drive and then click on the Scan Now option.
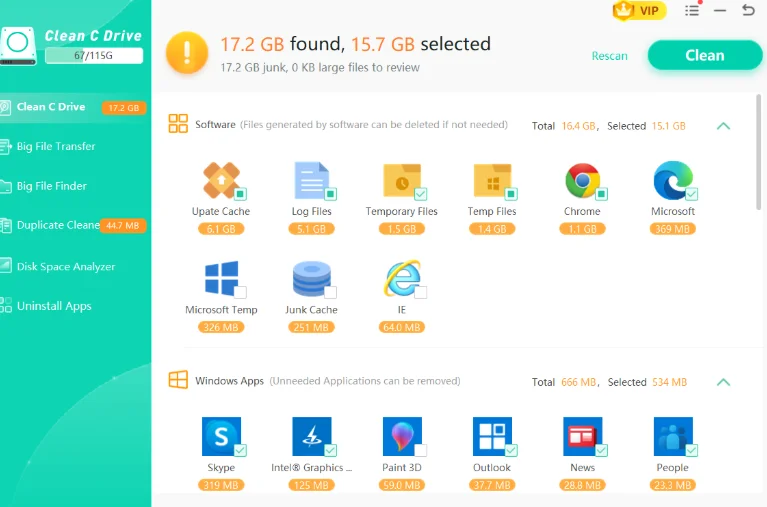
Step 3: Once completed, select the desired ones and hit the Clean button in the top right corner to complete the process.
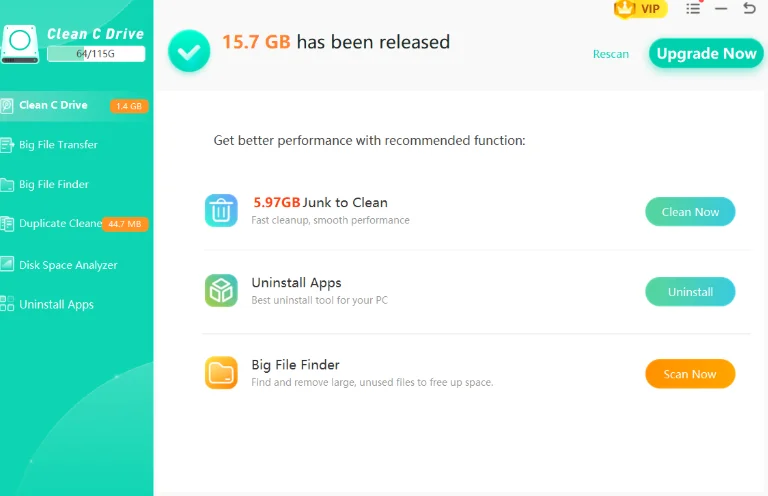
💡Tip:After the deletion completes, you can see how much space you have recovered. Likewise, you can also find out how much space is left in your C drive.
Part 4: How to Extend C Drive in Windows 11 by Other 7 Ways
Once you clean your C Drive of all the junk, you can work for how to extend the C drive with Windows built-in tools and commands.
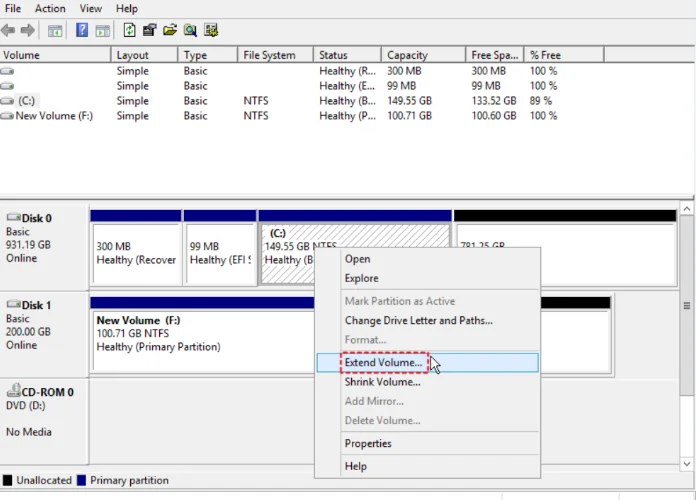
1.How to Extend C Drive Space with Windows Disk Management
Windows has a built-in system to extend the C drive. It's the most accessible option to get space in your partition without using any tools or complicated prompts. Follow along to know how to extend C drive in Windows 11 by yourself:
Step 1: Search for the Disk Management option from the Start menu and open it.
💡Tip:Here, you'll find the Here, you'll find the color partitions representing your hard drive. Your focus should be on Black sections that are labelled as Unallocated.
Step 2: If you find the black Unallocated Space, it means you can extend your C drive. For this, you have to right-click C: and select Extend Volume.
Step 3: Now, just follow the Wizard and click on Next and then Finish to claim extra storage.
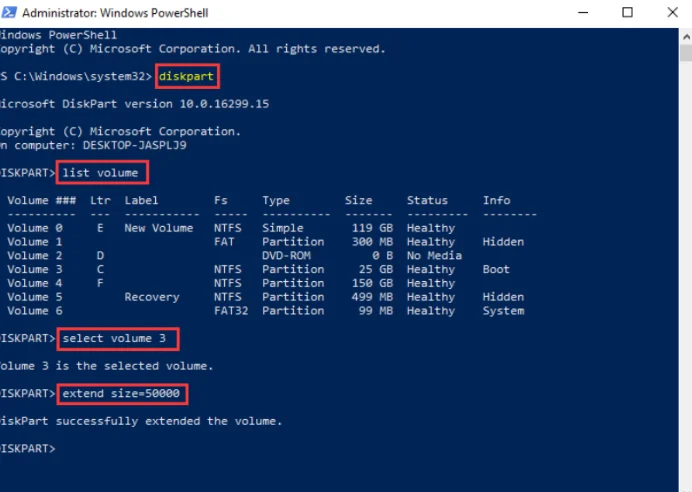
2. DiskPart Command Line with Contiguous Unallocated Space
If the Disk Management option remains grayed out, you can directly go to the Command Line to reclaim space. It's the fast and convenient method:
How to extend c drive from unallocated space
Step 1: To begin with, search for Command Prompt from the Start menu and select Run as Administrator.
Step 2: Type diskpart and press Enter.
Then run the command "list volume" to find your C drive number; type "select volume [number]".
And finally, type and enter "extend" to expand your C drive using the available unallocated space.
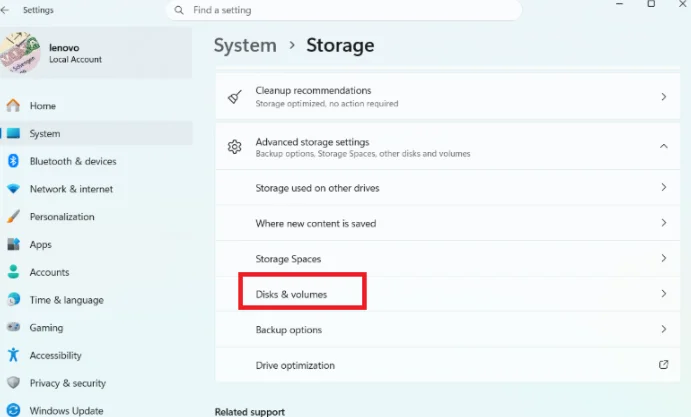
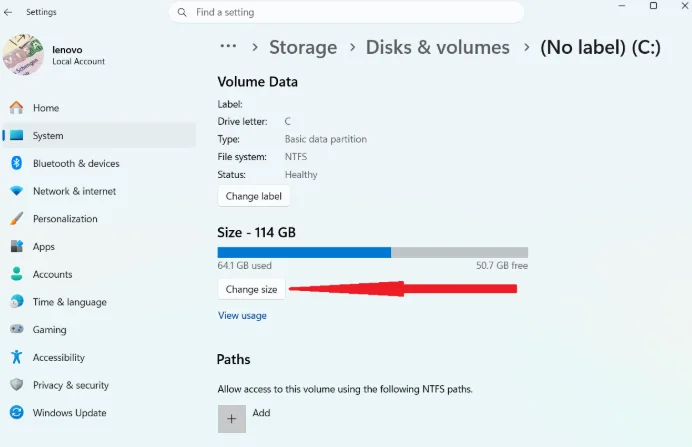
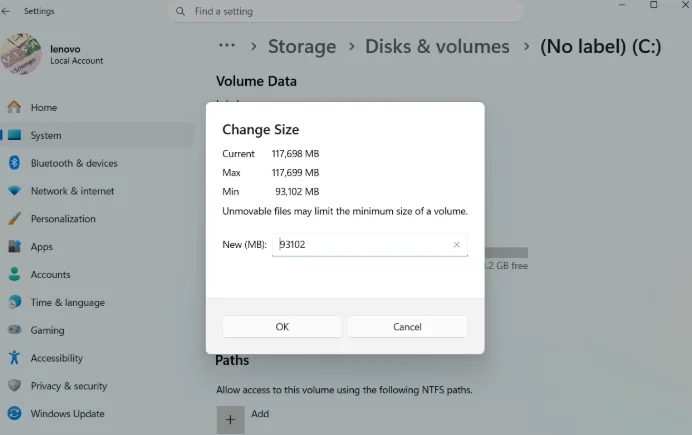
3. Disks & Volumes
Microsoft allows you to change the settings to extend the C drive in Windows.
Step 1: You first have to go to Storage via Settings. Here, you need to click on Advanced storage settingsand then select Disks & volumes.
Step 2: Now, select the C: drive and then click Properties to see a full view of storage.
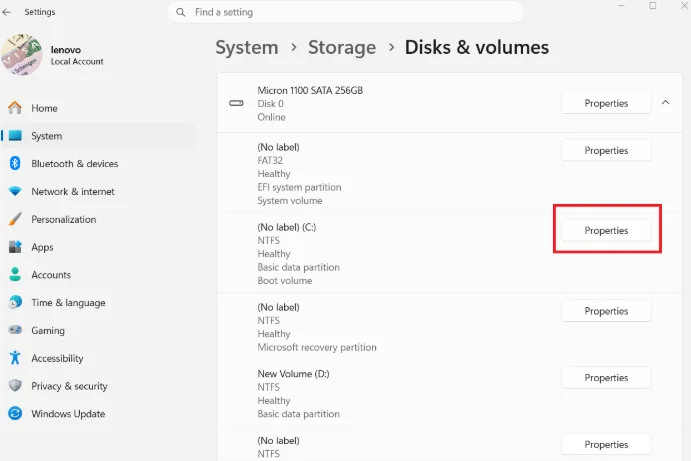
Step 3: Now you can change the size of the disk by selecting the Change size option.
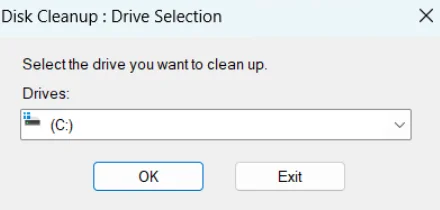
4. Using Disk Cleanup
The Disk Cleanup is the most effective way to extend the C drive and reclaim massive space.
Step 1: Search for Disk Cleanup from the Start menu. A dialogue box will open here; select the C drive for a thorough scan.
Step 2: Click on System Cleanup Files from the bottom left to perform a much deeper scan of the C drive.
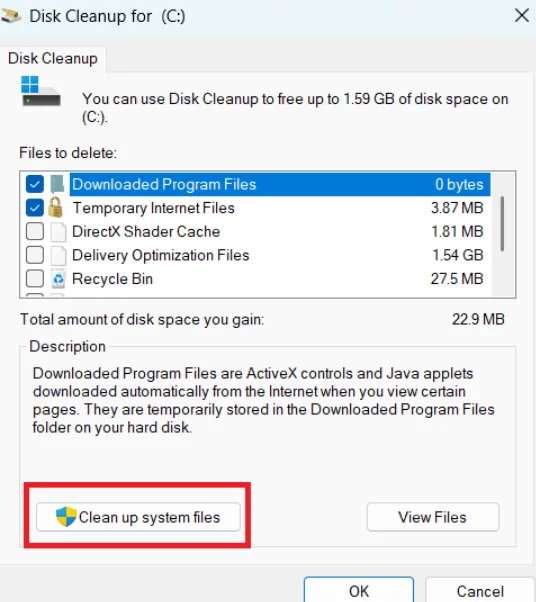
Step 3: Once the scan finishes, you can delete the large files, Windows old updates, and the old hard drive packages.
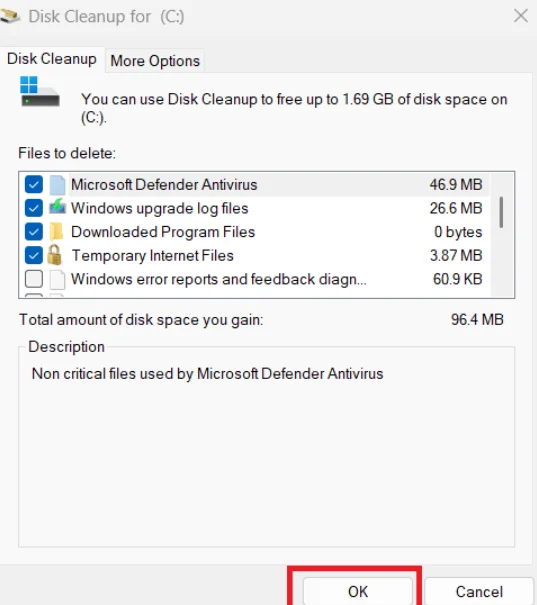
Check the desired boxes and confirm the action to free up the space from the C drive quickly.
5. PowerShell
PowerShell is the quick method to extend the C Drive in Windows with just a single command.
Step 1: Search for PowerShell from the Start menu. Once the window opens, you have to type;
command: Get-Partition
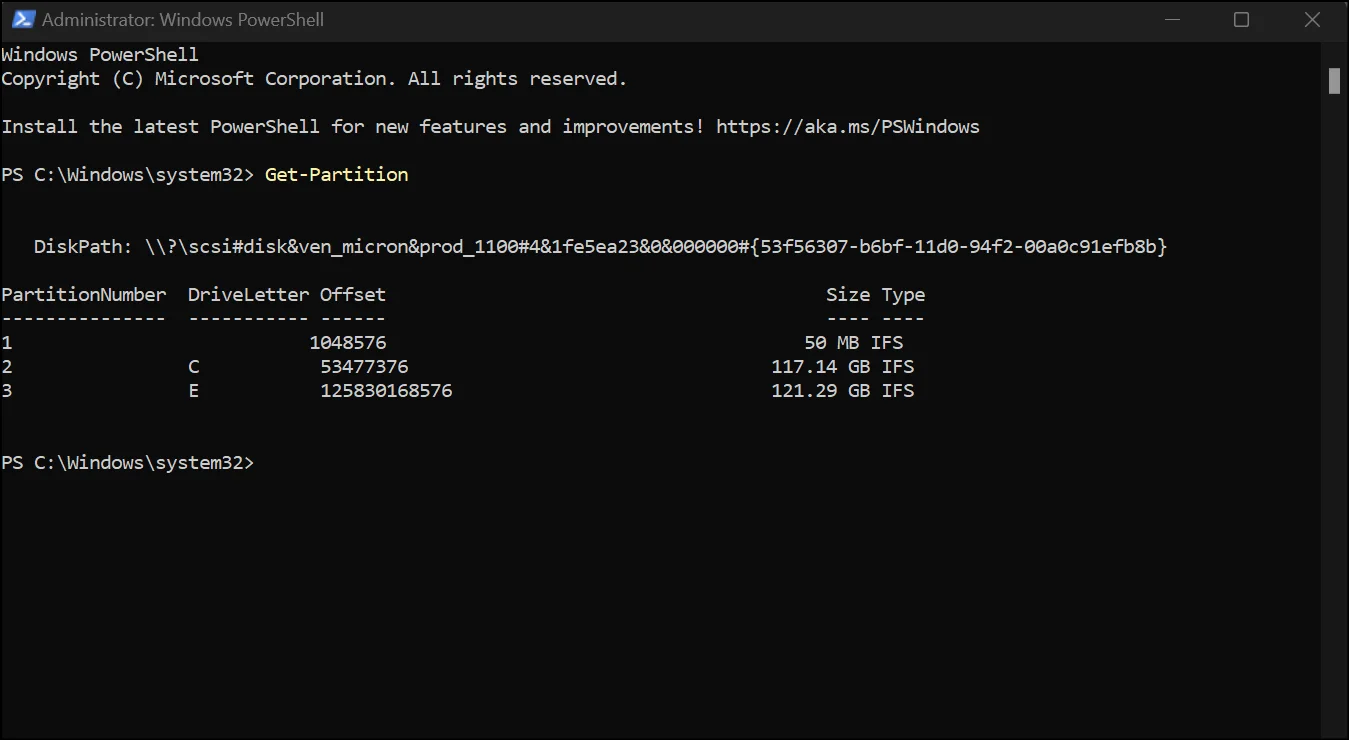
Step 2: Note the drive letter and type the next command:
Command = Get-PartitionSupportedSize -DriveLetter drive_letter
Replace the "drive_letter" portion with the actual value and then run the below command to extend the C drive in Windows 11:
Command = Resize-Partition -DriveLetter C -Size $size

💡Tip:You can recheck and confirm the extended space of the C drive from disk management.
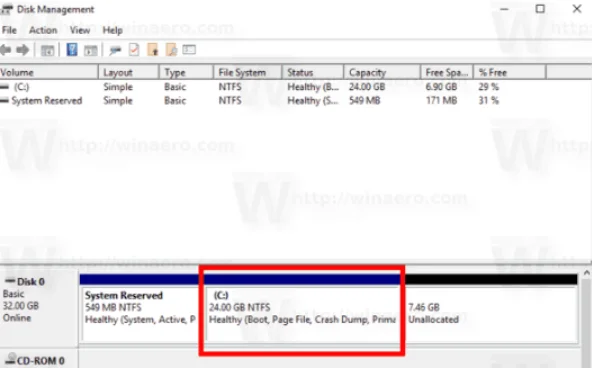
6. Delete Adjacent D: Partition
This is the fastest way to enable the Extend option, but it erases everything on the D: drive. Use this only if the D: drive is empty or fully backed up.
Step 1: To start with, go to the Start menu and search for and select Disk Management.
Step 2: Now, you have to place your D drive right next to C drive. For this, you have to delete some volume of D. Right-click the D: drive and select Delete Volume to complete the action.
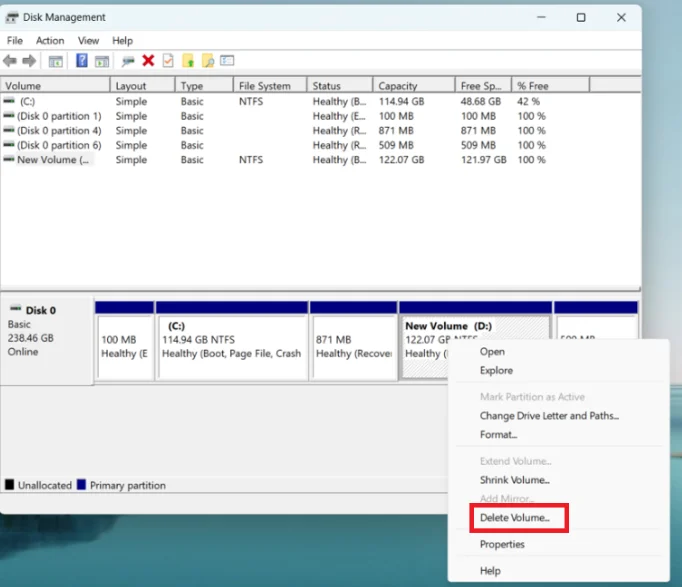
Step 3: Once the volume of D drive is deleted, you have to right-click your C: drive and from here select Extend Volume.
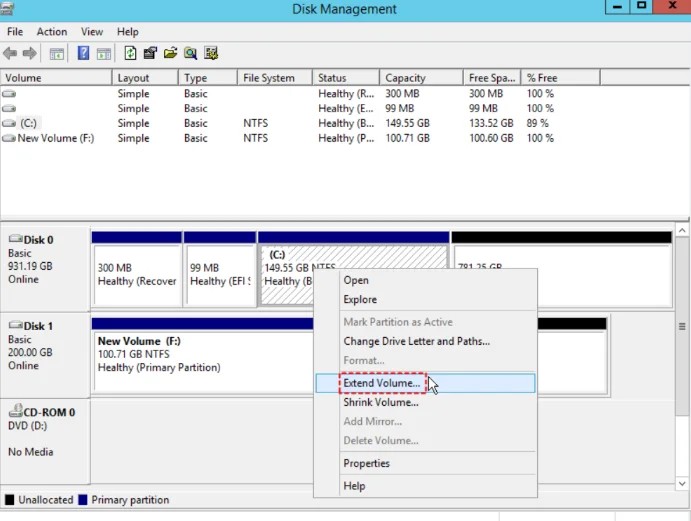
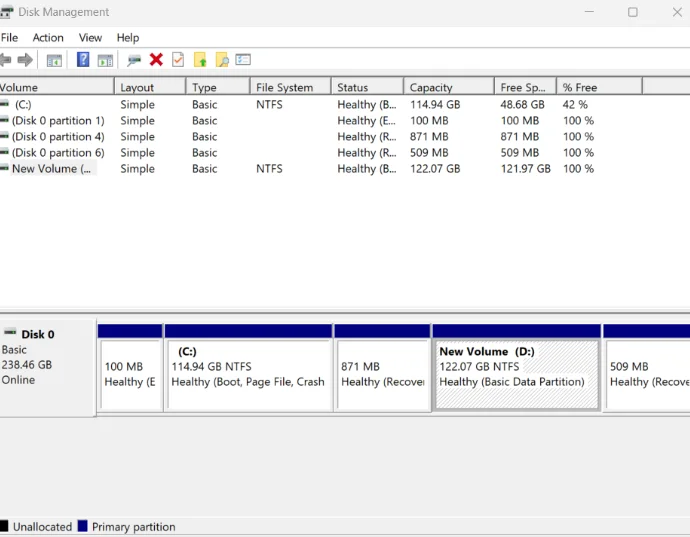
7. Shrink the Adjacent D: Partition
If you want to keep your D: drive but make C: larger, you can shrink it as well. In native Disk Management, shrinking D: creates space to its right, which means you will still need a third-party tool to move that space next to C:.
Step 1: Open Disk Management and right-click your D: drive and select Shrink Volume.
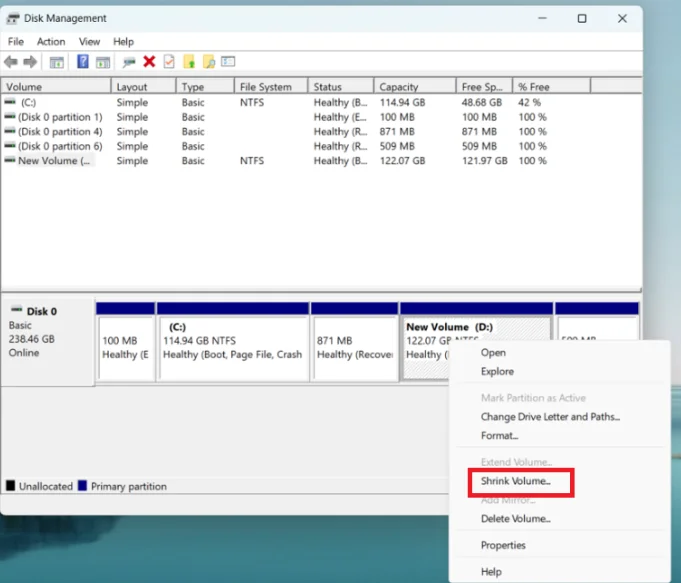
Step 2: Enter the amount of space (in MB) you want to take away from D: and give to C:, then click Shrink.
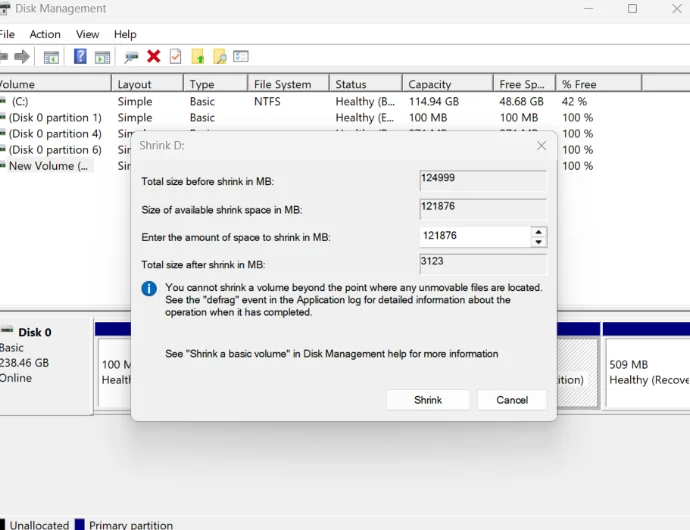
Step 3: Now, you'll see the Unallocated Space to the right of D:.
Once the space is adjacent to C:, right-click C: in Disk Management and choose Extend Volume.
Part 5: Helpful Tips to Extend the C Drive in Windows 11
If you want to extend C drive successfully, you need to understand the disk layout first. Moreover, you should keep your data protected for later use. Here are some helpful tips to extend the C drive in Windows 11 without affecting any critical information:
- Back up all your data to an external drive before making partitions.
- The unallocated space should be right next to the C Drive to extend the storage, as Windows can't jump over partitions.
- If a Recovery Partition is blocking your path, use CMD to safely move or recreate it rather than simply deleting it and losing repair options.
- If you need to move space without deleting data, use a reputable third-party partition tool.
- Run the chkdsk command before extending, or you might corrupt the OS with the existing file system.
Read also: How to clean up temp files in Windows, Mac, and mobileto reclaim device space.
Part 6: FAQs-How to Extend C Drive in Windows 10/11
1. Why is the "Extend Volume" option grayed out even though I have unallocated space?
One of the reasons that this option is still grayed out is that the unallocated space is not directly adjacent to the right of the C drive. Windows Disk Management can't jump over other partitions, so you must delete the blocking partition.
2. Can I extend my C drive by taking space from another physical disk?
No, you cannot take space from any other physical drive. To complete the action, you have to convert your disks to Dynamic Disks.
3. Is it possible that I extend my C drive without losing any data?
Yes. If you have adjacent unallocated space, extending is completely safe. But first, you should clean the C Drive to extend the space smoothly. And for this, you can use our all-in-one cleanup tool, WMaster Cleanup, for a cleaner C drive and a faster PC.
4. Is it possible to extend a FAT32-formatted C drive?
Windows does not support FAT32 format. You should have volumes formatted with the NTFS or ReFS file system to extend the C drive.
5. What should I do if there is no unallocated space at all on my disk?
If your disk is already full, then you need to create unallocated space by shrinking or deleting some volume from other partitions of Windows first. Once you have created the space next to C:, you can extend the drive safely.
Conclusion
That's all you need to know about how to extend the c drive in Windows 11. There are some built-in methods, like Disk Management, to extend the space in Windows. Besides this, you can shrink the adjacent drive to create space.
Although it's a bit tricky to make space in the C drive, if you clean up your drive beforehand using WMaster Cleanup , you can smoothly do this. You can get rid of junk, delete or move large files, and remove unused apps within seconds to create space for extending your C drive.