

How to free up space on c drive in my Windows 11? This question instantly reminded me of how I have been in the same situation so many times. Staring at 3 GB free on a 256 GB drive, wondering where it all went.
But what most people don't realize is that a full C drive does more harm than just taking up space. It slows down Windows updates, kills app performance, and causes random crashes that feel completely unrelated.
Today, let me tell you how to free up space on c drive with 10 effective ways and free up space in your C drive.
In this article
Part 1: When You Need to Clean Up Space on the C Drive
Your C drive needs attention when any of these situations apply. When more than two are true simultaneously, I would clear some space right there instead of waiting.
Before we get into the list, I want to tell you about this general rule: Windows needs at least 10%-15% of your C drive free at all times to function properly. Beneath that, things begin to break in a way that seems to be unrelated, but nearly always traces back to storage.
- Windows updates continue to fail: Updates require temporary space to download and extract, and a full drive blocks them completely.
- Your PC is booting slower than it was before: Low disk space causes Windows to heavily rely on virtual memory, which slows down the boot times.
- Applications are crashing randomly: Some applications write temporary data in the middle of the session when there is no place to write, and the application crashes.
- You are getting low disk space warnings: This one is self-explanatory, but many people ignore the warning and forget about it.
- New software will not install: Installers require working space and will not run when the drive is almost full.
- Your PC is generally slower: This is the typical symptom; everything is a beat longer than it ought to be.
- You are about to upgrade Windows: Major version upgrades require several gigabytes of free disk space. Any attempt to upgrade on a full disk will always fail.
Try our all-in-one cleanup tool, WMaser Cleanup, to analyze your system's full drive and reveal space hogs within a few seconds.

Part 2: What To Avoid Deleting From The C Drive
Before going on a deletion spree, know what to leave alone. I have witnessed how people can easily corrupt their Windows installation by deleting stuff that they do not recognize. This is what you should never touch:
1. Windows folder (C: Windows): This is all your operating system. Anything you delete here is in recovery mode territory.
2. Program Files and Program Files (x86): These are where your installed software is located. Removing folders here does not correctly uninstall anything; it merely breaks the apps.
3. Users folder: This is where your personal files, documents, and settings of applications are stored. Do not delete the folder itself; empty out particular subfolders that you are certain are safe.
4. System32 folder: A traditional folder that sounds like junk is actually a critical folder. It's the core of Windows. Keep it to yourself.
5. Pagefile.sys: This is the virtual memory file of Windows. Windows does it automatically; leave it alone.
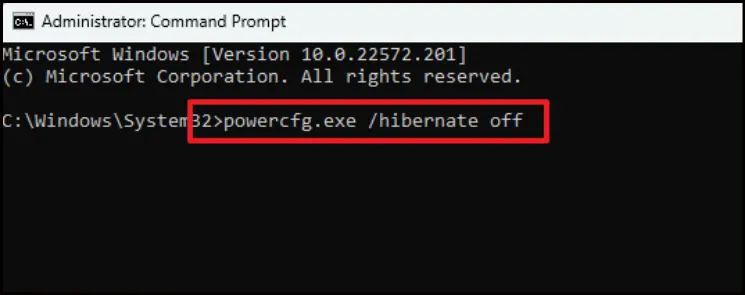
6. Hiberfil.sys: The hibernation file is big, but you can only safely remove it by disabling hibernation using CMD. Do not simply delete the file itself.
7. AppData folder: App settings and data are stored here. You can delete some of the subfolders, like AppData/Local/Temp, but don’t delete the AppData folder.
8. Boot folder: Removing this folder will cause your PC to not boot.
Part 3: The Easiest and Best Way to Free up Space on C Drive: Deeply & Automatically on Windows 11/10
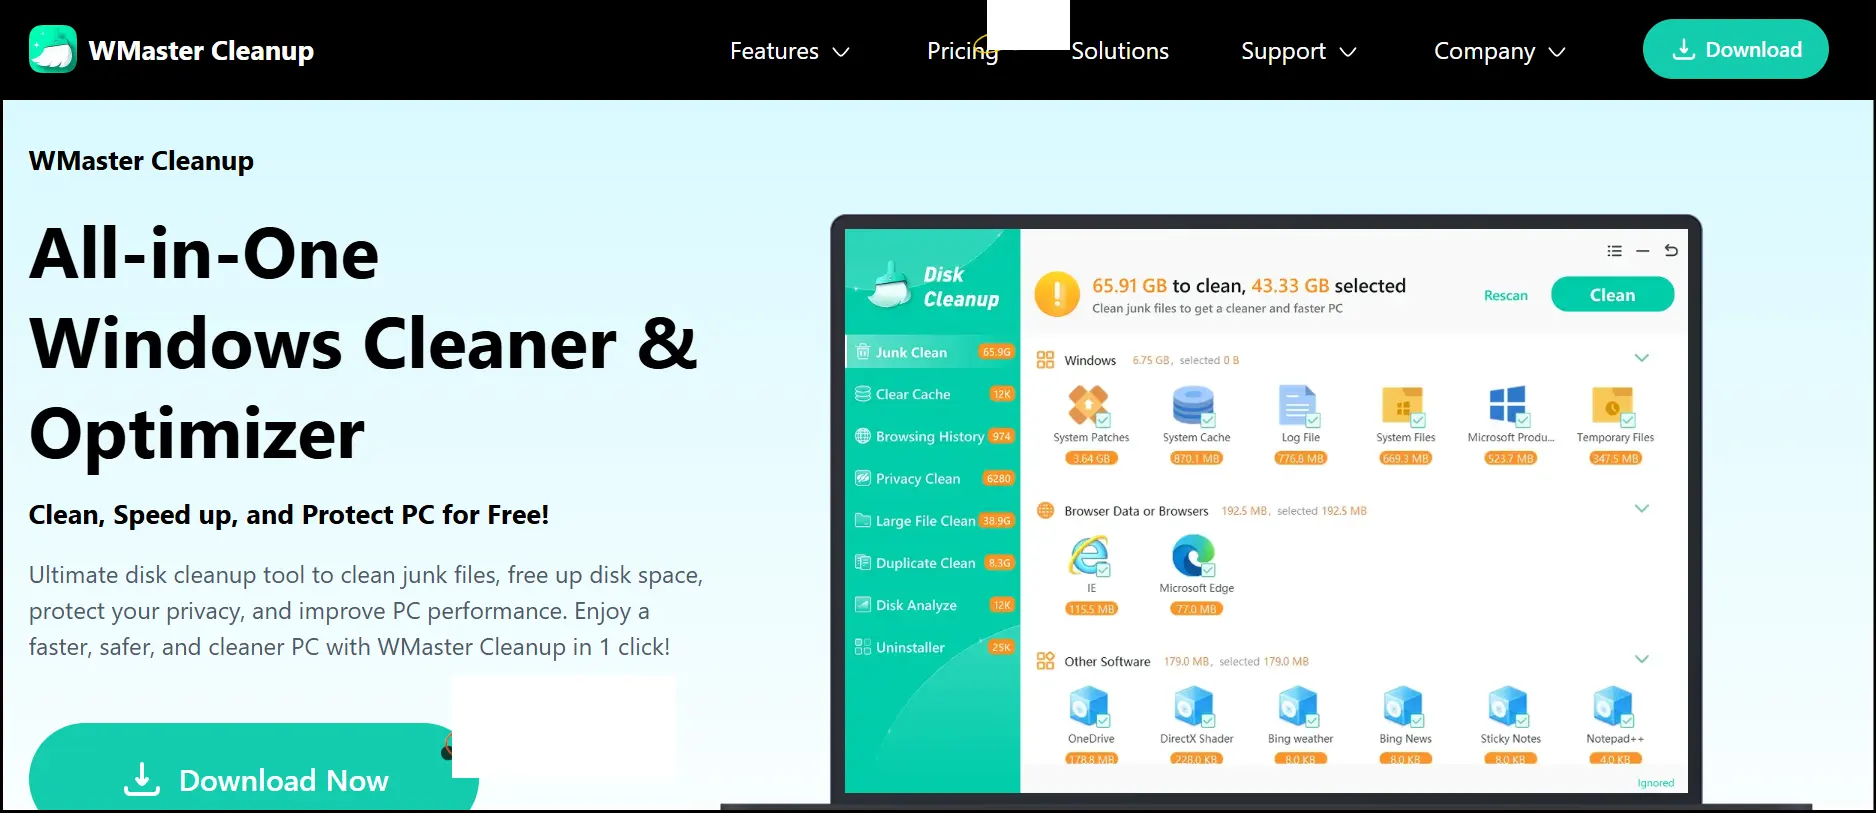
I have tried almost all the methods of how to free up space on the c drive, and the one that I keep returning to is WMaster Cleanup.
The Clean C Drive feature is what makes it actually useful for cleaning up the C drive specifically. With manual methods, it is very easy to miss different types of junk files like system residues, update leftovers, installer fragments, and duplicate files sitting in hidden folders. But WMaster Cleanup's Clean C Drive feature does not simply run a deep scan; it goes after unused language packages, update/backup caches, and old system files and logs, which eat your C drive silently.
URL: https://www.wmastercleanup.com
OS: Windows 7, 8, 10, 11
WMaster Cleanup
Free up Space on Windows 11 & 10 by WMaster Cleanup
- ·Clean C drive:Aimed at system junk, remnants of updates, caches, and leftovers.
- ·User-Friendly Interface: The intuitive interface makes it super easy to use.
- ·Zero Risk Data Handling: Your data is secure with built-in safety measures to avoid accidental loss.
- ·Move Big Files: Instantly move large files from C drive to D drive to free up space.
- ·Batch Deletion: Find and batch delete junk files on the C drive with one click.
Guide to Free up Space on C Drive on Windows 11 & 10 Using WMaster Cleanup
Step 1: Download and install WMaster Cleanup . Follow the on-screen prompts to set up the installation.
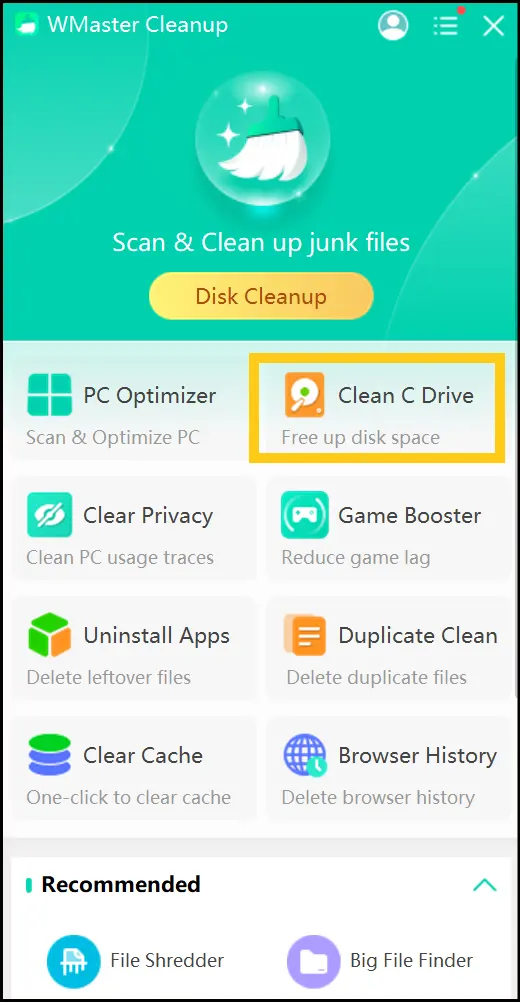
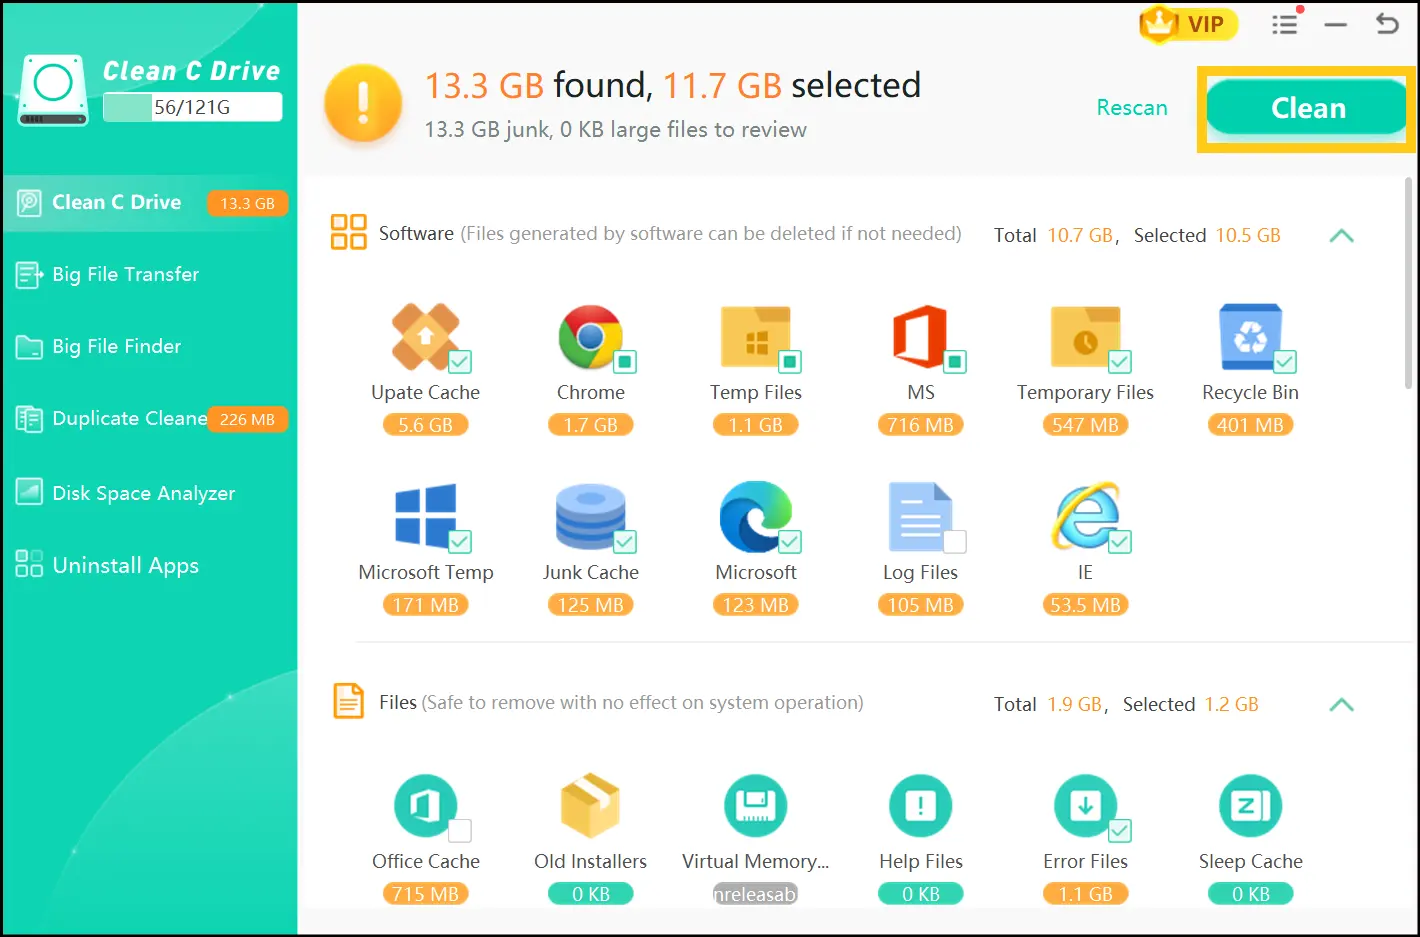
Step 2: Start WMaster Cleanup by launching it on your desktop. Click Clean C Drive from the main dashboard to get started with the targeted C drive cleanup.
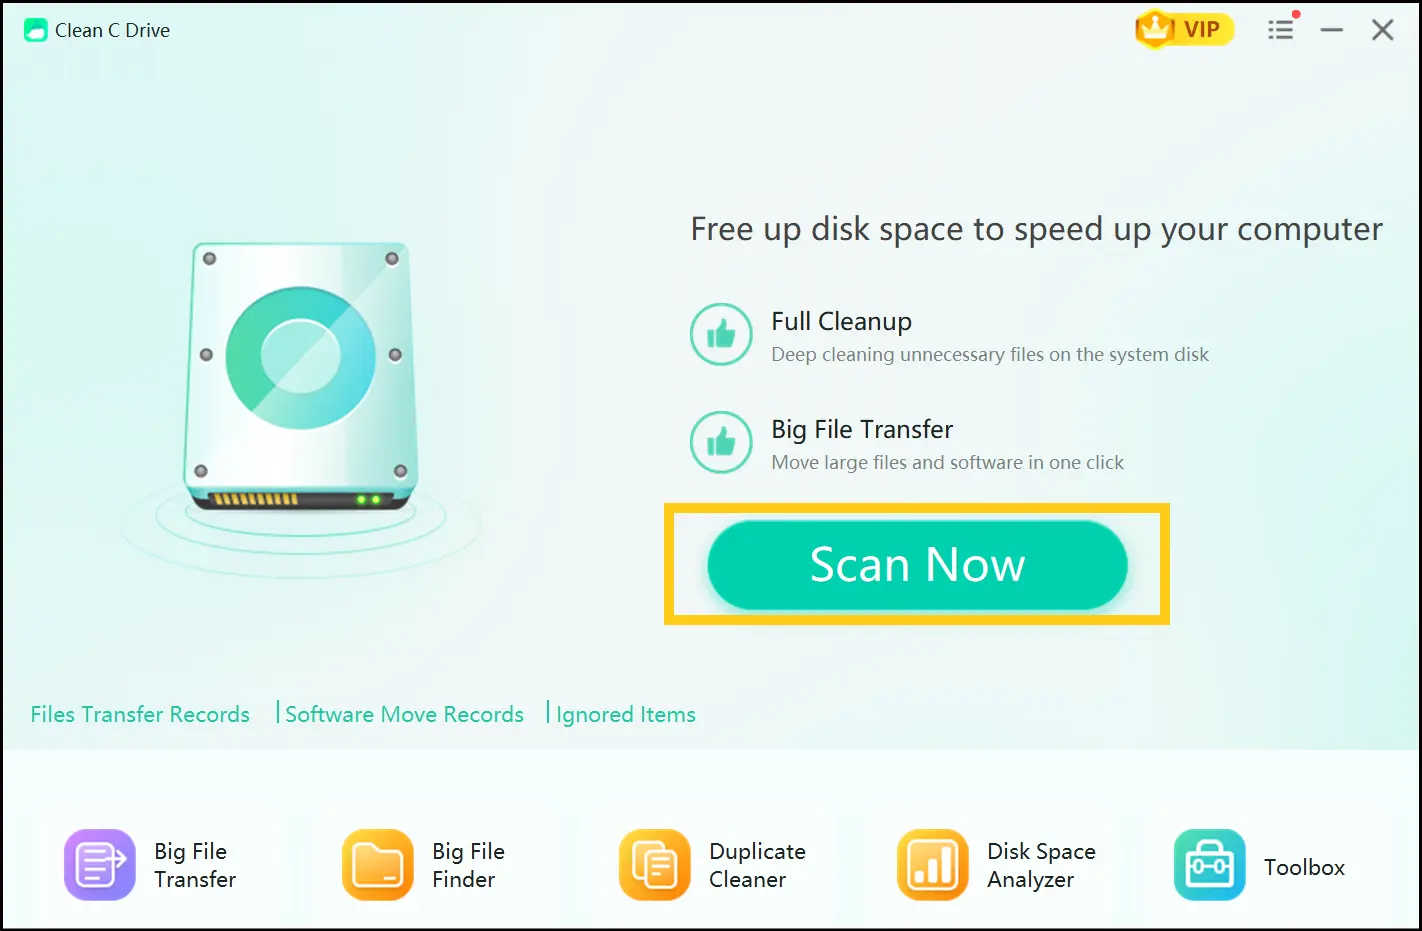
Step 3: An interface will appear on your screen. Click the Scan Now button, and WMaster Cleanup will begin to scan your C drive.
Step 4: Your scan results indicate a complete breakdown of file types, categories, and sizes. Carefully assess what the scan results show you. You can delete selective items or everything at once by clicking Clean.
Part 4: 9 Other Ways to Free up Space on C Drive on Windows 11/10
Way 1. Run Windows Built-in Disk Cleanup
Windows has always had an inbuilt Disk Cleanup utility, and it continues to do so. It is not as comprehensive as Clean C Drive by WMaster Cleanup, but it does the job to some extent.
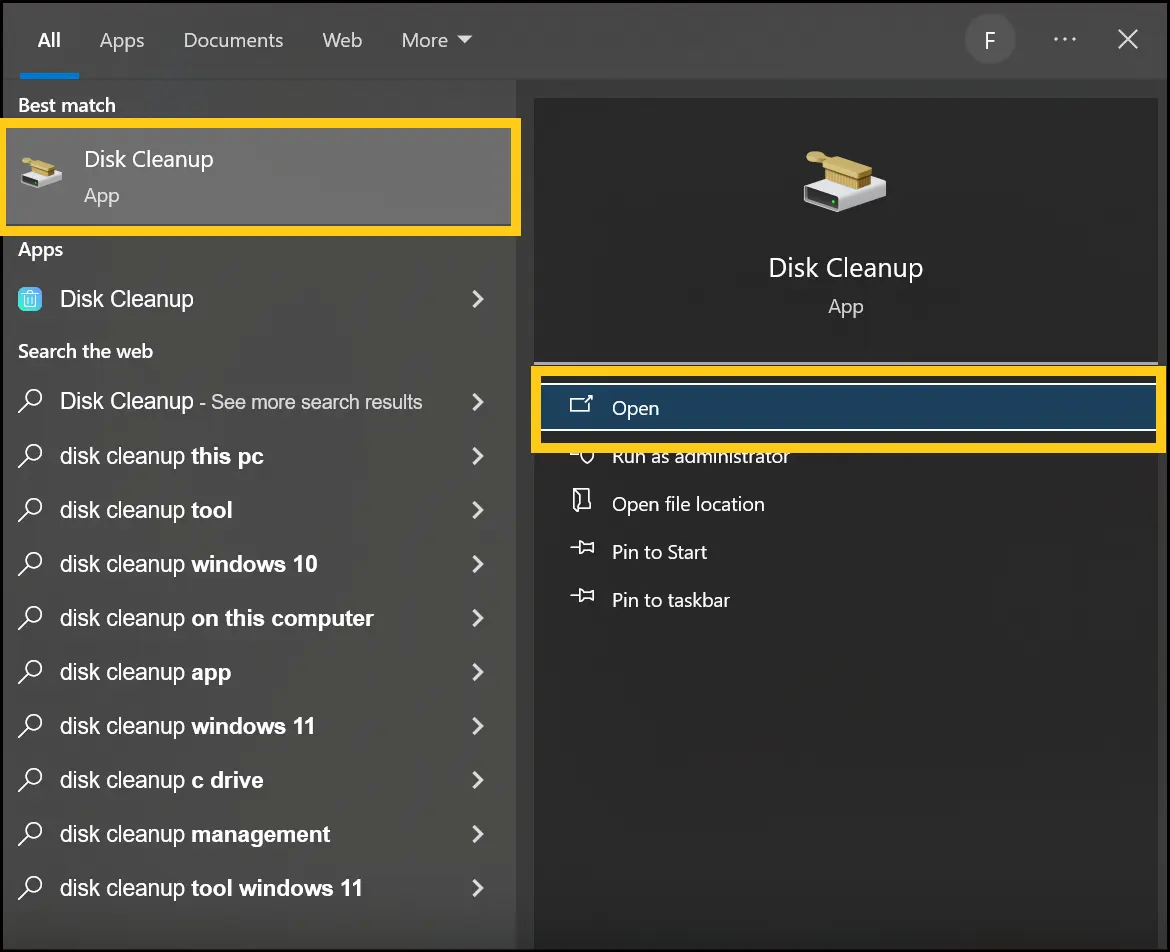
Step 1:Click on Win, type Disk Cleanup, and open it.
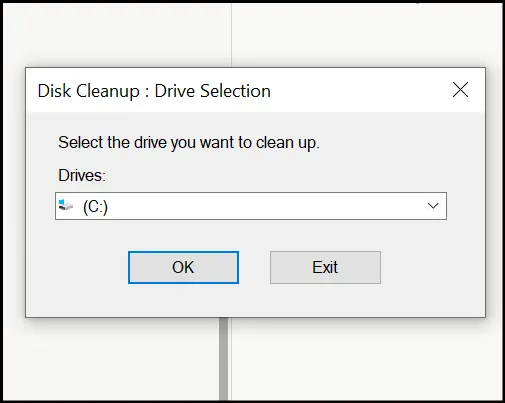
Step 2: On Disk Cleanup : Drive Selection dialogue box, click on your (C:), and press OK.
Step 3: A Disk Cleanup interface will show up on your screen. Select your desired files, and click OK to delete files.
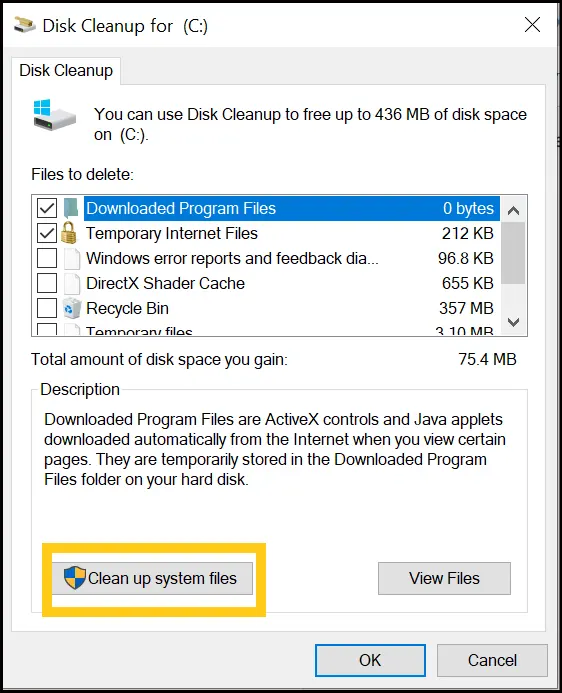
💡Tips:It is suggested to select "Clean up system files" to further scan, which also includes update leftovers.
Way 2. Use Storage Sense (Windows 11 & 10)
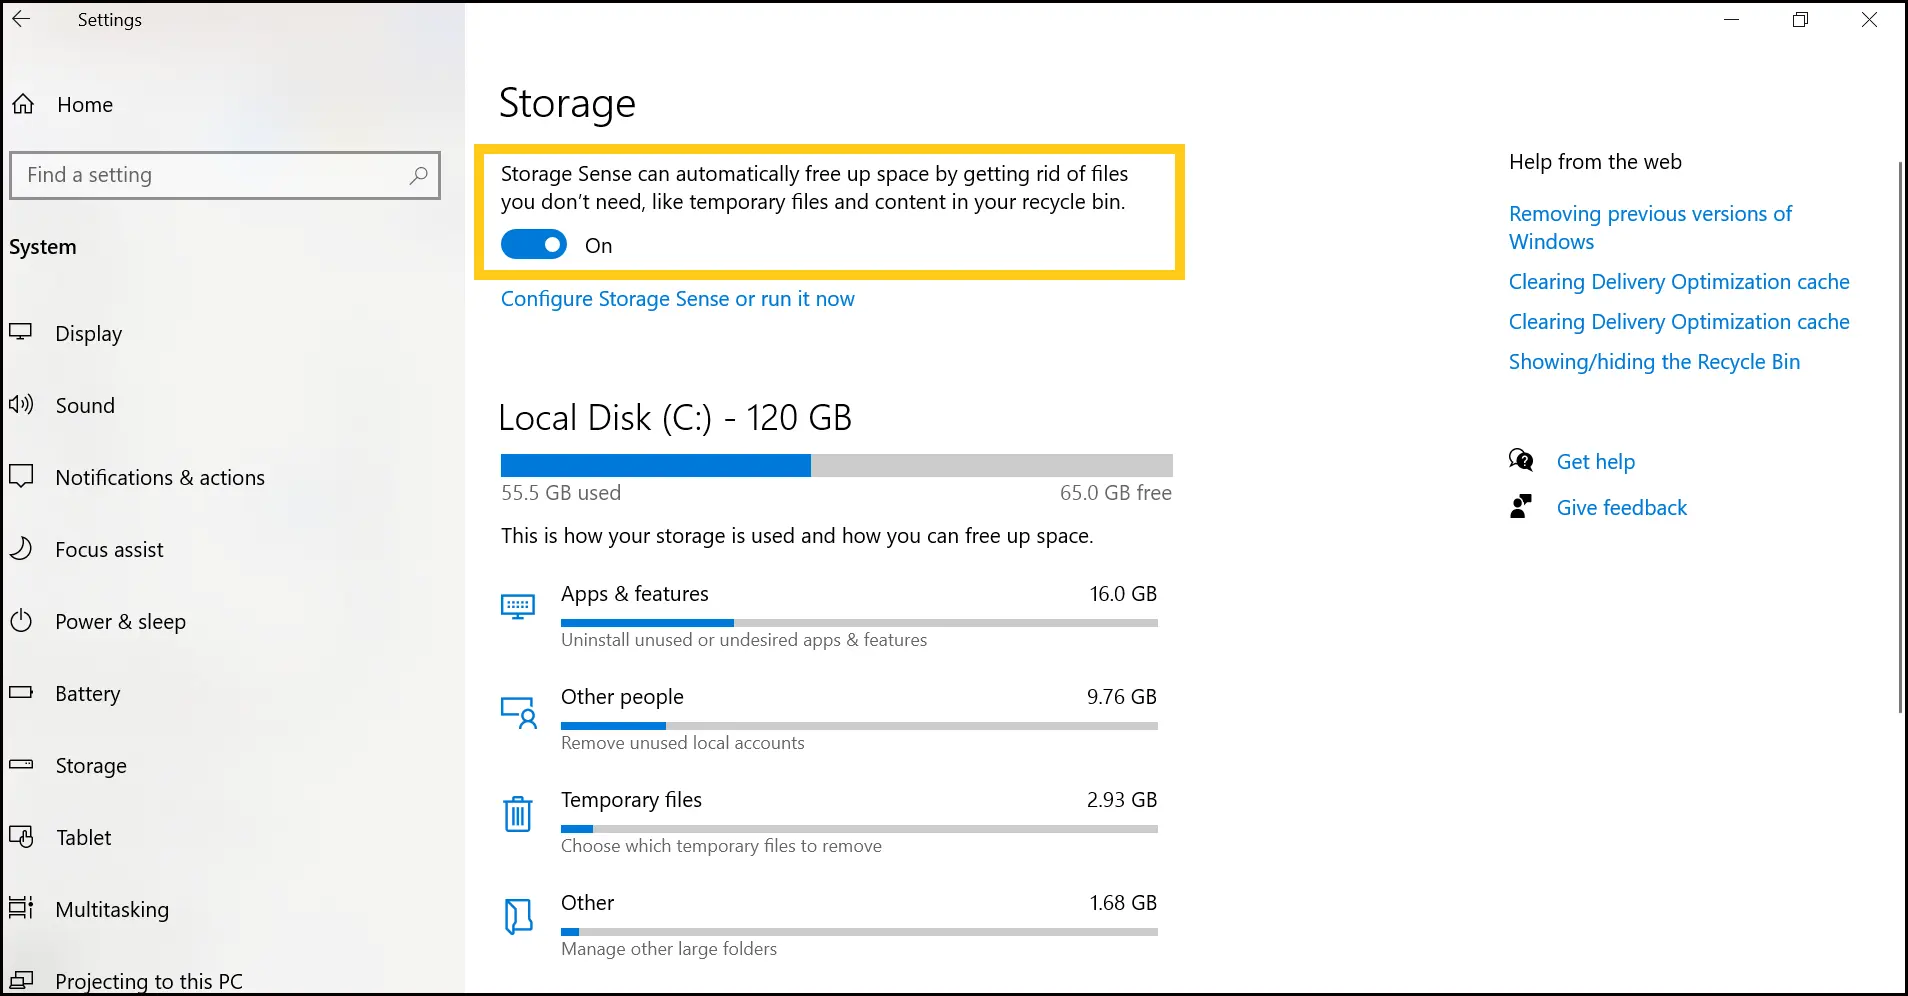
Storage Sense is the automatic clean-up option of Windows. When it is turned on, it will auto delete temp files, empty the Recycle Bin, and manage the Downloads folder on a schedule time, without you having to do anything.
Step 1: Select Settings & System & Storage. Now you have to make sure toggle Storage Sense is on.
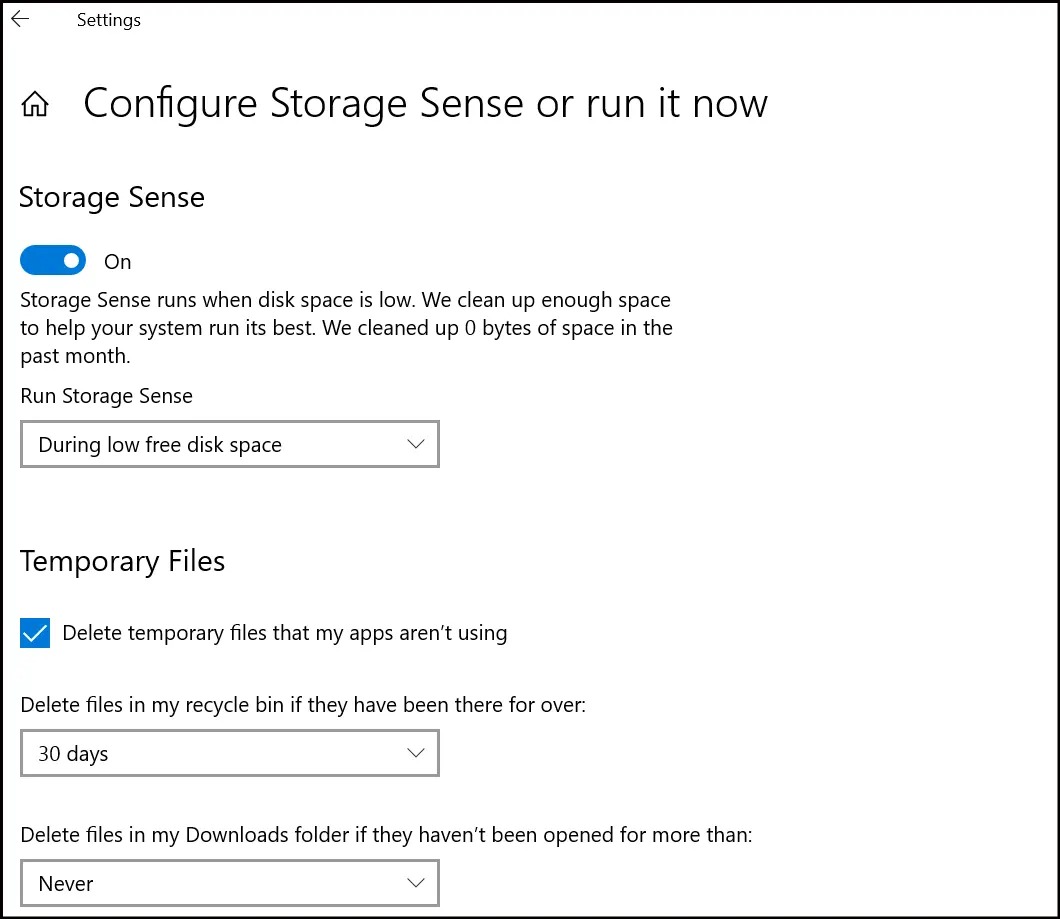
Step 2: Click on Storage Sense to access its settings. Choose the frequency of its operation (I would recommend once a week). Similarly, set the time interval for your Recycle Bin folder and Downloads folder.
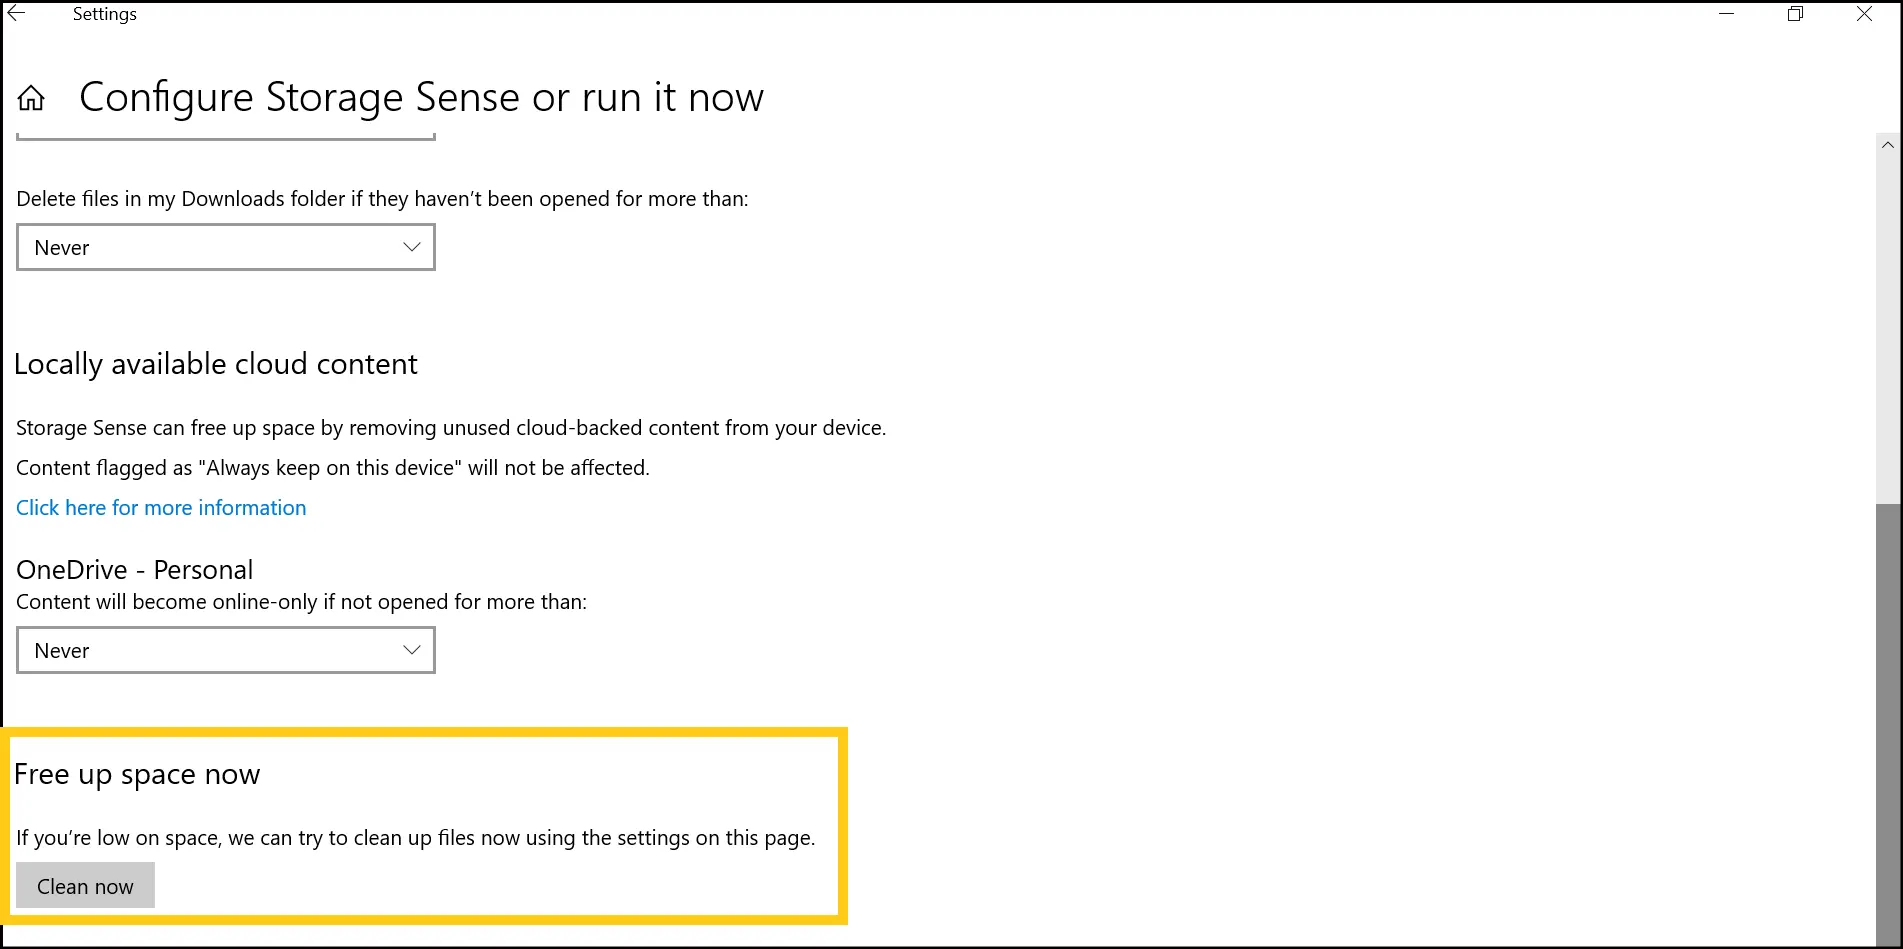
Step 3: Scroll down and click Clean Now under the Free up space now option to initiate an immediate cleanup.
💡Tips:Storage Sense is especially helpful on laptops with lower SSDs. Have it run once a week, and you will hardly ever have to go and clean up the temp files again.
Way 3. Uninstall Apps You Are Not Using
This may seem self-evident, but the vast majority of people have 10-15 apps on their devices that they have forgotten about. On my personal computer, I discovered that the app occupying most of my space, a messaging app, is the one that I don't even use anymore.
Step 1: Go to Settings & Apps & Installed apps (Windows 11)& or Settings & Apps & features (Windows 10).
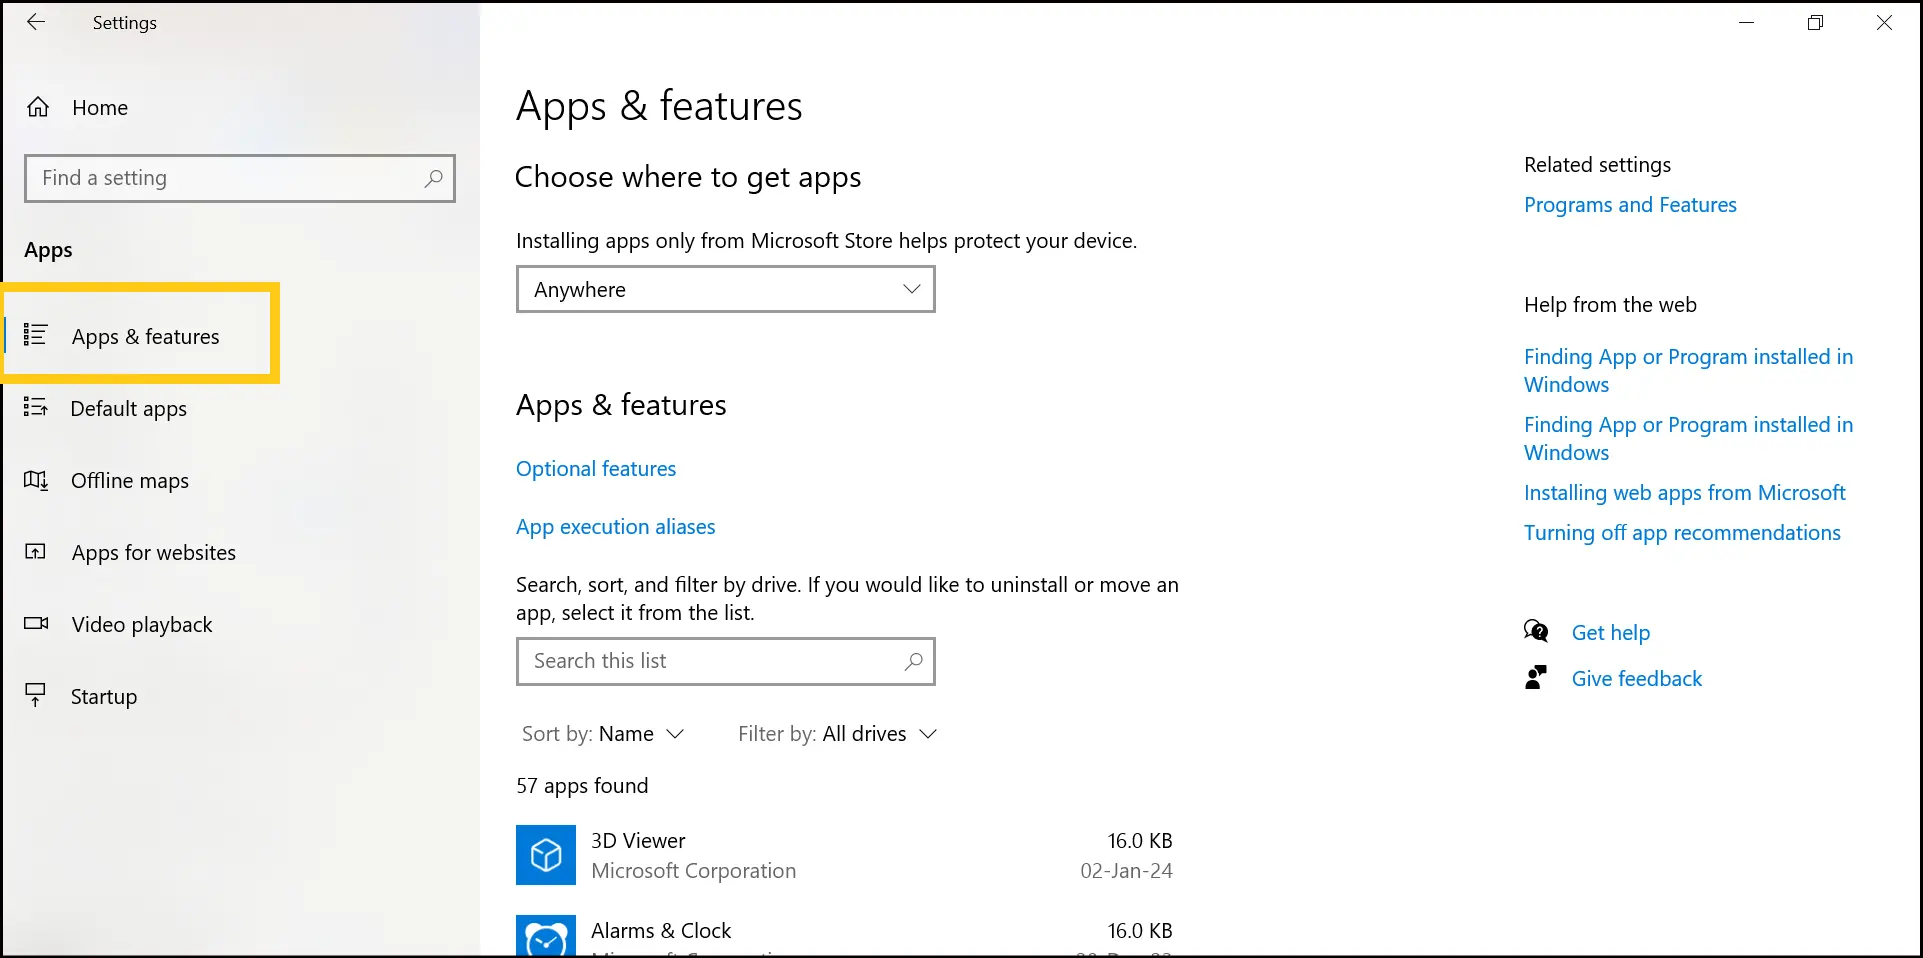
Step 2: There, you will see your files sorted by Name. Click on the drop-down arrow and select Size to sort the largest first. You will instantly know what apps are consuming your C drive.
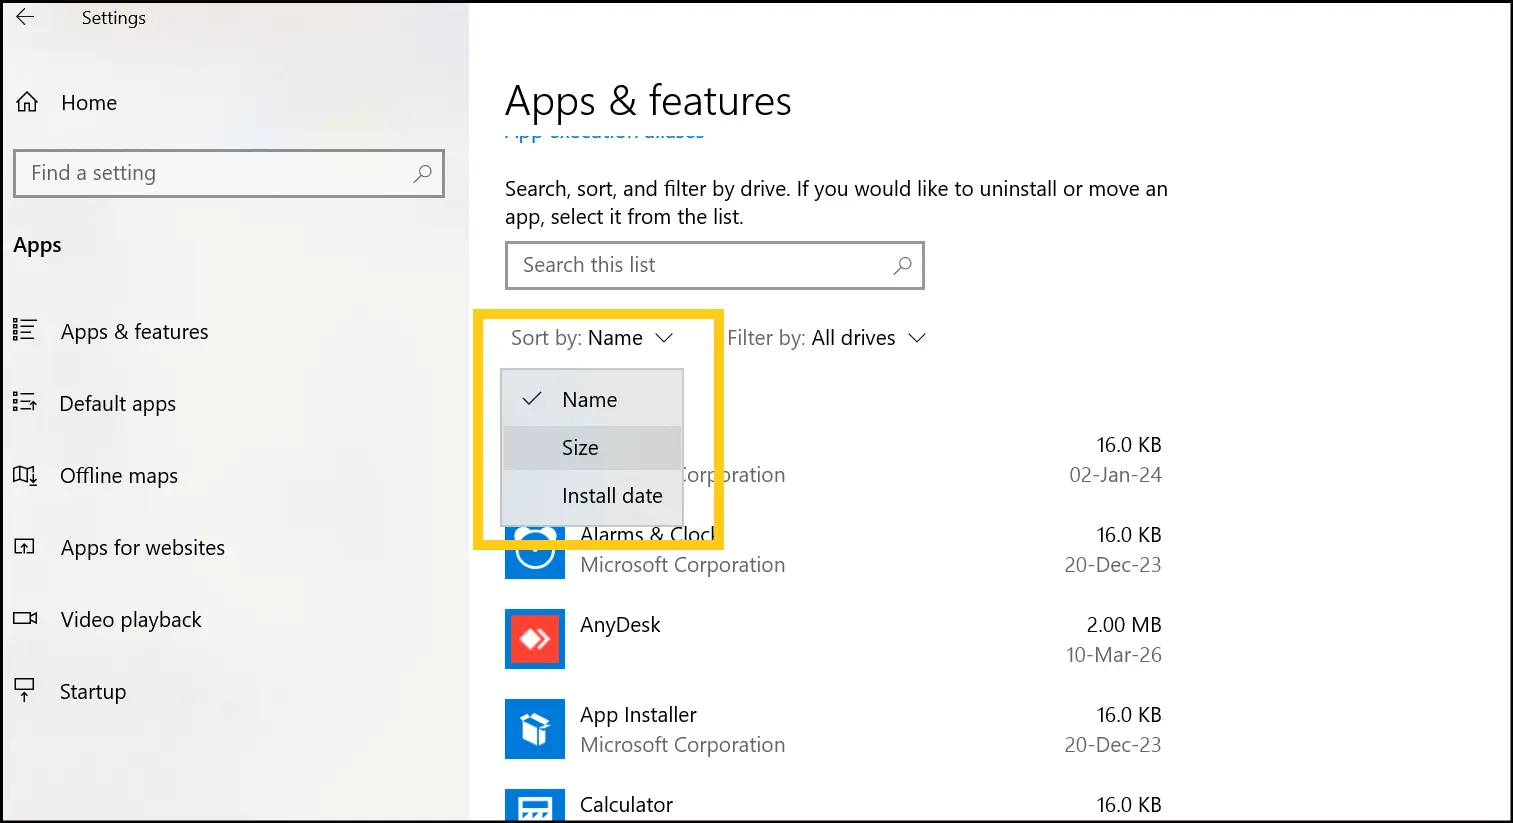
Step 3: Uninstall the apps that you do not use and are taking up space.
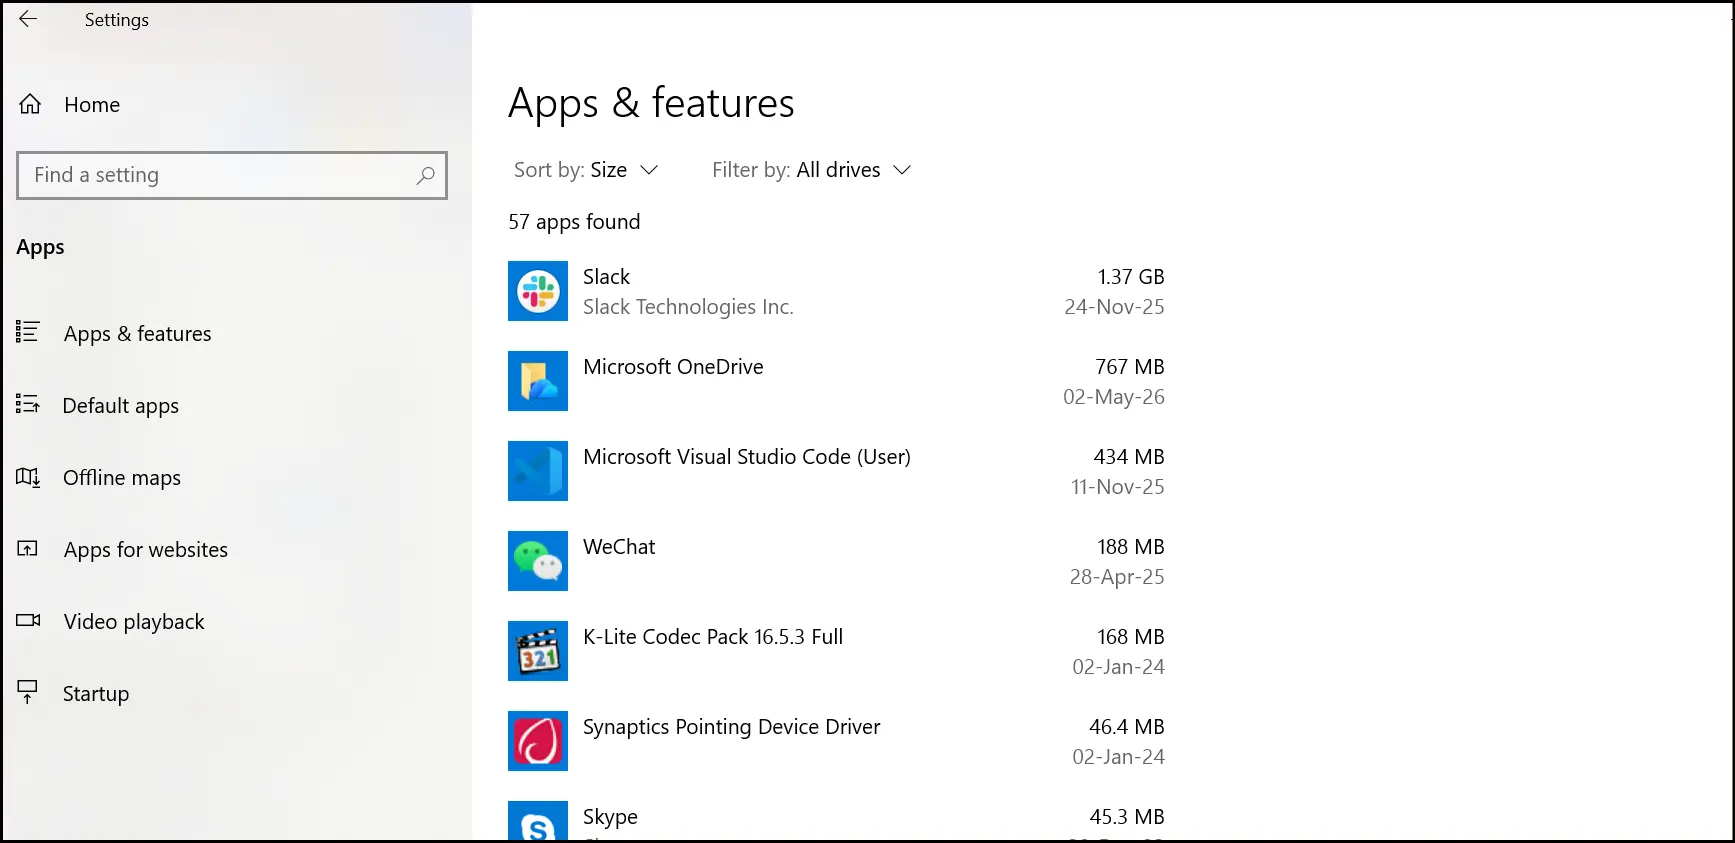
If you want to save time and energy, refer to the WMaser Cleanup uninstall applications feature page to avoid the hassle of doing it manually.
Way 4. Clean Temp Files Manually
Windows generates temporary files continuously, and they accumulate quickly. But is it safe to delete temp files ? Yes, consider it to be a digital spa day for your PC-clearing out all the clutter so that your PC can run a little smoother and faster.
This procedure is a manual fast method of clearing them directly.
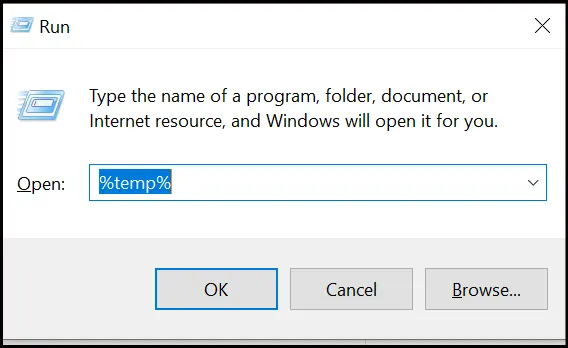
Step 1: Click Win + R, type in %temp%, and press OK. This directly opens the user's temp folder.
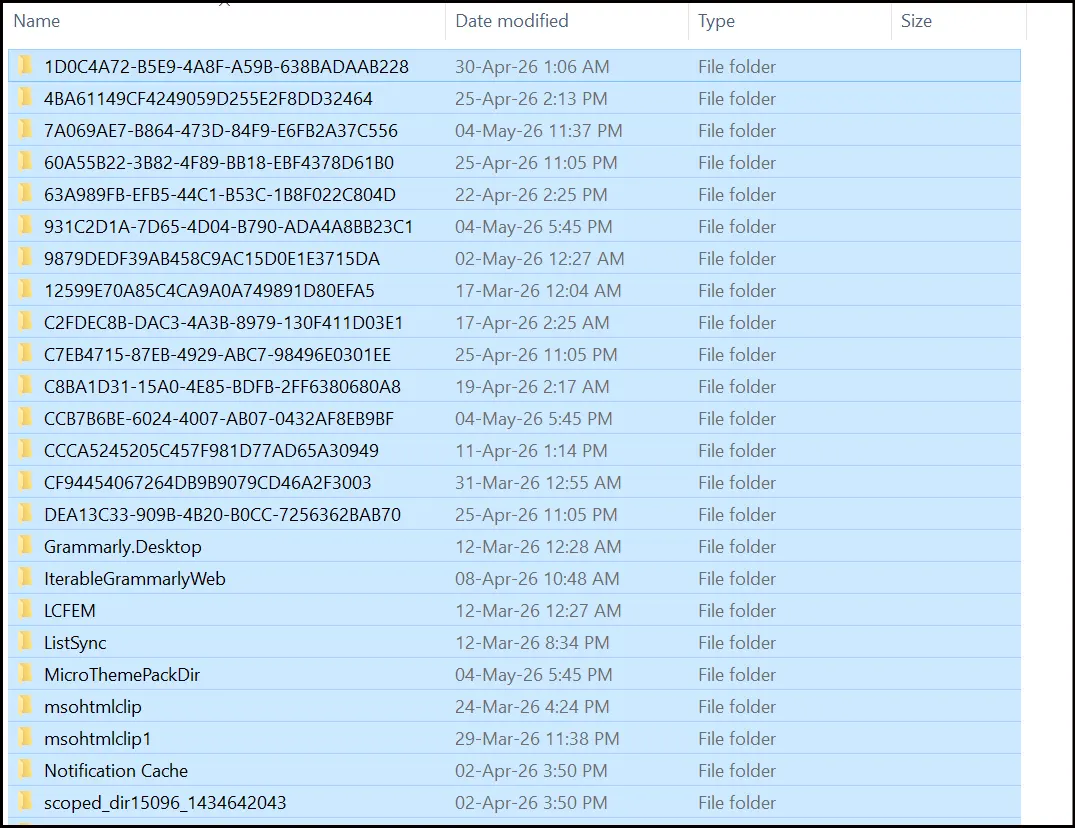
Step 2: Select all the files by pressing Ctrl + A, and then hit delete. Windows will not open any file that is already in use; just click Skip when asked.
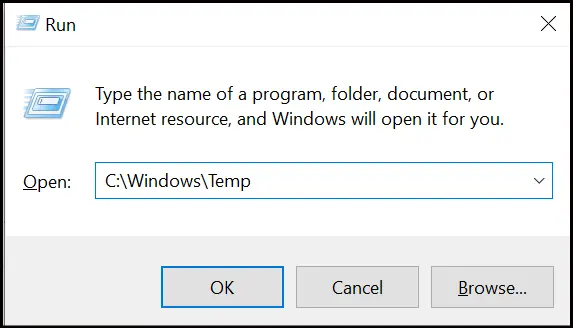
Step 3: Again, press Win + R, type C:\Windows\Temp, and this will take you to the system temp folder.
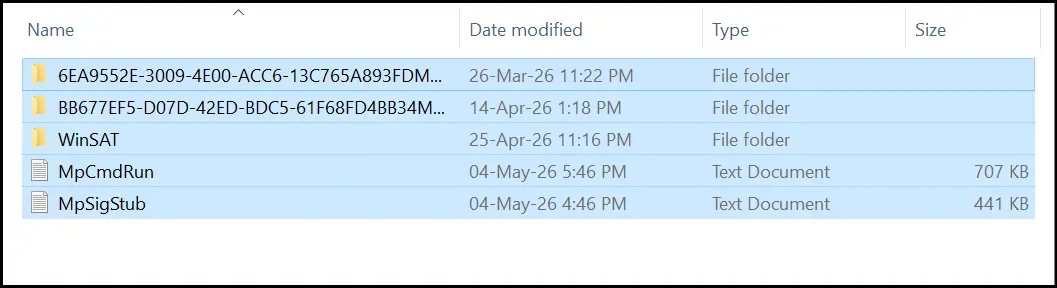
Step 4: Now repeat the same process, i.e., press Ctrl + A to select all the files and folders displayed in the system temp folder and delete them.
Way 5. Clear Recycle Bin
This one is always forgotten by people. I have observed recycle bins with 8-10 GB of deleted files that are just sitting there, taking up real space. Here is, how to free up space on drive C by emptying the Recycle Bin:
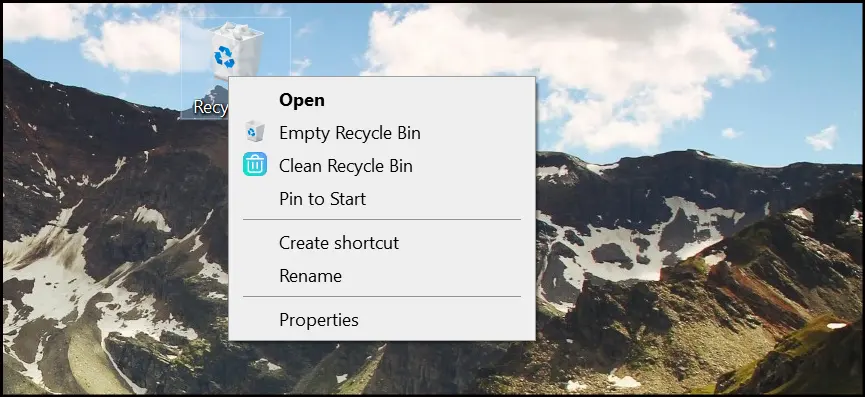
Step 1: Right-click the Recycle Bin folder to open the dropdown menu and selet Empty Recycle Bin.
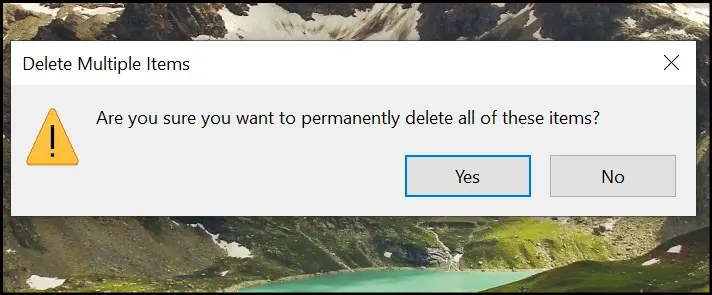
Step 2: Click Yes to confirm when it asks you before deleting multiple items at once. That is all! It will literally take you less than ten seconds.
💡Tips:Open the Recycle Bin before emptying it and sort it by size. Before permanently nuking everything, you may wish to fish out an important file before deleting it.
Way 6. Copy Files to an External Drive or Cloud Storage
In case you have a big photo collection, old videos, or project archives that you rarely access, then shifting them to an external drive or cloud storage is one of the quickest methods of freeing up space on the C drive without permanently deleting anything.
Step 1: Plug in an external hard drive or open your cloud storage account (OneDrive, Google Drive, Dropbox). Open File Explorer and go to your big files, typically in Documents, Downloads, Pictures, or Videos. Sort by size to locate the largest ones.
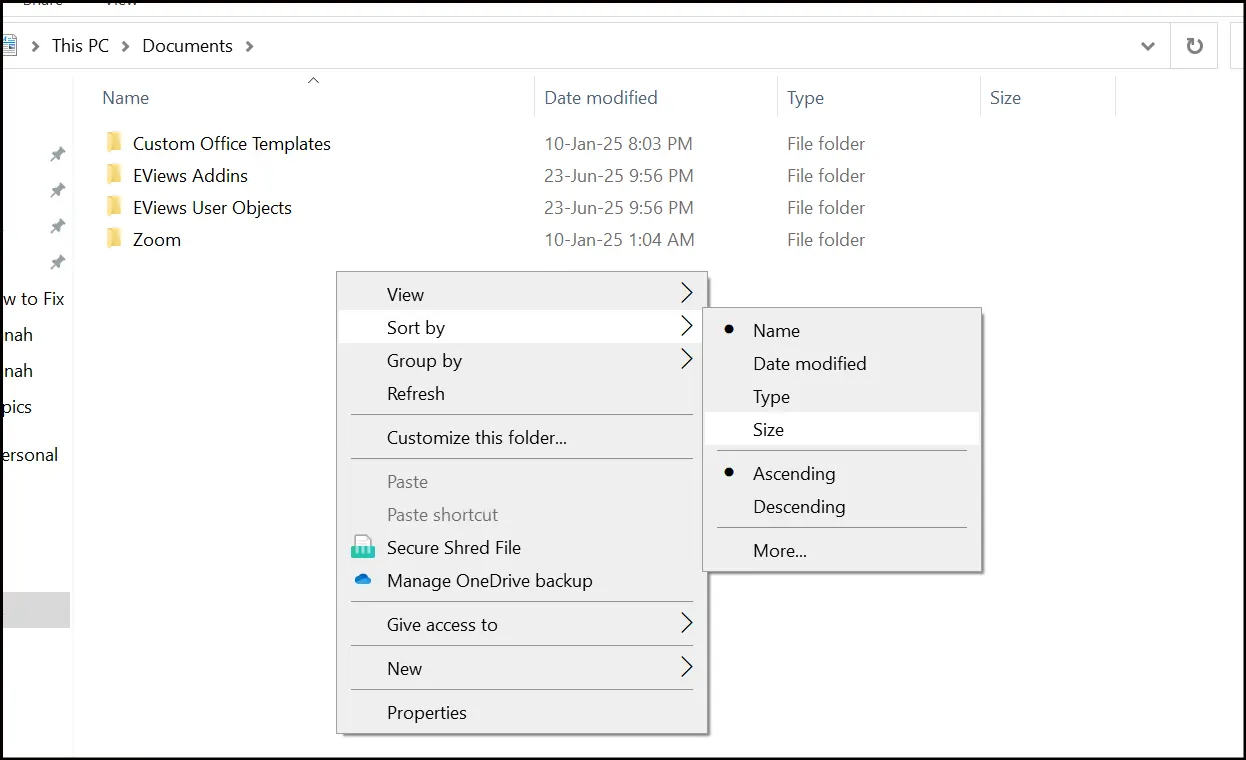
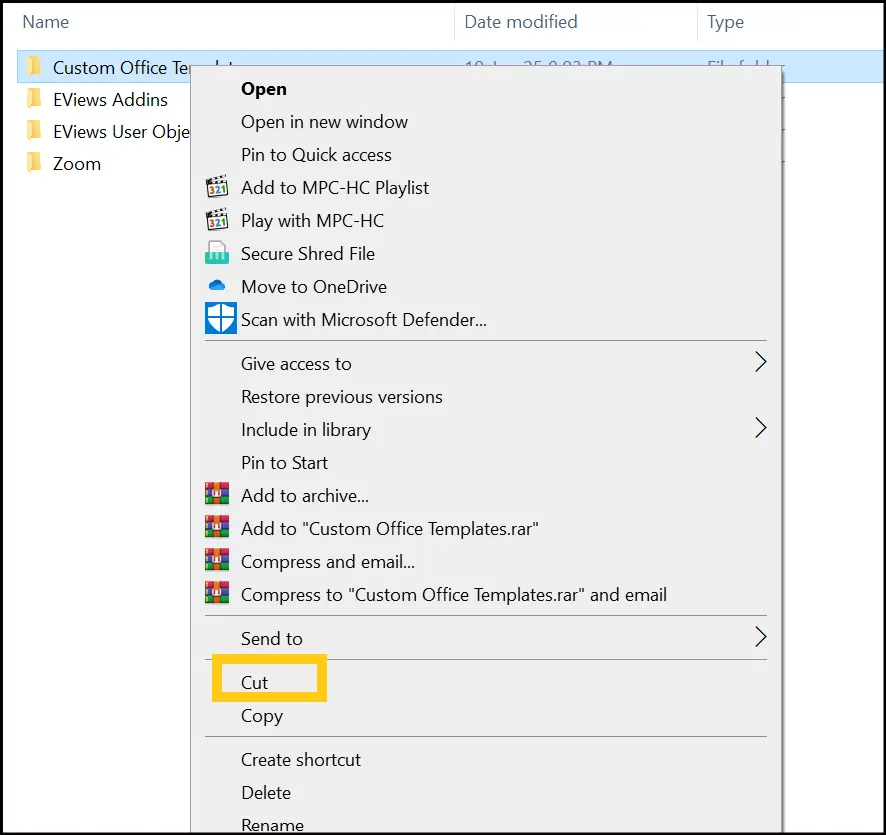
Step 2: Click on the files that you wish to move and right-click to select Cut. You can also Cut complete folders if you want to. Go to your external drive or cloud drive and paste.
💡Tips:Check and verify before erasing originals that they have been transferred correctly.
Way 7. Disable Hibernation (Windows 10 & 11)
The hibernation file (hiberfil.sys) may be 48 GB or so based on your RAM. When you never use hibernation (most desktop users do not), turning it off will delete the file and reclaim that space.
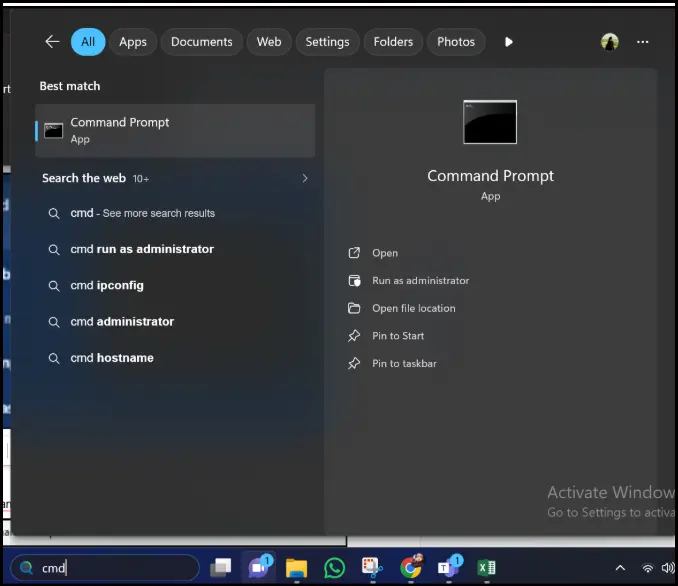
Step 1: Click Win, type cmd, tap on Command Prompt, and choose Run as administrator.
Step 2: Enter the command: powercfg /hibernate off and press Enter:
Step 3: Reboot your PC. The hiberfil.sys file is no longer there, and the space is once again on your C drive.
💡Tips:If you're using Hibernate, skip this step. Or, use this instruction when you shut down or use sleep mode.
Way 8. Control System Restore Points
Depending on its settings, System Restore can silently consume gigabytes of C drive space. You do not have to turn it off completely; you just need to reduce the space it occupies.
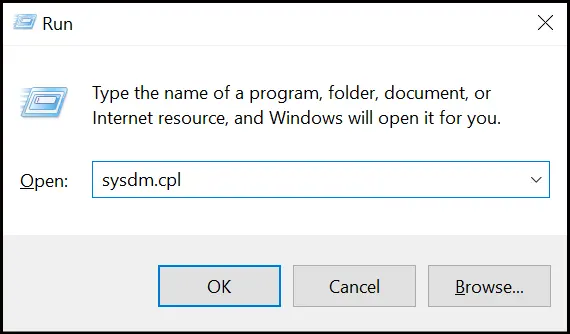
Step 1: Click Win + R, enter sysdm.cpl, and press OK.
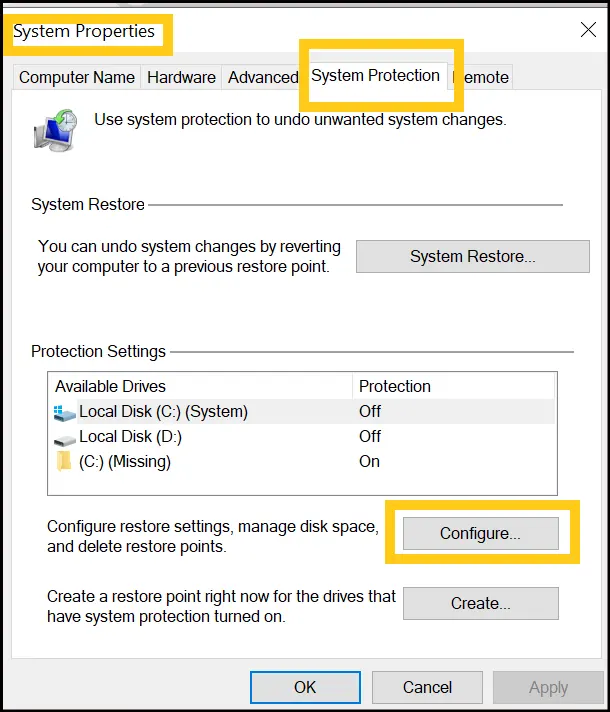
Step 2: Click on the System Protection tab. Now, hit on Configure and select your C drive.
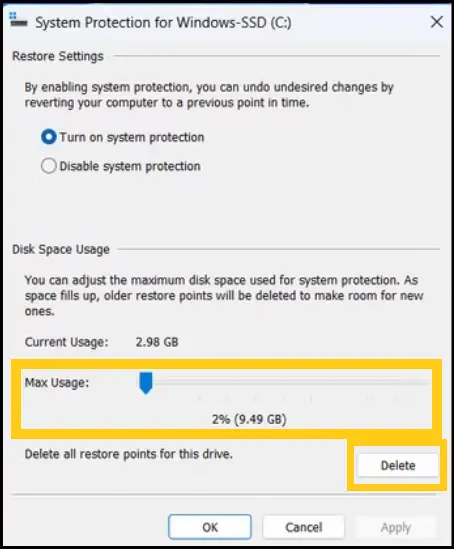
Step 3: You will find a slider indicating the amount of disk space to be used in restoring points. Drag it down to approximately 2%-5%. Next, click Delete to delete any restore points that are already in place and reclaim that space instantly.
Way 9. Compress Files and Folders on C Drive (Windows 10 & 11)
Windows NTFS compression is something you can use if you want to compress your files while keeping them in place and not deleting them. So NTFS compression is not something you go for primarily if you want to solve your problem, but it is a good trick to use when you have a folder with very large documents or archives that you do not use very often.
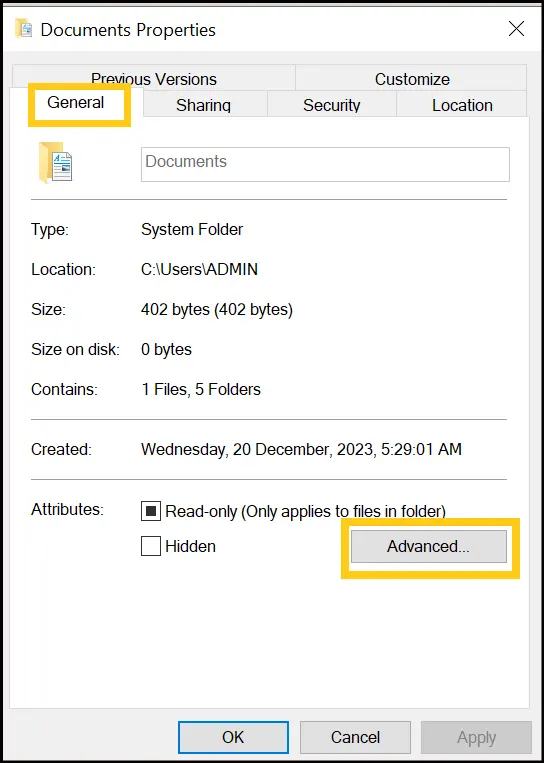
Step 1: Go to the folder you wish to compress, right-click on it, and select "Properties".
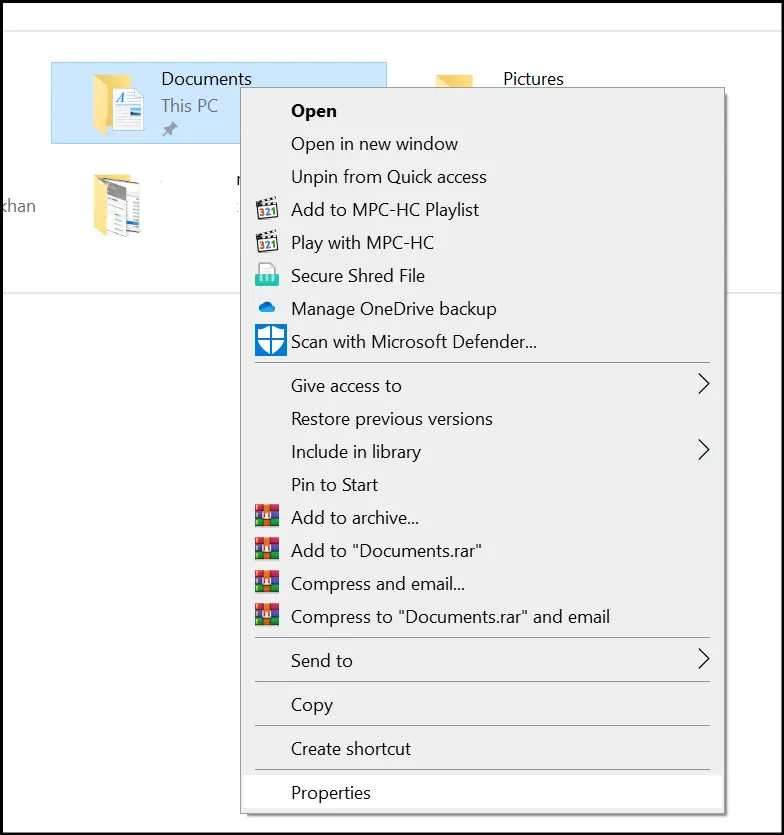
Step 2: In the General tab in Document Properties, click the Advanced button available in the Attributes section.
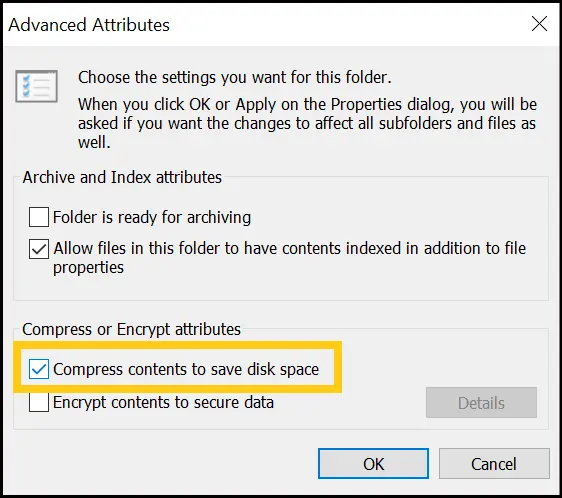
Step 3: The Advanced Attributes dialog will open in front of you. Then check the "Compress contents to save disk space" option and hit the "OK" button.
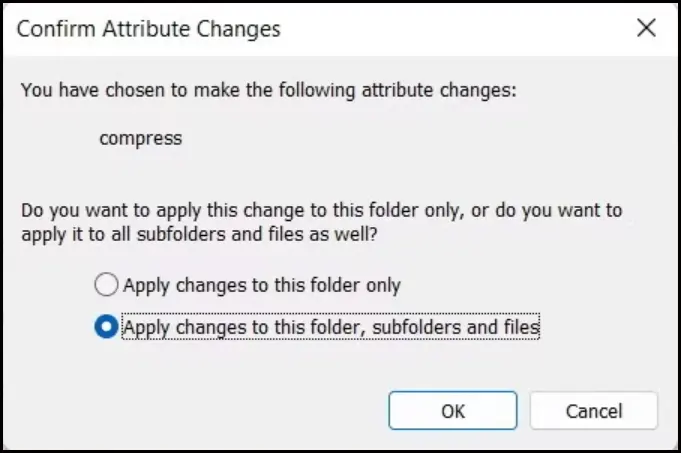
Step 4: You will be asked whether to apply changes to this folder only or apply changes to this folder, subfolders, and files. If you are dealing with large document archives, select the second option.
💡Tips:Do not compress your Windows or Program Files folder. System file compression can have a very negative impact on your computer's performance.
To quickly compress your large files and extract them with one click, download our AI-powered tool, WMaster Zipking. It is secure and ad-free Windows software that saves time and disk space.
Part 5: FAQs-How to Free Up Disk Space on C Drive in Windows 11/10
1. Why is my C drive full when I have not downloaded anything?
Windows itself may be slowly filling up your C drive with saved update files, system restore points, hibernation files, and temporary data from background processes. I noticed that the C drive grows by 5 to 8 GB in one month, only due to the Windows updates, without downloading any files to put in.
Try WMaster Cleanup to free up space on your C drive, optimize your system, and boost Windows PC performance.
2.Will I have to face any issues if I delete everything in C:\Windows\Temp?
Definitely, you can delete the files inside, but not the actual folder. Windows will create temp files again as and when required. You must close all applications before deleting them so as to avoid skipping files that are in use. The user's AppData temp folder is separate from the Windows\Temp folder, and clearing them both is safe.
3. What are other ways of getting more space on the C drive besides file deletion?
Some of the methods are moving files to an external drive or cloud storage, enabling the NTFS compression feature in large folders, reducing System Restore space, and turning off hibernation if not used. These methods are not really deleting files; they are just moving or compressing files to reclaim storage space
4. Why is my C drive filling up so fast after I clean it?
In most cases, it's the Windows Update that caches update files, or the browser cache that gets rebuilt. Using WMaster Cleanup's Disk Space Analyzer, you can identify which files or folders are consuming the most space, and then disable or limit their usage.
5. How much free space should I keep on the C drive?
Always keep at least 10%-15% of the total capacity free. For a 256 GB drive, this corresponds to around 25-38 GB of free space. Going below 10% will cause a significant performance degradation of Windows. At less than 5%, things start to go wrong, updates can't be installed, apps crash, and the system slows to a crawl.
Final Words
Having a full C drive is a problem that really creeps up on you; today everything works fine, and tomorrow your PC is running like a snail. Luckily, most of the stuff taking up space is the junk files that Windows and different apps leave behind, and it is easy to get rid of them once you are aware of the right spots to target.
But, how to free up space on c drive windows 11/10 specifically? If I were to pick a single approach out of this entire guide, it would be the Clean C Drive feature of WMaster Cleanup. It detects what most of the manual methods fail to find; it is equally effective on Windows 10 and Windows 11, and it takes only half a minute.
Use it first, then if you wish, carry on with anything specific to your system manually via the methods above.