.jpg)
If you are dealing with the Windows 11 version 25h2 install error 0x800f0991 that is constantly showing up lately, I understand how frustrating it can be. Each time the same cycle repeats: you go to install an update, it runs for a few seconds, and then this error shows up without any explanation.
I have also experienced this issue lately, just like many other Windows 11 users, and I have finally figured out how to fix the install error 0x800f0991. Let me show you how.
In this article
- What is Windows 11 Version 25h2 Install Error 0x800f0991
- What Caused Install Error - 0x800f0991
- Why Can't I Install Windows 11 25H2?
- How to Fix Install Error - 0x800f0991 in Windows 11 [5 Proven Ways]
- Helpful Tips to Avoid Windows 11 Version 25h2 Install Error 0x800f0991
- FAQs Related to Windows 11 Version 25h2 Install Error 0x800f0991
Part 1: What is Windows 11 Version 25h2 Install Error 0x800f0991
The install error - 0x800f0991 is a Windows update failure code, and it pops up on your computer when the system fails to complete the installation of a feature upgrade, cumulative update, or system component. You might have noticed that it mostly gets triggered during major version updates, including Windows 11 25H2, and other times it occurs during specific KB patch installations.
When you hit this error, it means Windows attempted the installation, failed halfway through the process, and rolled back to the previous state. This is when you see a message saying the update could not be installed, followed by the error code 0x800f0991. Keep in mind that it does not damage your system in any way, but it leaves you stuck on an outdated system.
Part 2: What Caused Install Error - 0x800f0991
The install error - 0x800f0991 is mainly caused by broken update services, missing system components, conflicts blocking the installation from completing, etc. Here's a list of all the possible causes:
- Corrupted System Files:
Damaged core files completely block the installation pipeline
- Broken Windows Update Components:
Corrupted and incomplete update modules prevent processes from running smoothly
- Missing Media Feature Pack:
This is common on Windows N editions that ship without multimedia components, on which these updates depend on
- Third-Party Software Conflicts:
Incompatible drivers and antivirus tools often interfere with update execution
- Disabled Windows Installer Service:
Updates cannot be installed if this service is not running
- Outdated Windows Build:
Some updates fail on older builds because they are designed for newer ones
- Registry Misconfigurations:
Incorrect registry entries stop required update components from loading
- Pending Incomplete Updates:
New updates get blocked because of previously failed updates quite often
- Unstable Internet Connection:
If the connection drops mid-download, it will corrupt the update package
Part 3: Why Can't I Install Windows 11 25H2?
If you're repeatedly running into the 0x800f0991 error while trying to install Windows 11 25H2, the problem could be more significant than a simple update glitch. Windows 11 25H2 needs a media feature pack, and if your PC is running a Windows N edition, it won't have this feature pack by default. So regardless of what else you try, the installation will always fail in this scenario.
Another important thing to note is that 25H2 is a major feature update; it is not just a patch. So it needs:
- More disk space.
- Cleaner update components.
- More system integrity than any other monthly update.
Leftover files from previous unsuccessful upgrades, a nearly full drive, and even a single corrupted system file are enough to block this update. It is also important that your hardware properly meets Windows 11 requirements, especially around TMP 2.0 or secure boot. Because, the fixes I am going to talk about next might not work if your hardware is incompatible, so it is advised to address this issue first.
Part 4: How to Fix Install error - 0x800f0991 in Windows 11 [5 Proven Ways]
Method 1: Run Windows Update Troubleshooter
The quickest first step. Windows includes a handy utility designed to identify and resolve typical update problems. I find it's always best to begin troubleshooting with this.
You can follow these simple steps to resolve the issue:
Step 1: Hit Win + I to bring up Settings. Then, head to System "Troubleshoot" Other troubleshooters.
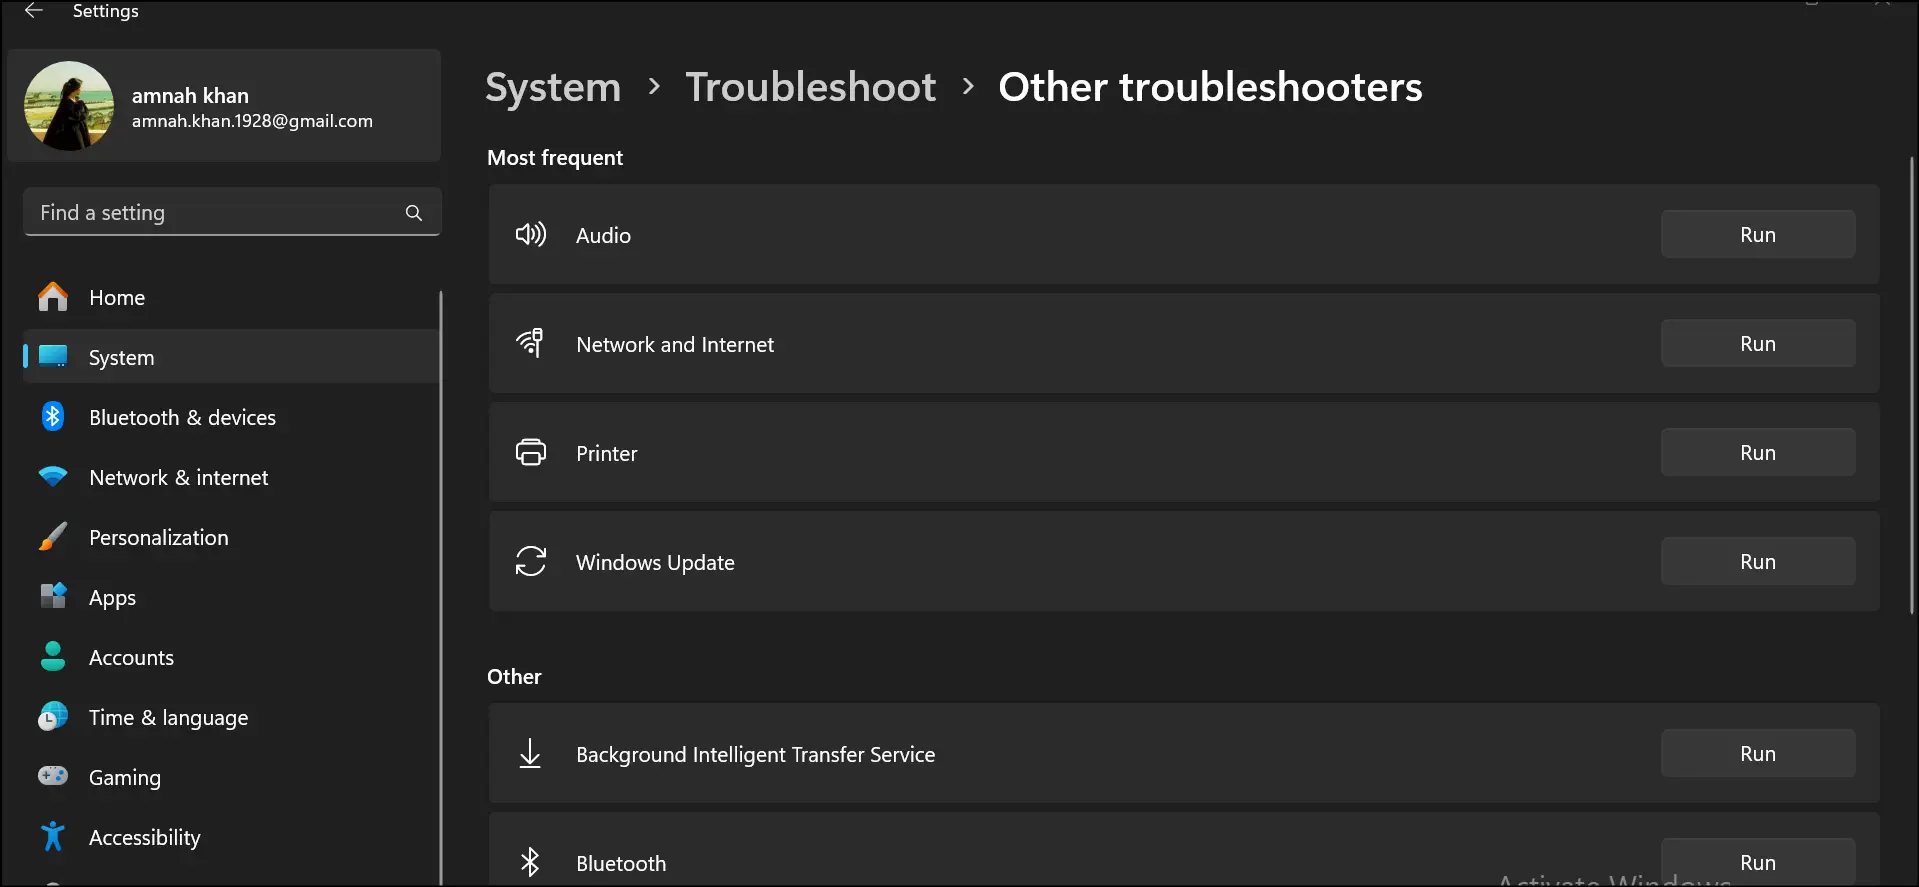
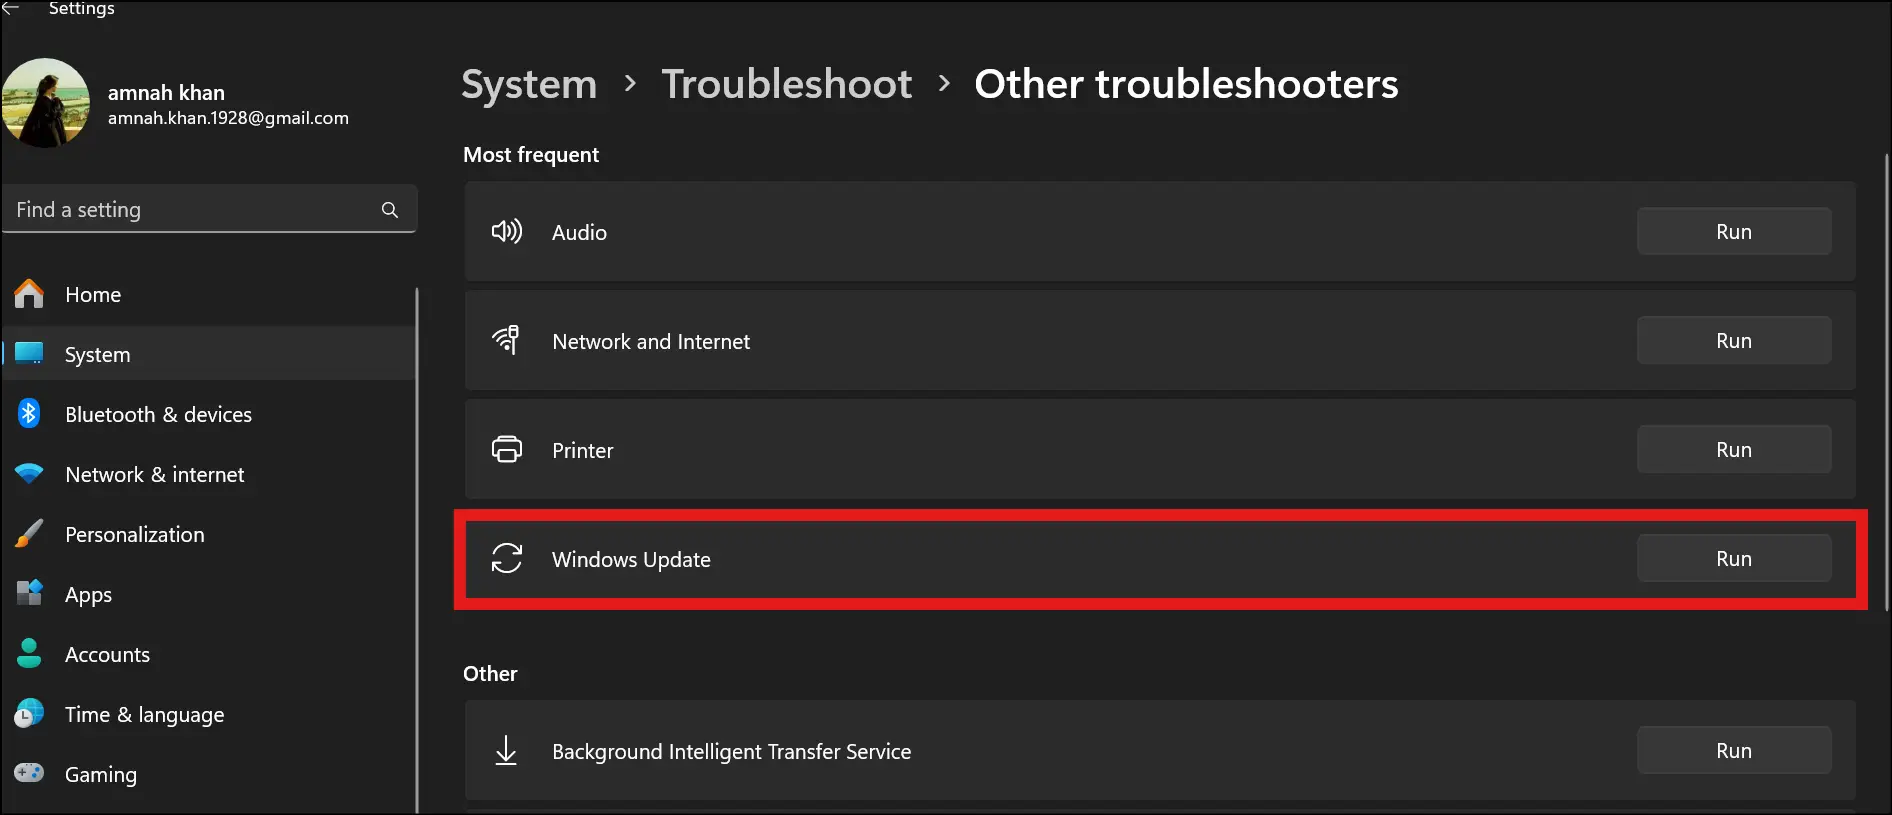
Step 2: Locate Windows Update in the list and click "Run" so that you can initiate the process of detecting issues.
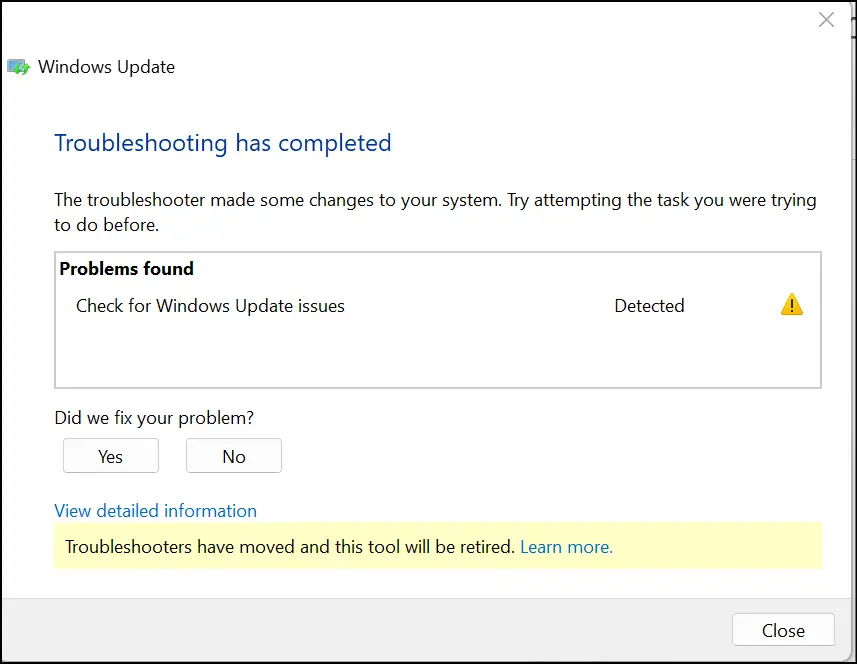
Step 3: Let it scan and apply fixes automatically. Once done, restart your Windows 11 PC and retry the update.
Method 2: Install the Update Manually via Microsoft Update Catalog
If the troubleshooter doesn't help, download the update package directly from Microsoft and bypass the automatic process entirely. Below are the steps for how I do it:
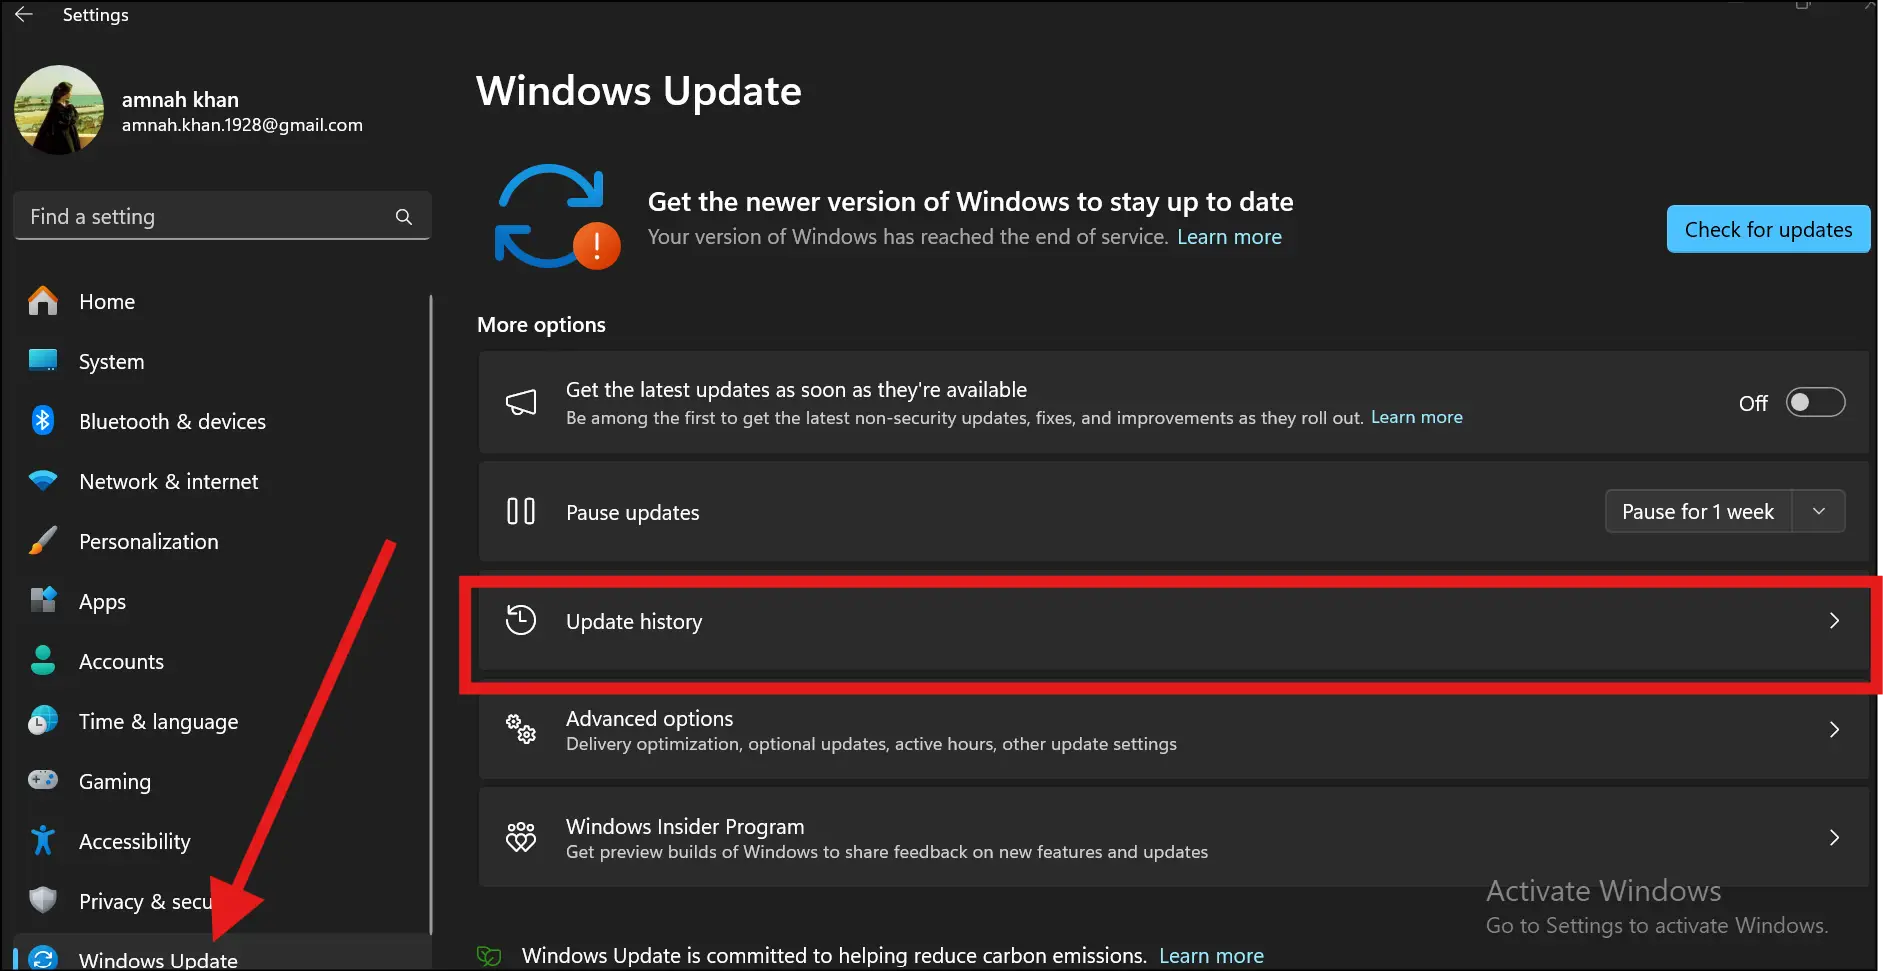
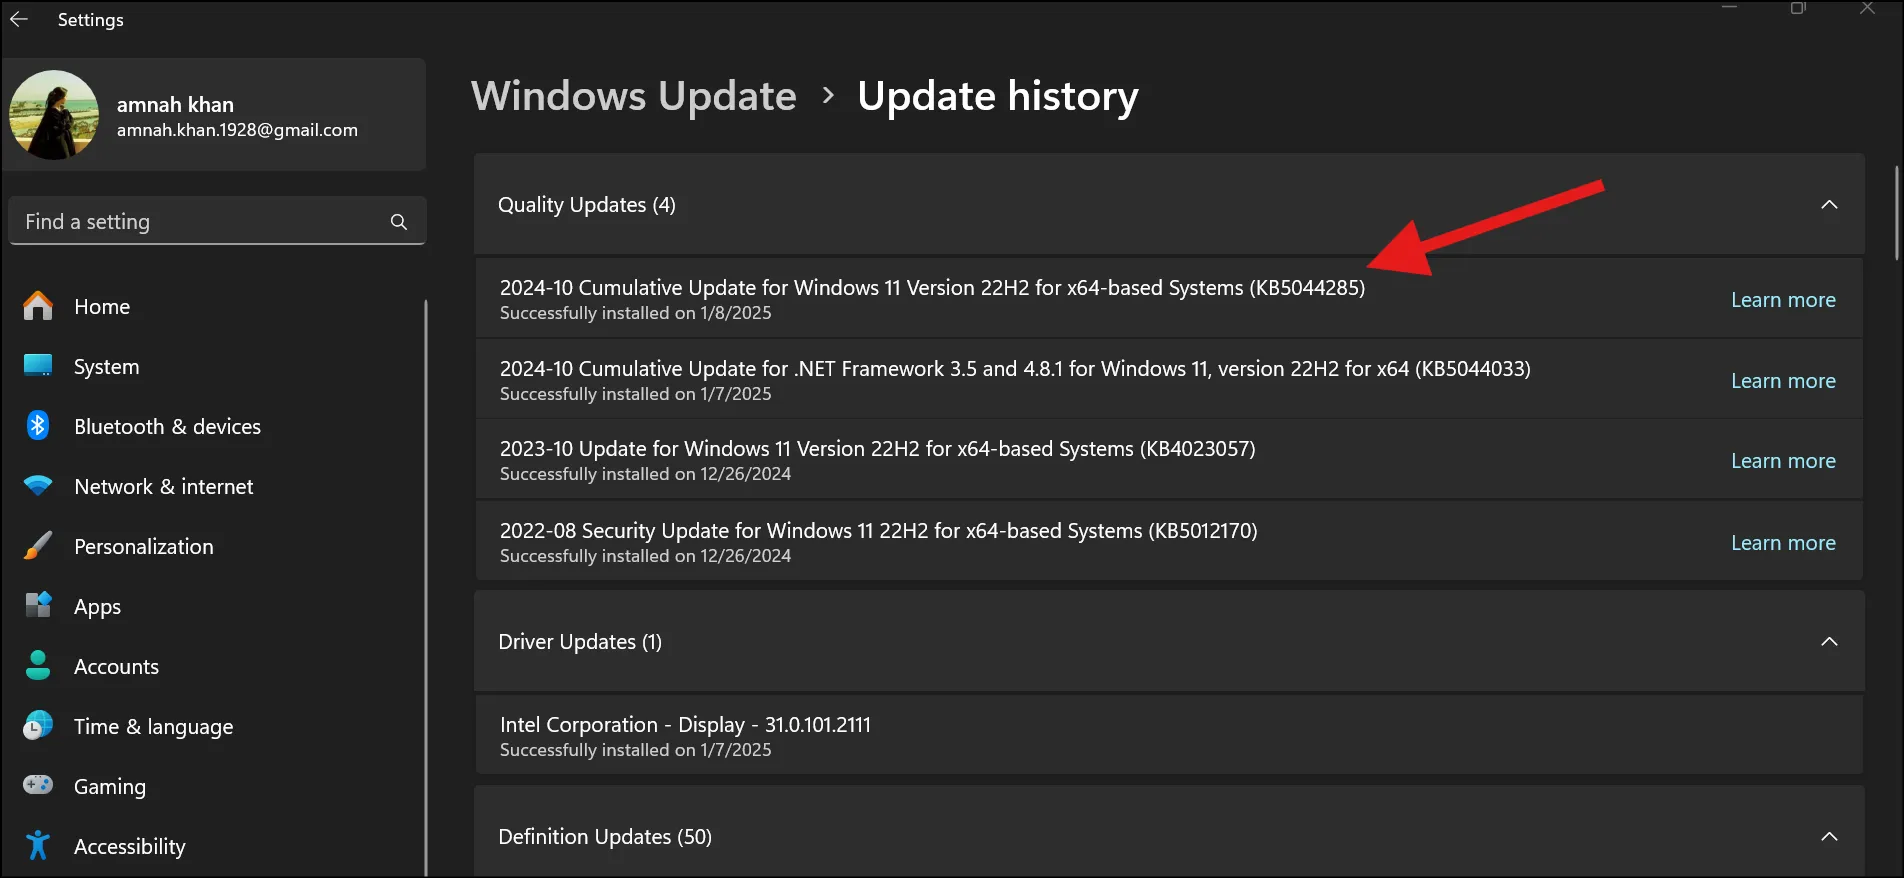
Step 1: First, go to Settings "Windows Update" Update History, and note the KB number of your failed update.
💡Tips:The below images are for reference only, because in my Windows 11 Pro, all the installations are already successful and do not need to be downloaded again.
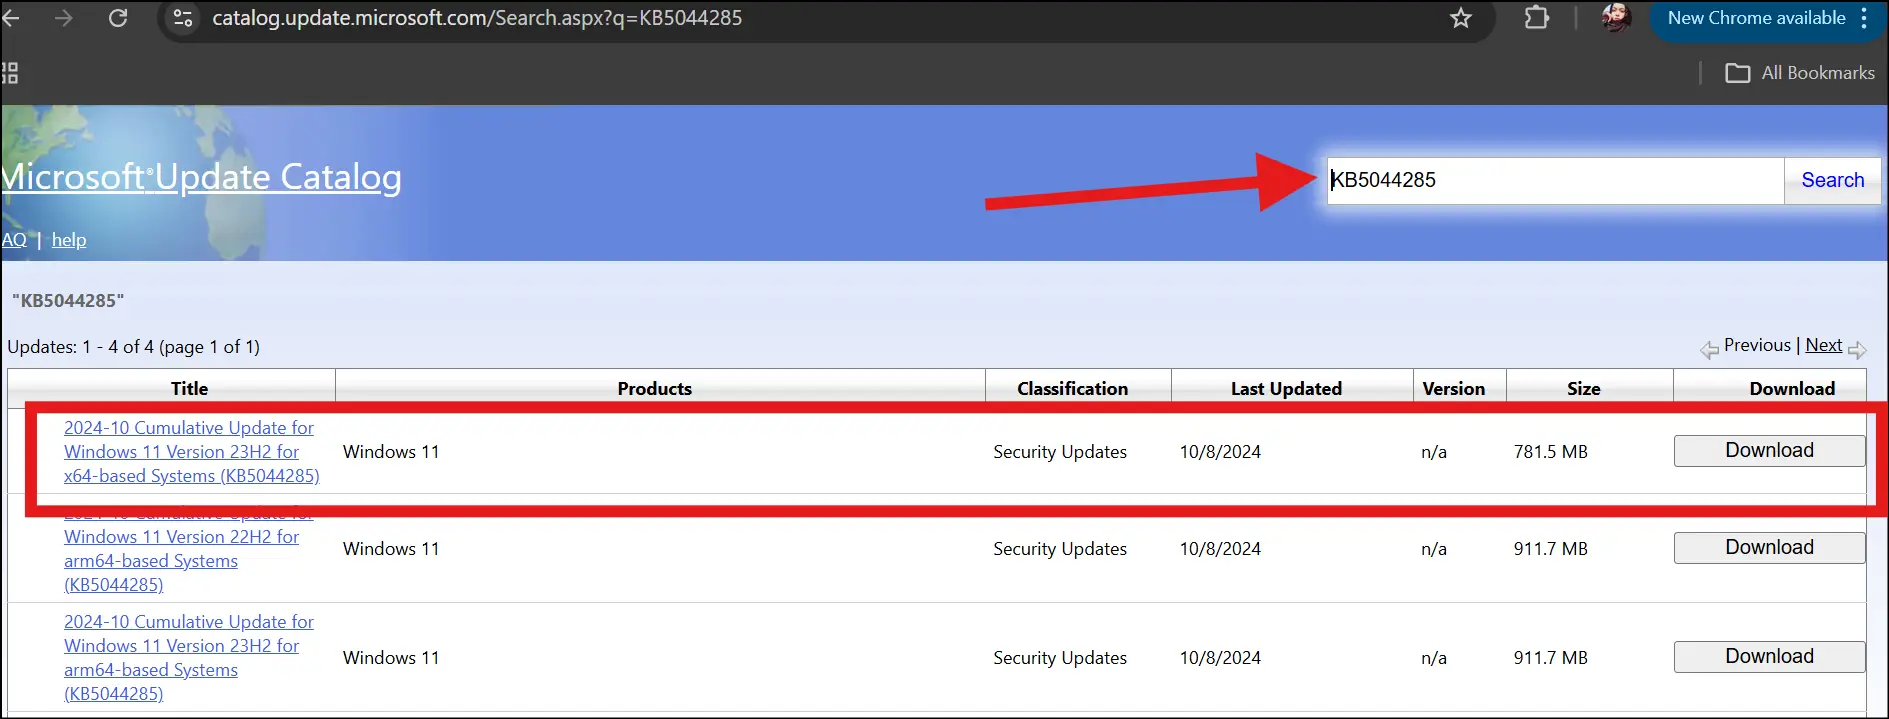
Step 2: Visit https://www.catalog.update.microsoft.com and search for the KB number. Now download the correct version for your system (x64 for most PCs), run the file, and follow the installation prompts.
Step 3: Restart your PC once installation completes and retry to install the major update again.
Method 3: Run SFC and DISM Commands
Corrupted system files are a top cause of the install error - 0x800f0991. Running SFC followed by DISM repairs them at the system level. Follow the below steps to run SFC and DISM commands:
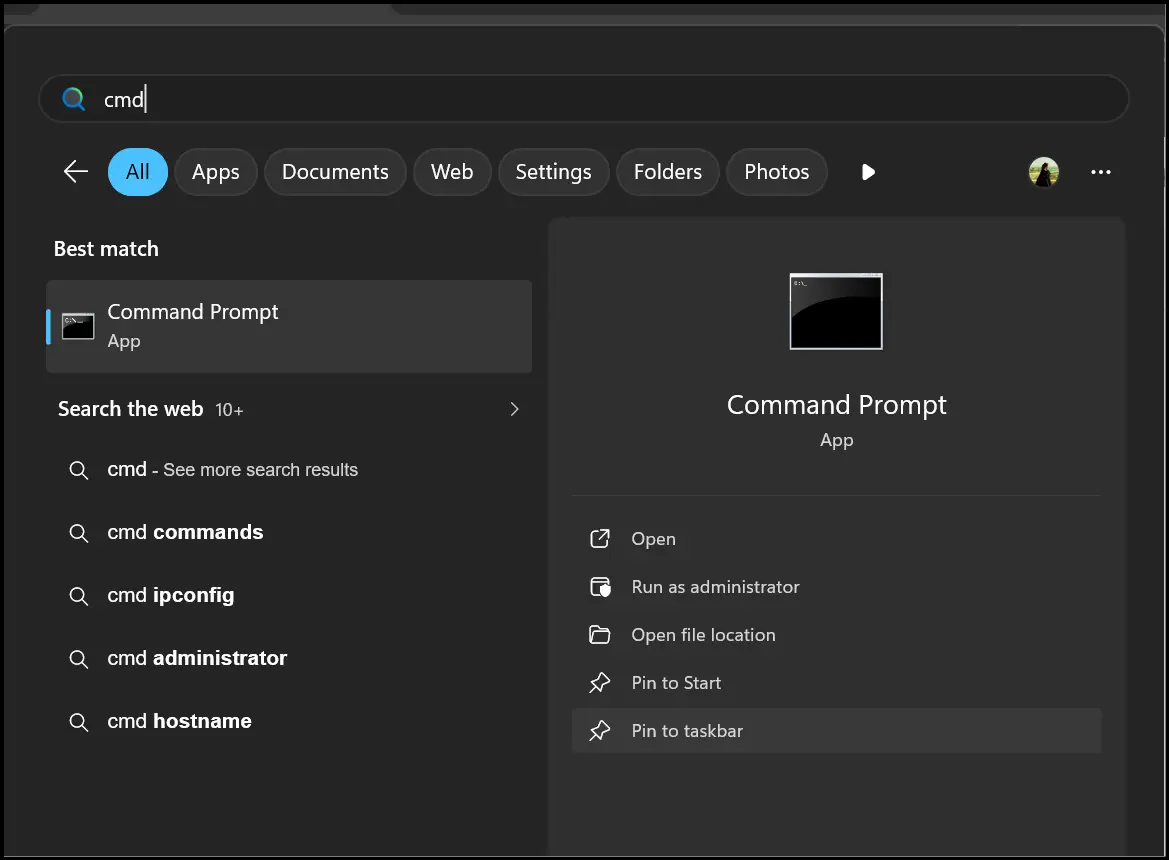
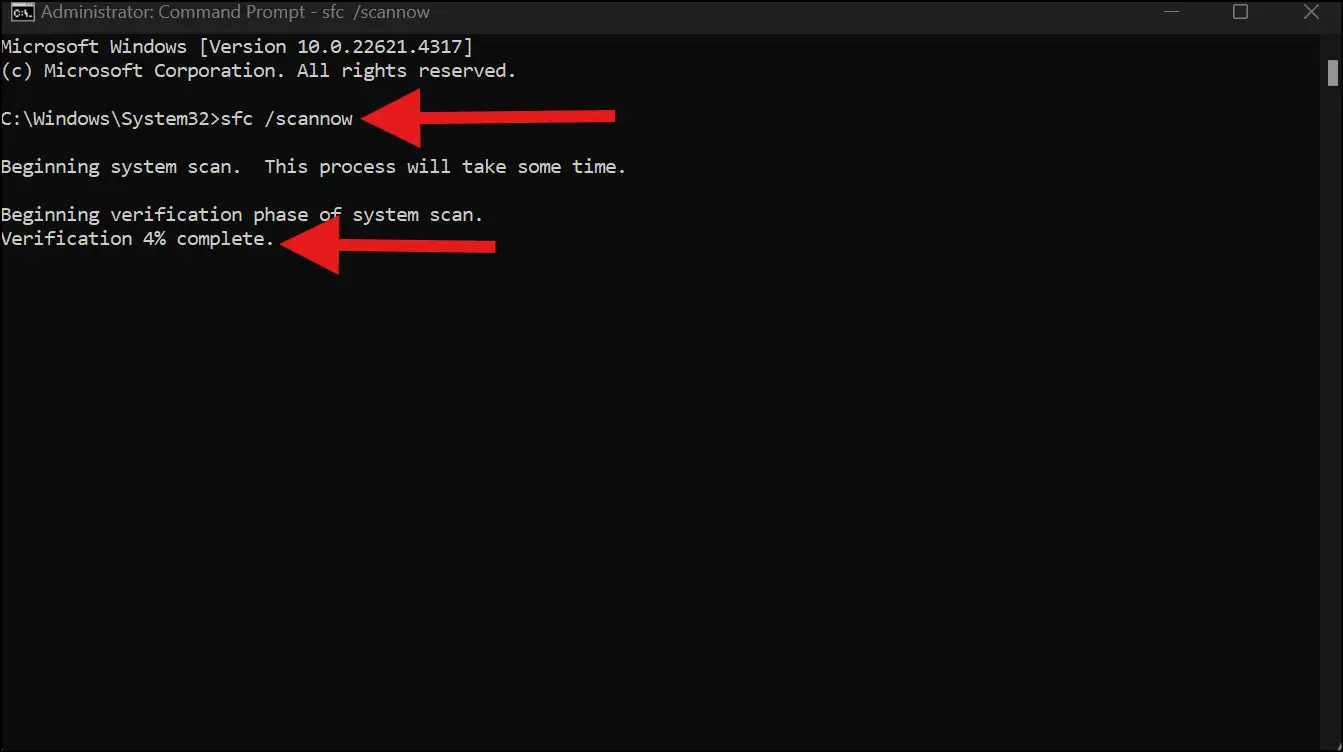
Step 1: Press Win, type cmd, right-click Command Prompt, and select Run as administrator.
Step 2: Type sfc /scannow and press Enter. Wait for the scan to complete fully.
Step 3: Once SFC completes, run these DISM commands one by one:
- DISM /Online /Cleanup-Image /CheckHealth (Checks for the image corruption or damage)
- DISM /Online /Cleanup-Image /ScanHealth (Deep scan for image corruption or issues)
- DISM /Online /Cleanup-Image /RestoreHealth (Repairs image corruption)
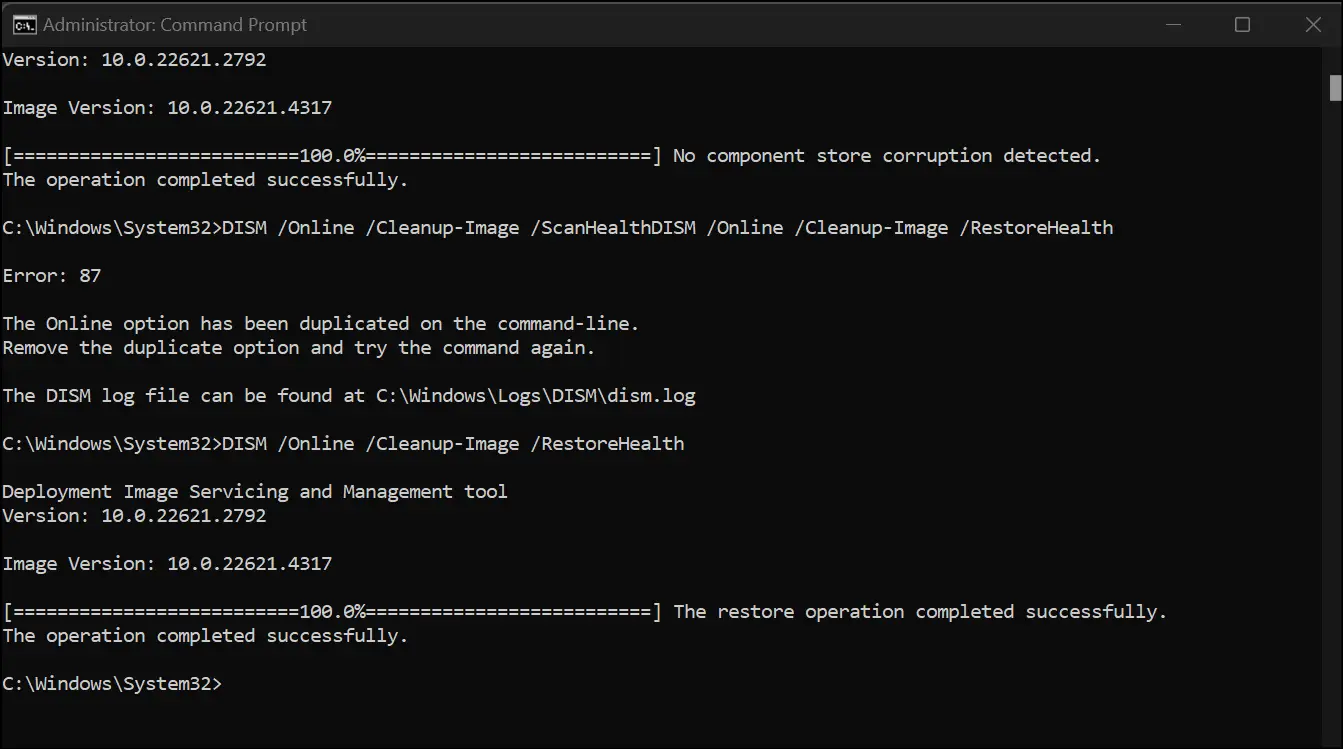
Step 4: Restart your PC and try the update again.
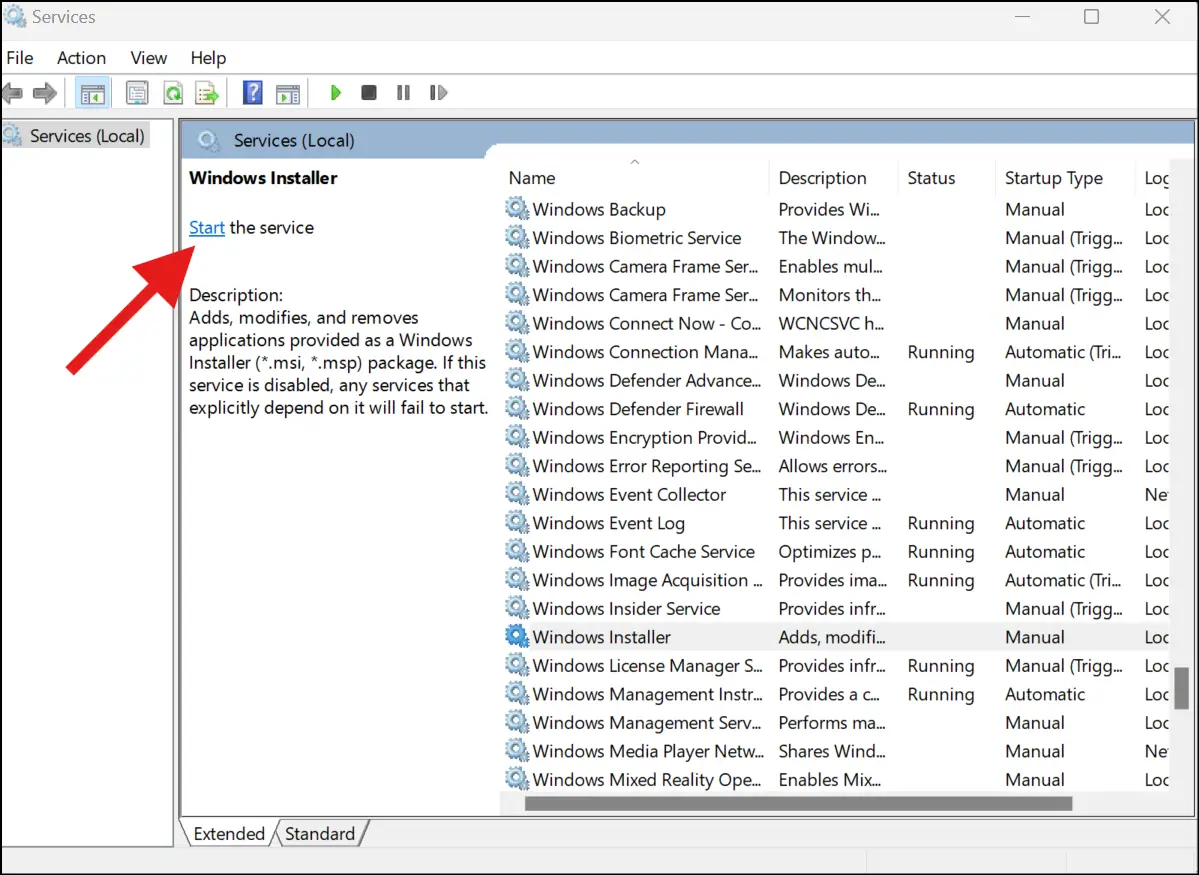
Method 4. Restart Windows Installer and Related Services
A stopped or malfunctioning Windows Installer service will block every update attempt. Restarting it takes two minutes and often resolves the install error - 0x800f0991 instantly.
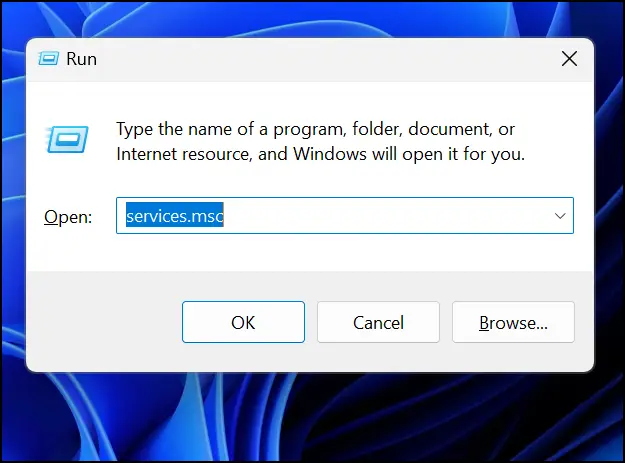
Step 1: Press Win + R, type services.msc, and press Enter.
Step 2: Scroll down and locate Windows Installer. Right-click it and select Restart (or Start if it's stopped).
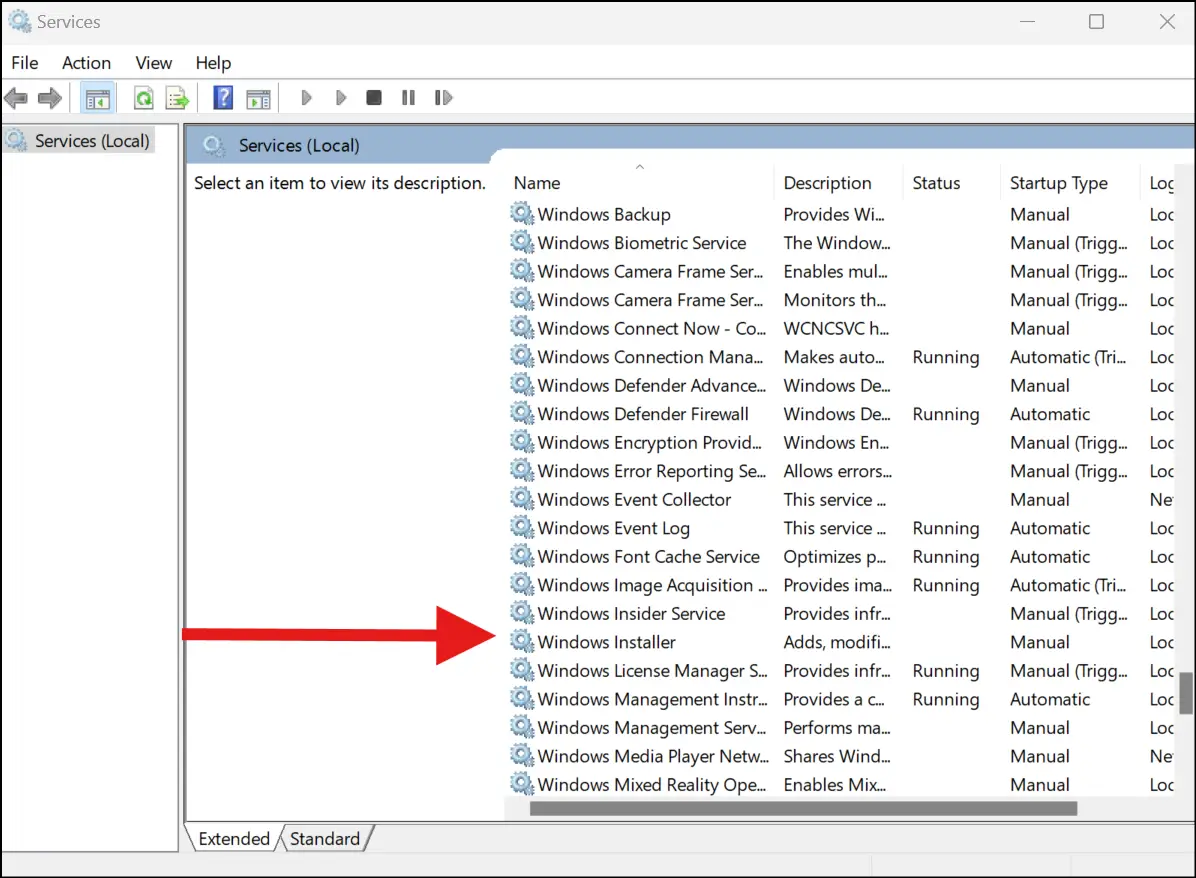
Step 3: While you are here, also ensure that Windows Update and Background Intelligent Transfer Service (BITS) are both running and set to Automatic.
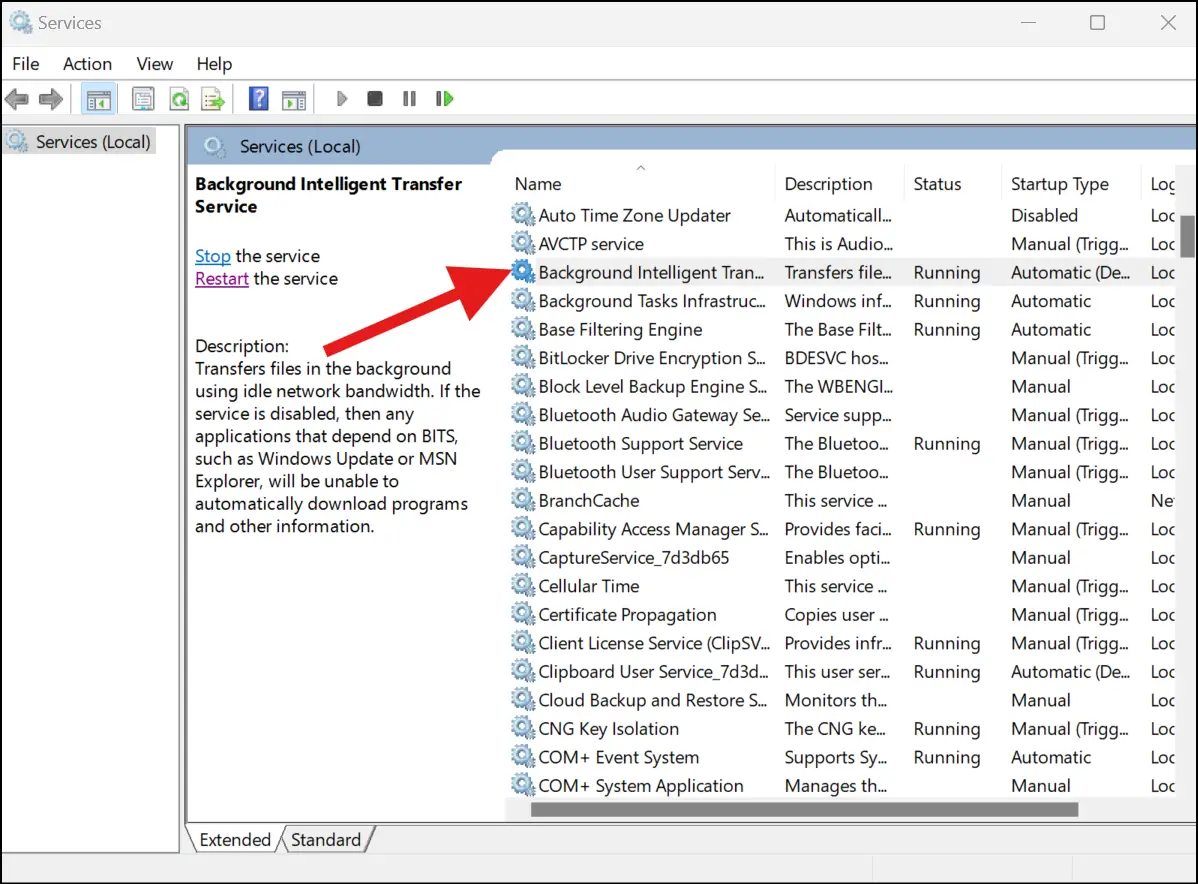
Step 4: Close Services, restart your PC, and retry the update.
Method 5: Run an In-Place Upgrade
If nothing else works, an in-place upgrade reinstalls Windows 11 over your existing installation, repairing everything without touching your files, apps, or settings. This is the most thorough fix for a persistent Windows update install error 0x800f0991.
Follow these simple steps to fix install error - 0x800f0991 windows update
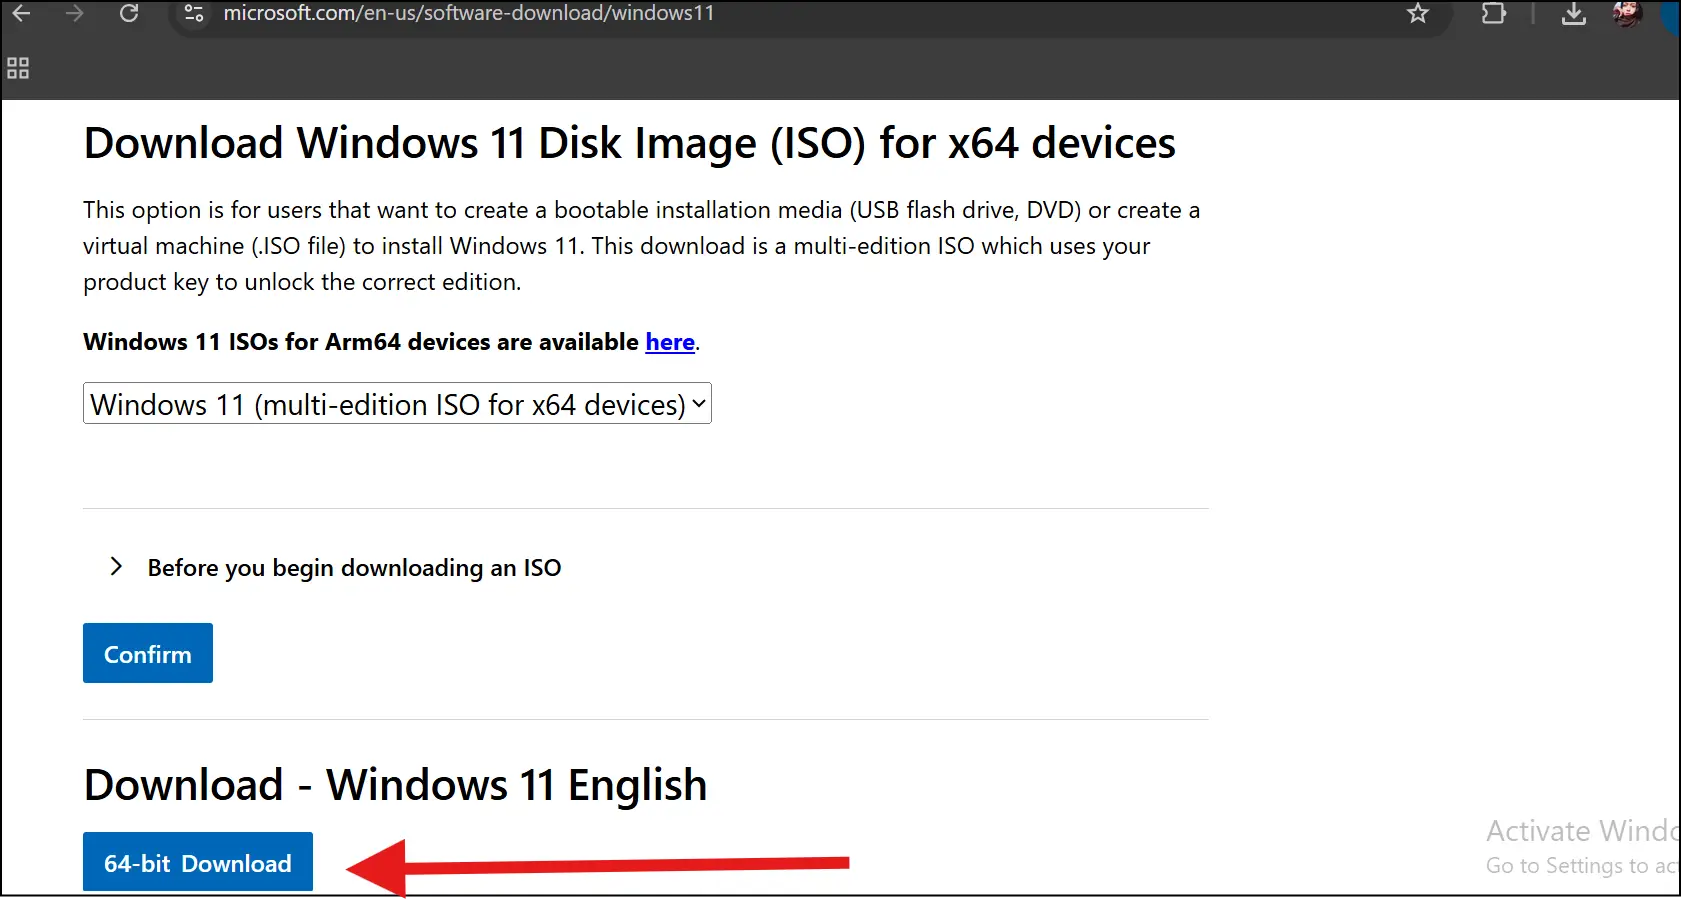
Step 1: Go to https://www.microsoft.com/software-download/windows11 and download the Windows 11 Installation Assistant or ISO file.
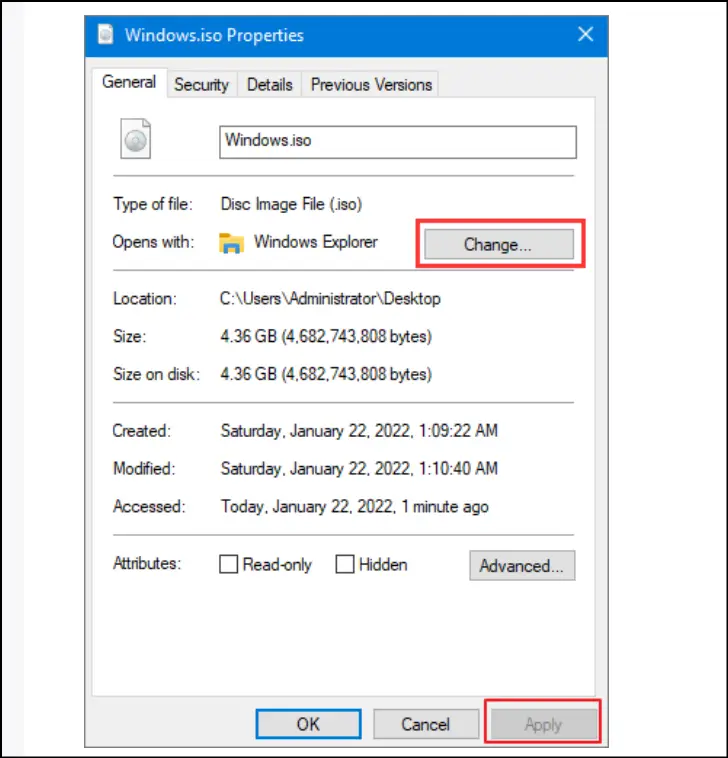
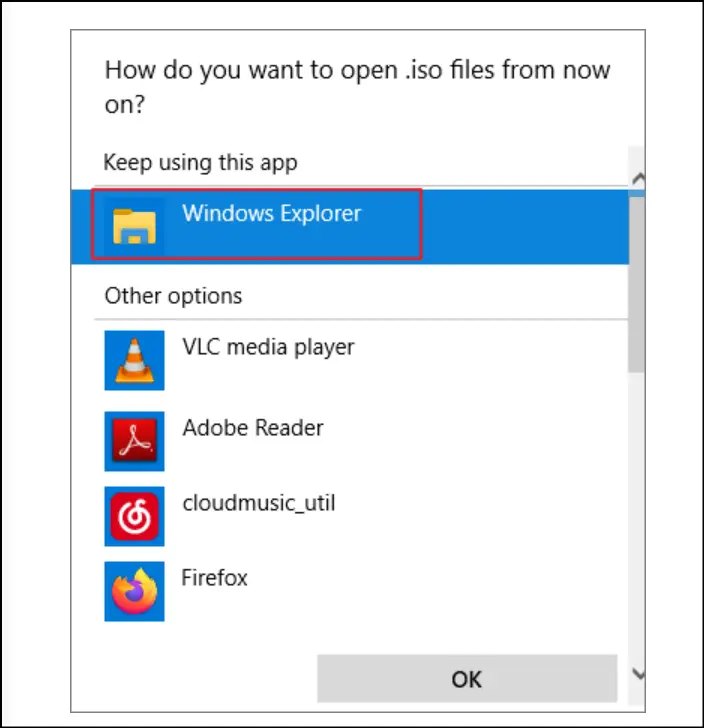
Step 2: If using an ISO, locate the file and right-click on it. Now select "Properties" and tap on "Change" within the "General" tab. Now, on the "Open with", select "Windows Explorer" to open the ISO file.
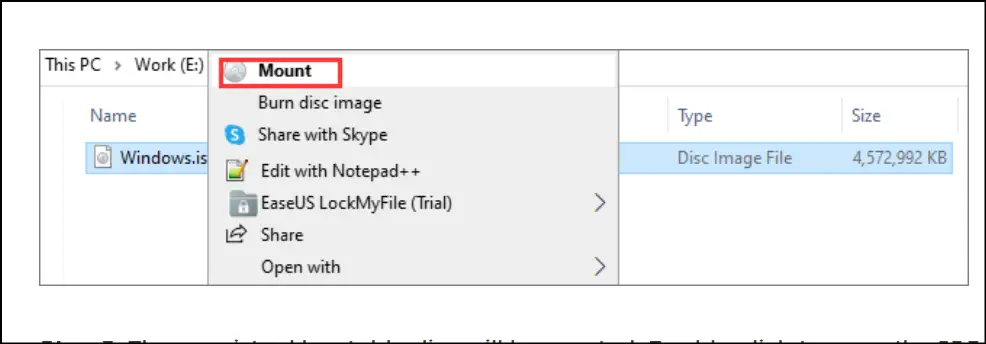
Step 3: Now right-click the file and select "Mount" to open up the mounted drive and run setup.exe. When prompted, choose "Keep personal files and apps" and follow the Windows 11 setup wizard to complete the upgrade.
Step 4: Once you complete the setup, go to Windows Update and check for any remaining updates.
Part 5: Helpful Tips to Avoid Windows 11 Version 25h2 Install Error 0x800f0991
Disk cleanup, stable internet, installing pending updates, and disabling antivirus software are some helpful tips to avoid Windows 11 Version 25H2 install error - 0x800f0991. But fixing the error is one thing, and making sure it does not show up again is another. Follow these tips to make sure that your system becomes update-ready at all times.
Tip 1. Free Up Disk Space Before Every Major Update
The primary cause of the Windows 11 version 25h2 install error 0x800f0991 is a full and cluttered disk. Major updates can only be successful when there is enough space to download, extract, and install them. With an almost full drive, the download is going to fail before it even starts.
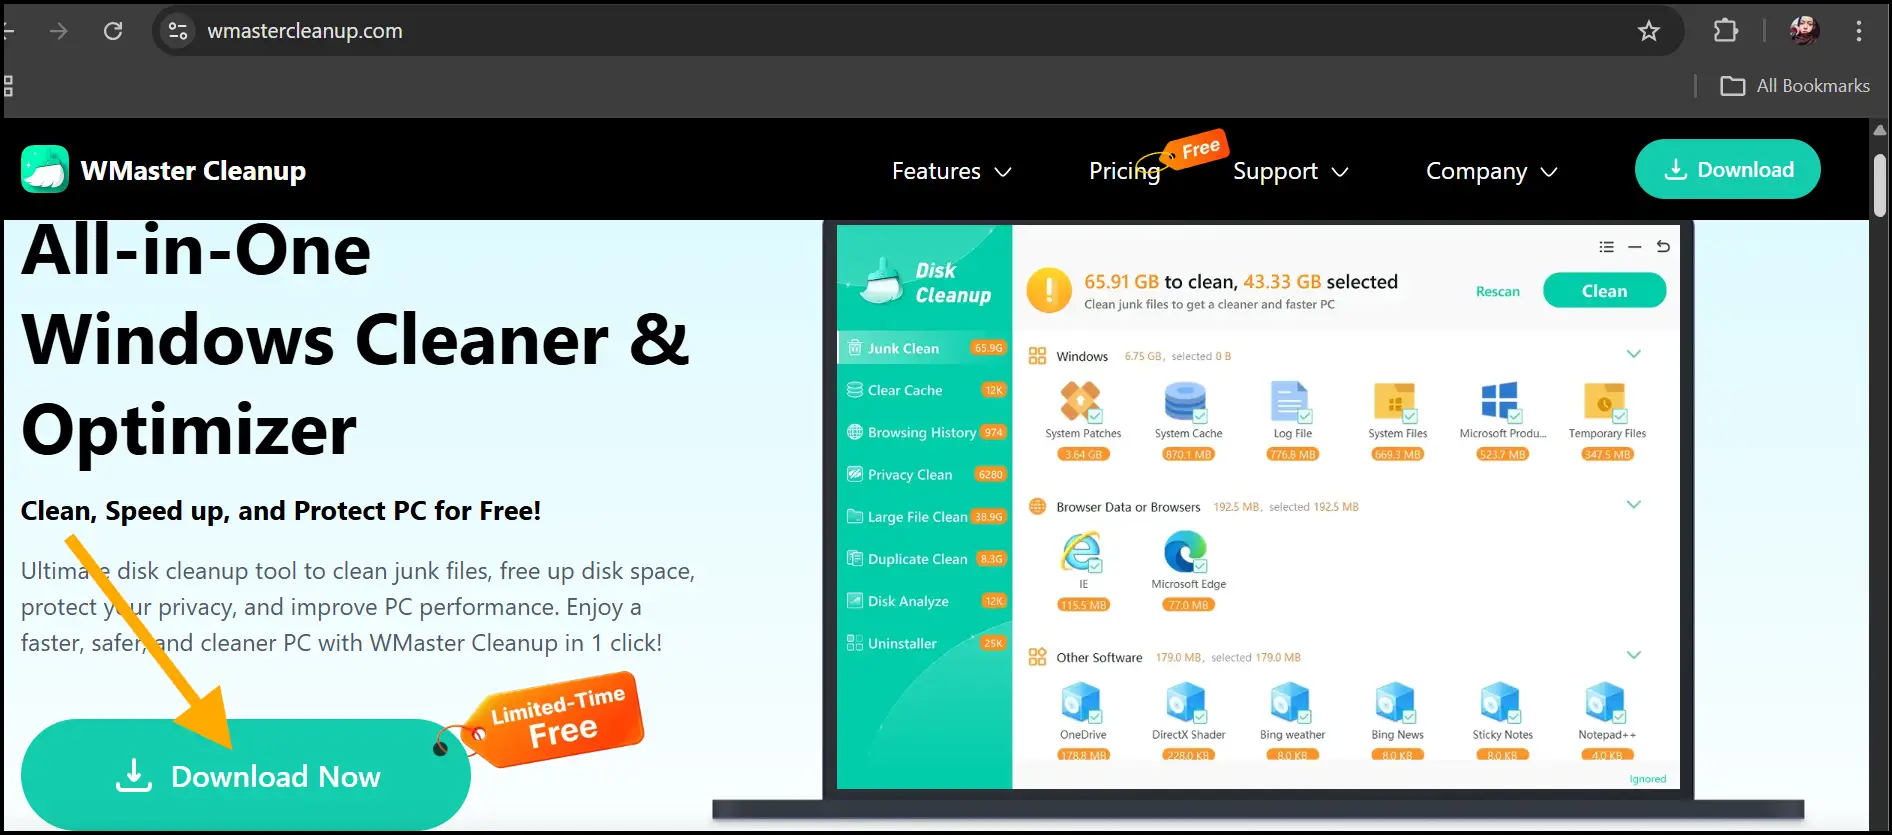
I have found the best solution for a full disk cleanup , and that is using WMaster Cleanup. It is free for a limited time, so you can download it right now. This all-in-one Windows cleaner will clear all junk, cache, system clutter, and duplicate files from your PC in one click.
- Url: https://www.wmastercleanup.com/
- Price: free for a limited time
5 Key Features of WMaster Cleanup:

WMaster Cleanup
Clean Windows 11 System Junk in One Click
- ·Instant Free Space: Disk Cleaner cleans up 11 types of junk files in seconds, freeing up a lot of space.
- ·Removes Hidden Clutter: Efficiently finds and removes your hidden clutter that Windows disk cleanup often misses.
- ·User Experience: Super easy and caters to all skill-level users.
- ·Clear Cache: Get rid of your browser and system cache in just one click.
- ·Auto-mode: Removes your system's junk files and privacy traces regularly to boost PC performance.
How to Free Up Disk Space with WMaster Cleanup:
Step 1: Download and install WMaster Cleanup for free (limited time offer) from wmastercleanup.com.

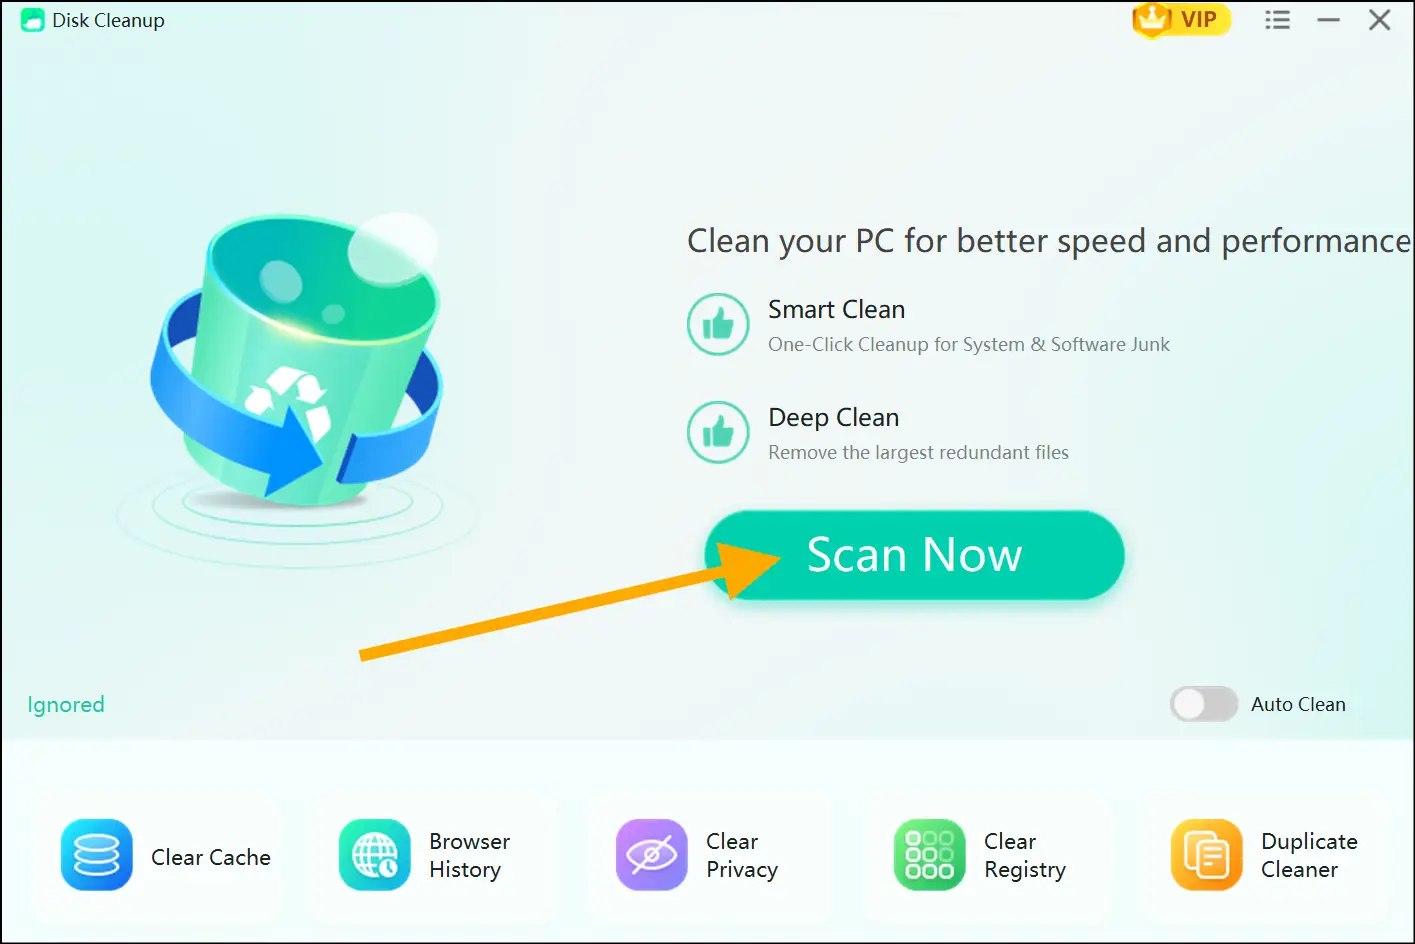
Step 2: Open the cleanup tool on your desktop. On the main dashboard, click the "Disk Cleanup" feature to clear out junk files and clutter from your Windows 11.
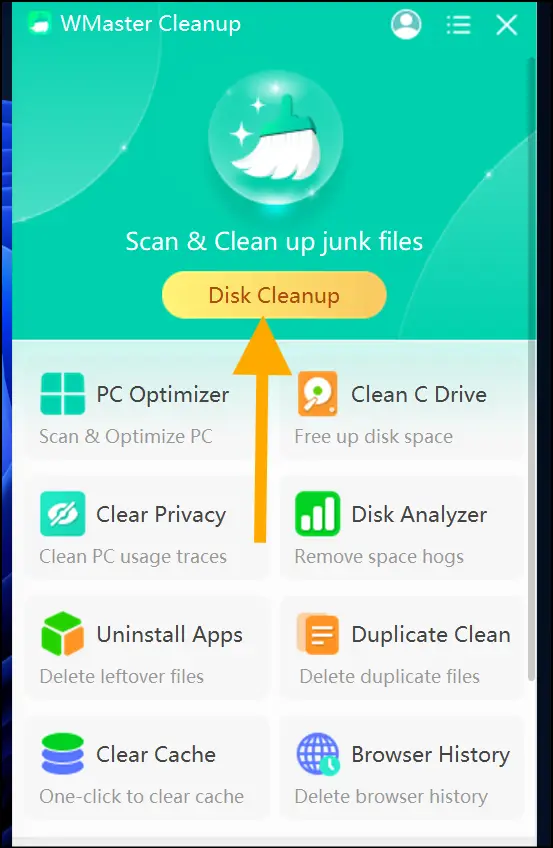
Step 3: Now click "Scan Now", and the tool will deep-scan your entire PC for junk files in seconds.
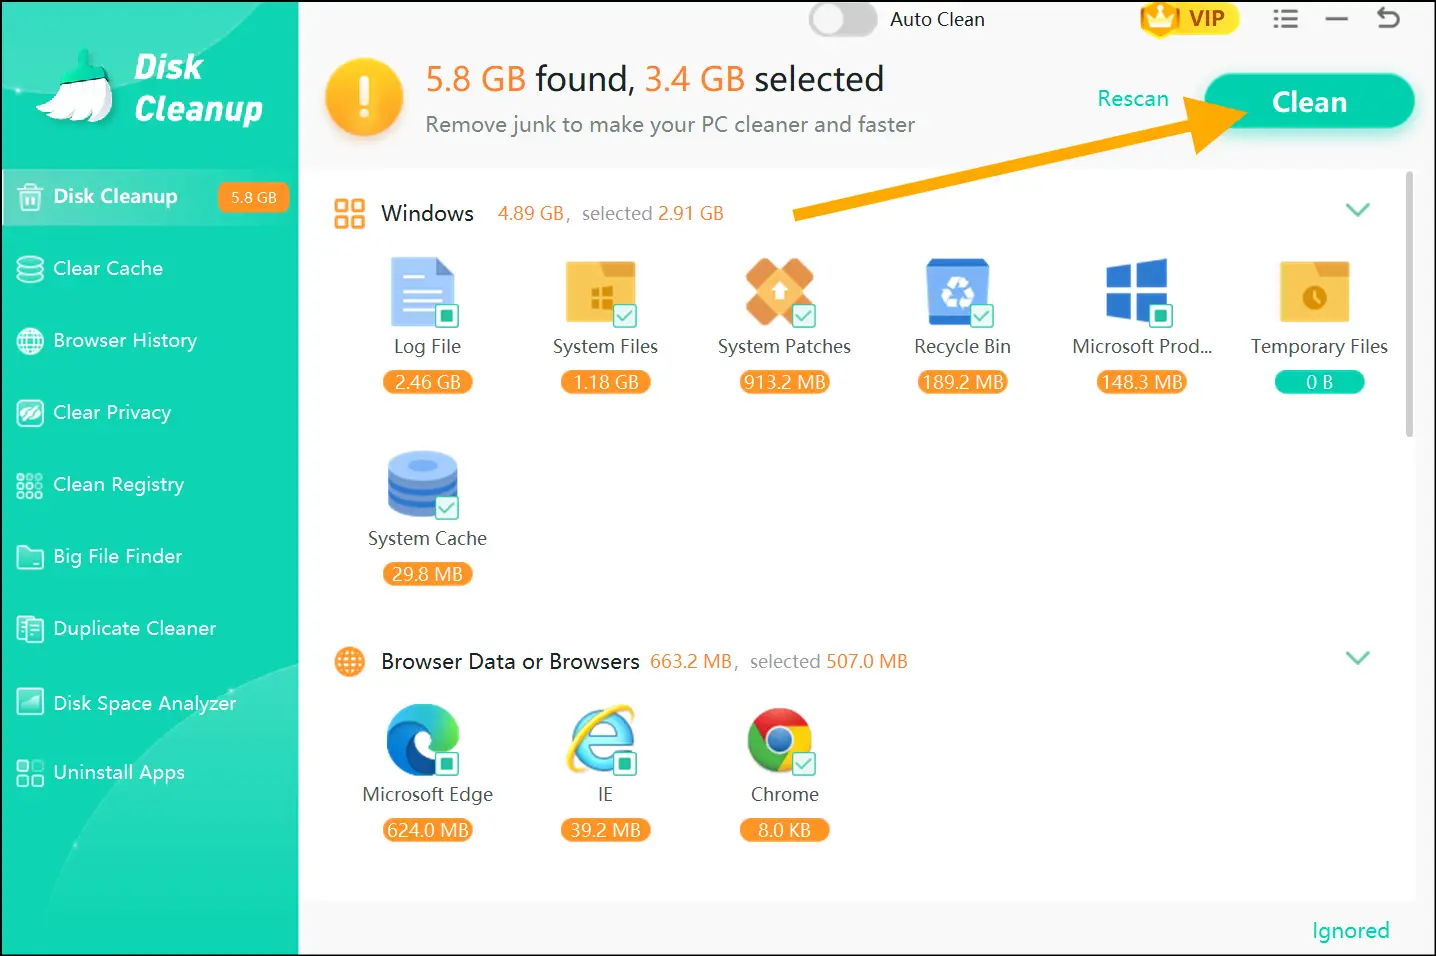
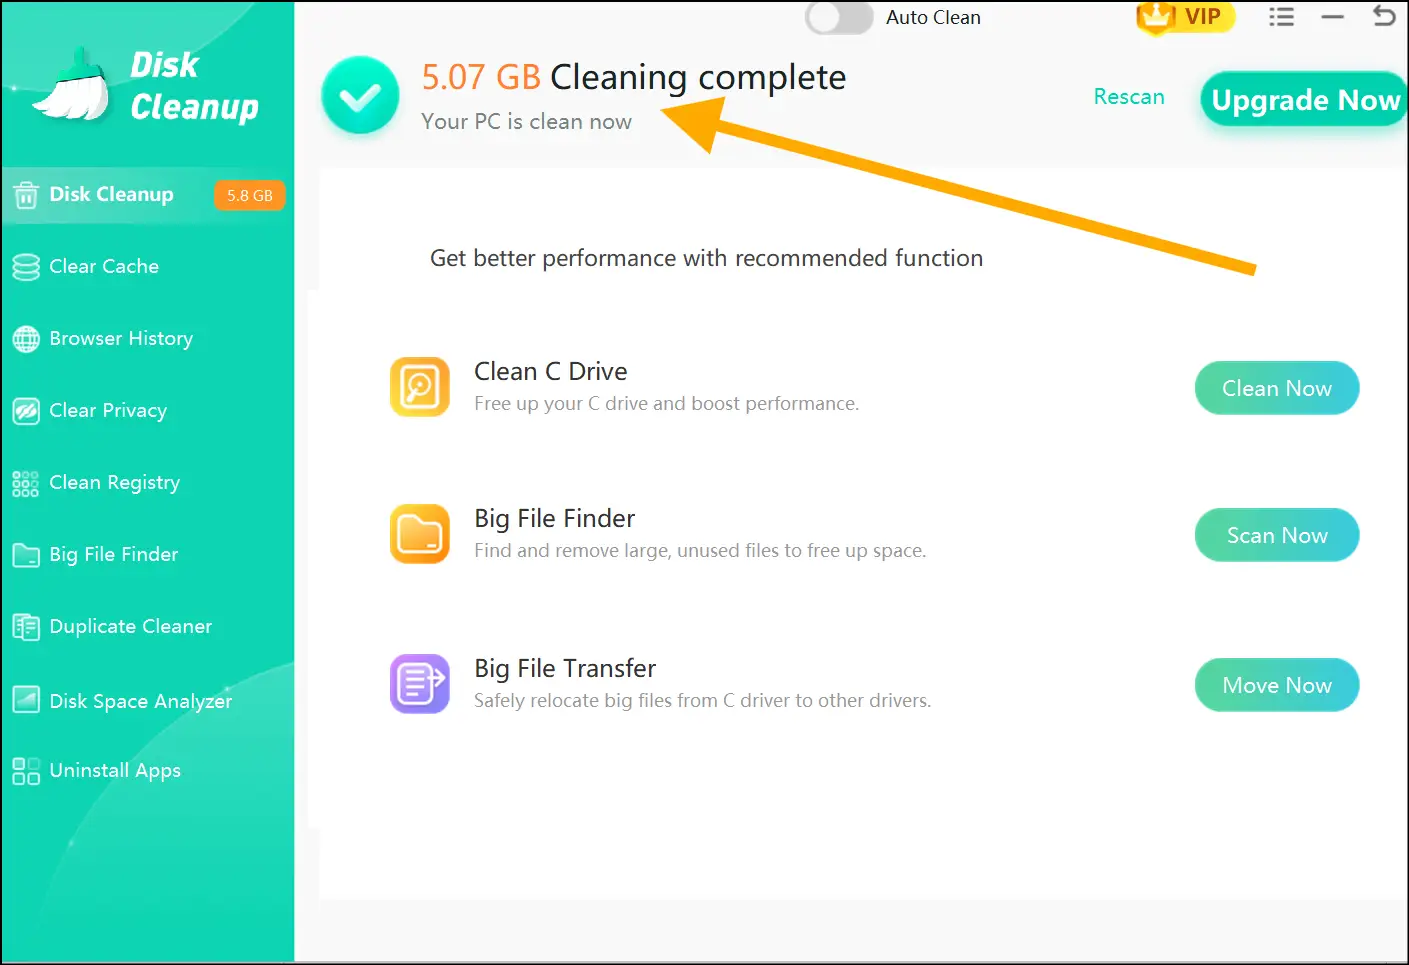
Step 4: Review the results that are divided by different categories, select the folders or programs, and hit "Clean" to clear up its junk. Once the process is done, you will see the total space freed. Your disk is now ready for a clean update installation.
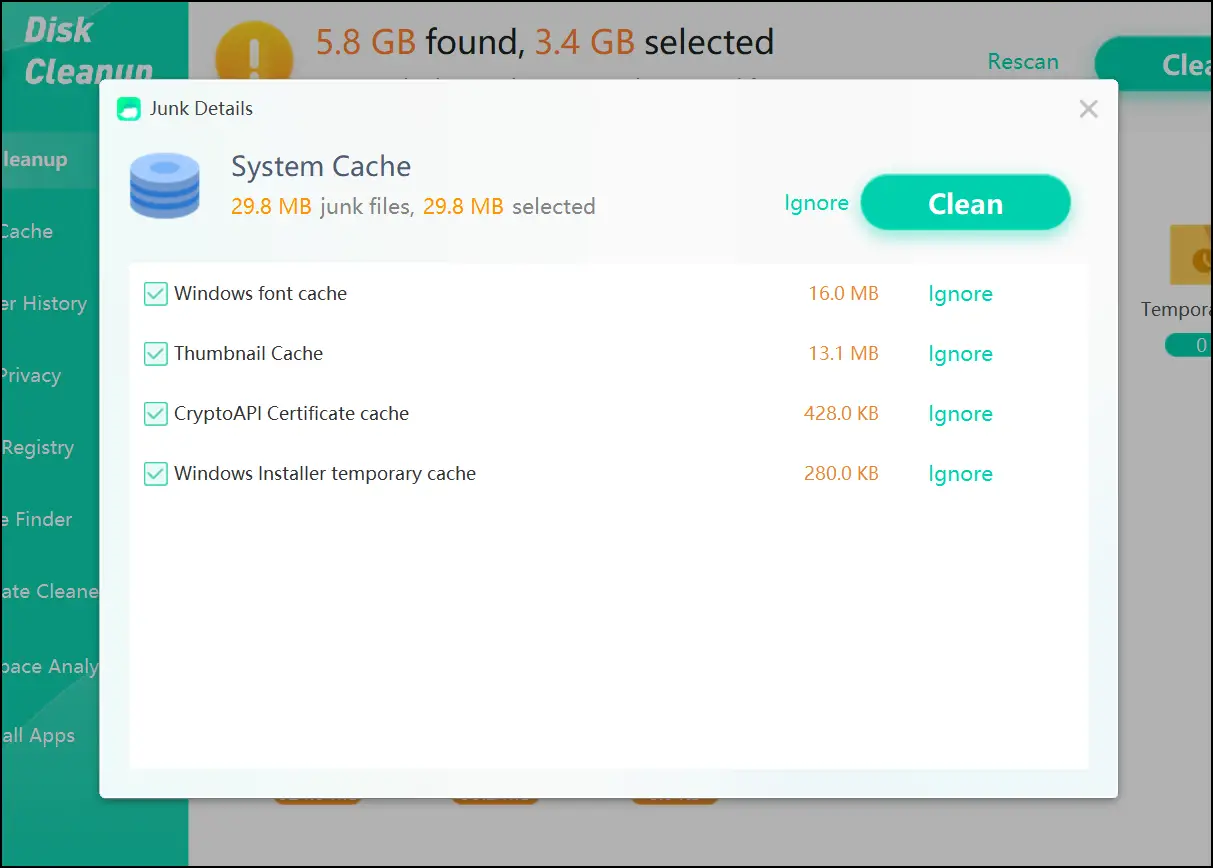
💡Tips:Tap on the desired program or folder to view its junk details. Tap "Ignore" to remove that specific junk from the list, and then hit "Clean" to clear out the remaining junk.
Tip 2. Keep Windows Update Service Always Running
It is best to check if the Windows update service is running before you start downloading any major update. Press Win + R, type services.msc, and make sure Windows Update is set to Automatic and Running. If this service is stopped, then every update will fail at the start.
Tip 3. Temporarily Disable Antivirus Before Updating
Your antivirus can also block update processes without giving any alerts. So, before you install a major update like 25H2, disable your third-party antivirus just for some time and then run the update. After you are done, you can enable the antivirus again. In the meantime, Windows Defender will keep you protected.
Tip 4. Always Maintain a Stable Internet Connection
Major updates mean downloading hundreds of megabytes of data. If your connection drops mid download, it will corrupt the package, and you will face the install error on the next attempt. Always make sure your connection is stable before starting a major update.
Tip 5. Install Pending Updates Before Attempting a Major Upgrade
When there are small pending updates already waiting, avoid starting a major version upgrade. First, through Settings > Windows Update, clear all the pending KB updates, restart your PC, and then attempt the major upgrade. Stacked pending updates are known blockers for 25H2.
If you encounter a similar download error (e.g., 0x80246019), check out our writeup on 6 Ways to Fix Windows 11 version 23H2 Download Error-0x80246019 [2026] for more troubleshooting tips.
Part 6: FAQs Related to Windows 11 Version 25h2 Install Error 0x800f0991
Q1. Is the install error - 0x800f0991 only specific to Windows 11 25H2?
No. It can appear on Windows 10 and on earlier versions of Windows 11 as well. Such issues can especially happen during KB patch installations.
Q2. Does this error damage my current Windows installation?
No, it does not. When the install fails, the system automatically rolls back, leaving your current setup untouched.
Q3. What is the media feature pack, and how is it related to this error?
Windows N editions are shipped without multimedia components. The media feature pack adds back these components. Certain updates, including 25H2, depend on these components, and without them, of course, you will see the install error - 0x800f0991.
Q4. How much free disk space must be there for the 25H2 update?
Microsoft suggests a minimum of 20 GB of available storage for a significant feature update. To prepare, run WMaster Cleanup beforehand to free up space and ensure a smooth update process.
Q5. The error persists, despite my attempts to resolve it. What should I do?
If none of the previous solutions have resolved the issue, it's likely your hardware isn't up to snuff for Windows 11 25H2. The culprits are probably secure boot or TPM 2.0.
Final Words
The install error - 0x800f0991 is definitely annoying, but the good thing is that it has fixable causes. The error code 0x800f0991 usually occurs by a cluttered disk, corrupted files, missing components, or a stopped service. And all these causes have actionable fixes you can try. Address these fixes sequentially to maintain a tidy and up-to-date system.
For a more streamlined Windows experience, particularly if you're grappling with system or installation errors, I suggest trying WMaster Cleanup. It's a comprehensive Windows cleanup solution. Currently, it's available for free, with all features accessible for a limited period, and it effectively eliminates unnecessary files and system clutter.
Download WMaster Cleanup now to significantly boost your Windows 11 performance and stability, resulting in a cleaner, faster system.